
Part 1 of experiments in FreeBSD and Kubernetes
Read the introduction to this series for background. This post documents getting a working, bootable installation of FreeBSD 13.0-CURRENT on an older NUC PC.
This post is roughly divided into two parts: the rather-chatty story version and then the actual step-by-step instructions for how I finally got a successful installation.
Day 1: The Adventure Begins
Ok, I got the FreeBSD 13.0-CURRENT memstick image, used my ancient Linux laptop to dd it onto the USB drive.
— Karen Bruner (@fuzzyKB) October 23, 2020
My only HDMI display is my TV, sooooo I'm currently sitting on the floor in front of it (don't have an HDMI cable + USB elongator for the keyboard to reach the couch).
The adventure begins on Twitter. And on my floor.
CBSD strongly recommends using a ZFS filesystem. My experience with FreeBSD also mostly predates widespread production use of ZFS. And of course, modern UEFI booting is always super-fun when you’re not Windows. Brad had made the NUC dual-boot Linux along with the original Windows 10 installation. Even though I avoid Windows whenever possible, for some weird, OS-pack-rat reason, I decided I would try to preserve the Windows installation if possible.
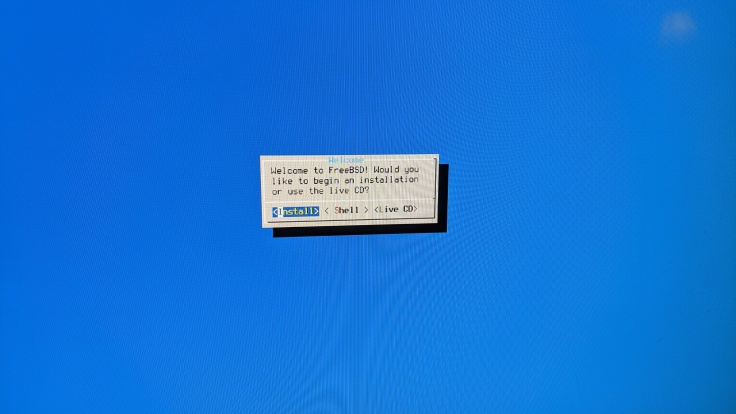
The FreeBSD installer: The happiest blue screen
The only option in the FreeBSD installer for a custom ZFS installation is via shell and use gpart. (The stalwart FreeBSD fdisk is available, but none of the guides I saw recommended using it. I’m not sure if it has to do with UEFI support or what, but I didn’t dig.)
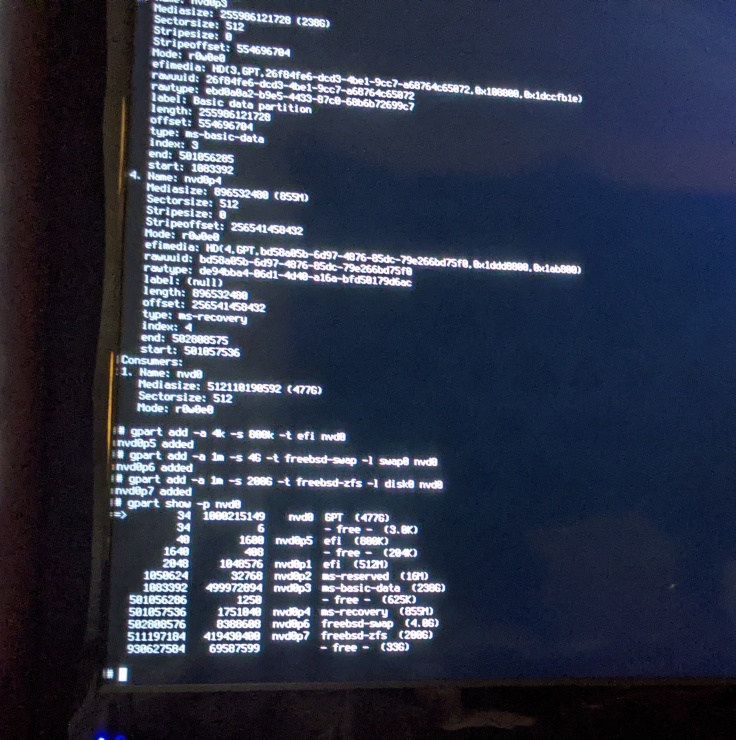
Fun with gpart, said no one ever
I went through one guide and the installation seemingly completed successfully but… it wouldn’t boot. I messed with the efi stuff a bit; nothing. Trying to bypass UEFI and use the boot loader from the USB stick; even though the boot loader could read the ZFS pool that I had installed just fine, I couldn’t get it to boot. It failed with “unknown file system.” Not sure if I missed some settings to enable ZFS-on-root that would normally be passed in /boot/loader.conf.
At this point, based on bits of what I’d seen in search results and the age of the NUC’s BIOS (4+ years), it seemed like a good idea to upgrade that, so I did. Still, no dice. I decided to sleep on it and if I still couldn’t boot, try a fresh install in the morning.
Even though I didn’t have a successful boot, I had gotten reacquainted with gpart and I had messed around with ZFS enough to get familiar with some of the basic commands.
Day 1, The Sequel: The Adventure Begins Again
Day 2 of Operation Free BSD
— Karen Bruner (@fuzzyKB) October 24, 2020
I updated the BIOS last night. Now trying to see I can manually boot from the ZFS-on-root partition, except Ziggy and George are having their 11AM zoomies so I keep getting distracted and miss the menu to exit into the boot loader.
The BIOS upgrade didn’t cure the problem, so I decided to start from scratch with a different guide. I ended up working from this how-to, even though it uses a ZFS pool on mirrored disks with geli encryption.. I only have one disk (which is partitioned), and I’m not interested in geli for the time being, so I just stripped out the mirroring- and encryption-specific steps.
I restarted the installer, used the shell option for disk partition, deleted the partitions I had previously created, and ended up with this partition table:
One important change: I did have to increase the source example’s sizes for the efi and freebsd-boot partitions, presumably because they were too small for the files I had to copy in. No big deal. The freebsd-boot partition went in there in case I kept having issues with UEFI and tried to make legacy boot work instead.
Fortunately, the how-to also warned about this little potential issue with /dev/null:
That's not good. pic.twitter.com/HmX92ta1SI
— Karen Bruner (@fuzzyKB) October 24, 2020
But this time around, success!
Woohoo! Success! Booting from the ZFS root with no human intervention! pic.twitter.com/Glj4WaJiHn
— Karen Bruner (@fuzzyKB) October 24, 2020
I still didn’t figure out how to boot from ZFS-on-root from the boot loader (I tried that before letting UEFI go) so I’m sure I’m missing something. It’s been years since I’ve had to spend any time with the FreeBSD loader, and the ZFS and UEFI stuff in it is all new to me. I may go back to figure it out later, or not.
Anyway, my FreeBSD 13.0-CURRENT PC is all humming. Next I’ll work on getting bhyve (probably via CBSD) up and running. I’ve never touched bhyve before, so I’m curious to see what that looks like.
Step-by-Step Manual ZFS-on-root FreeBSD Install
USE AT YOUR OWN RISK. Seriously, I have no idea what I’m doing.
Derived from this how-to, which also includes geli disk encryption and mirrored disks.
My system and use case (if yours differs you may have to make alterations or use a different tutorial completely):
- a single drive with existing partitions I didn’t want to delete (no second disk so no mirroring)
- no geli encryption
- disk already uses GPT partitioning. If it uses Master Boot Record and you want to keep the existing partitions, you’ll need to find another tutorial!
- x64 CPU
For reference, my PC’s disk device is nvd0 and I named my ZFS pool zroot.
- Boot the FreeBSD installer as usual
- When you get to the disk partition menu, choose the
Shelloption - Using gpart, carefully delete any partitions you no longer want
- Create the new FreeBSD partitions and ZFS file system
- Proceed as normal. At the end of the installation, when the installer asks if you want to reboot or exit to a shell, choose
Shellto finish the efi configuration.
Let the system reboot. Remove the installer media or manually select the disk for the boot device. With luck, it will boot on its own, through to your login prompt!
Part 2 covers creating my first FreeBSD bhyve guest.