This post describes the basics on learning to solve 3x3x3 cubes blindfolded. You can find a lot of good guides and videos, but I’m going to describe what finally clicked for me and how I do it. There are a couple other approaches, but most work pretty similarly.
Solving blindfolded can look really hard at first, but like most skills, you need to learn the basics and then practice a lot.
Why Learn to Solve Blindfolded
Learning how to solve a cube blindfolded is a good challenge, and once you learn how to do it, it’s a good way to exercise your short-term memory and your concentration. It may also be a cool party trick if people want to watch you for 5-10 minutes.
Basic Description
I use the Old Pochmann method. It’s not the fastest method, but it’s relatively straightforward, and I’m not trying to set any records.
Outline
- Each tile of each piece is assigned a letter, A-X. Each letter will be used twice, once for an edge piece and once for a corner.
- Edges have 2 letters
- Corners have 3 letters
- All algorithms are PLL moves. They only move pieces on the top layer.
- To get the next target place into the top layer, you also need to perform a few intuitive moves.
- We solve all the edges first, then the corners.
- Inspecting the cube and memorizing the sequence.
Tutorial Conventions
- Cube orientation
- Up – yellow
- Front – red
- WCA Notation
- Algorithms
- Practice scramble – R’ F’ Rw Uw’ Rw’ F2 R’ U’ Rw F R2 Fw’ Rw’ F’ R
- Terminology
-
Buffer piece – the next piece to move into the correct, target position
-
Target – the correct position for the current piece in the buffer
-

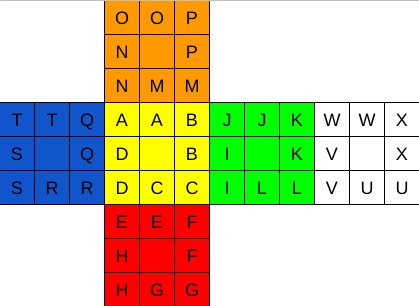
Lettering the Tiles
Each face of each piece, except the center pieces, get a unique letter. Each letter will be used twice, once for a corner and once for an edge.
I use this convention illustrated below. You can pick any lettering you like as long as you can remember it easily with some practice.
Tips
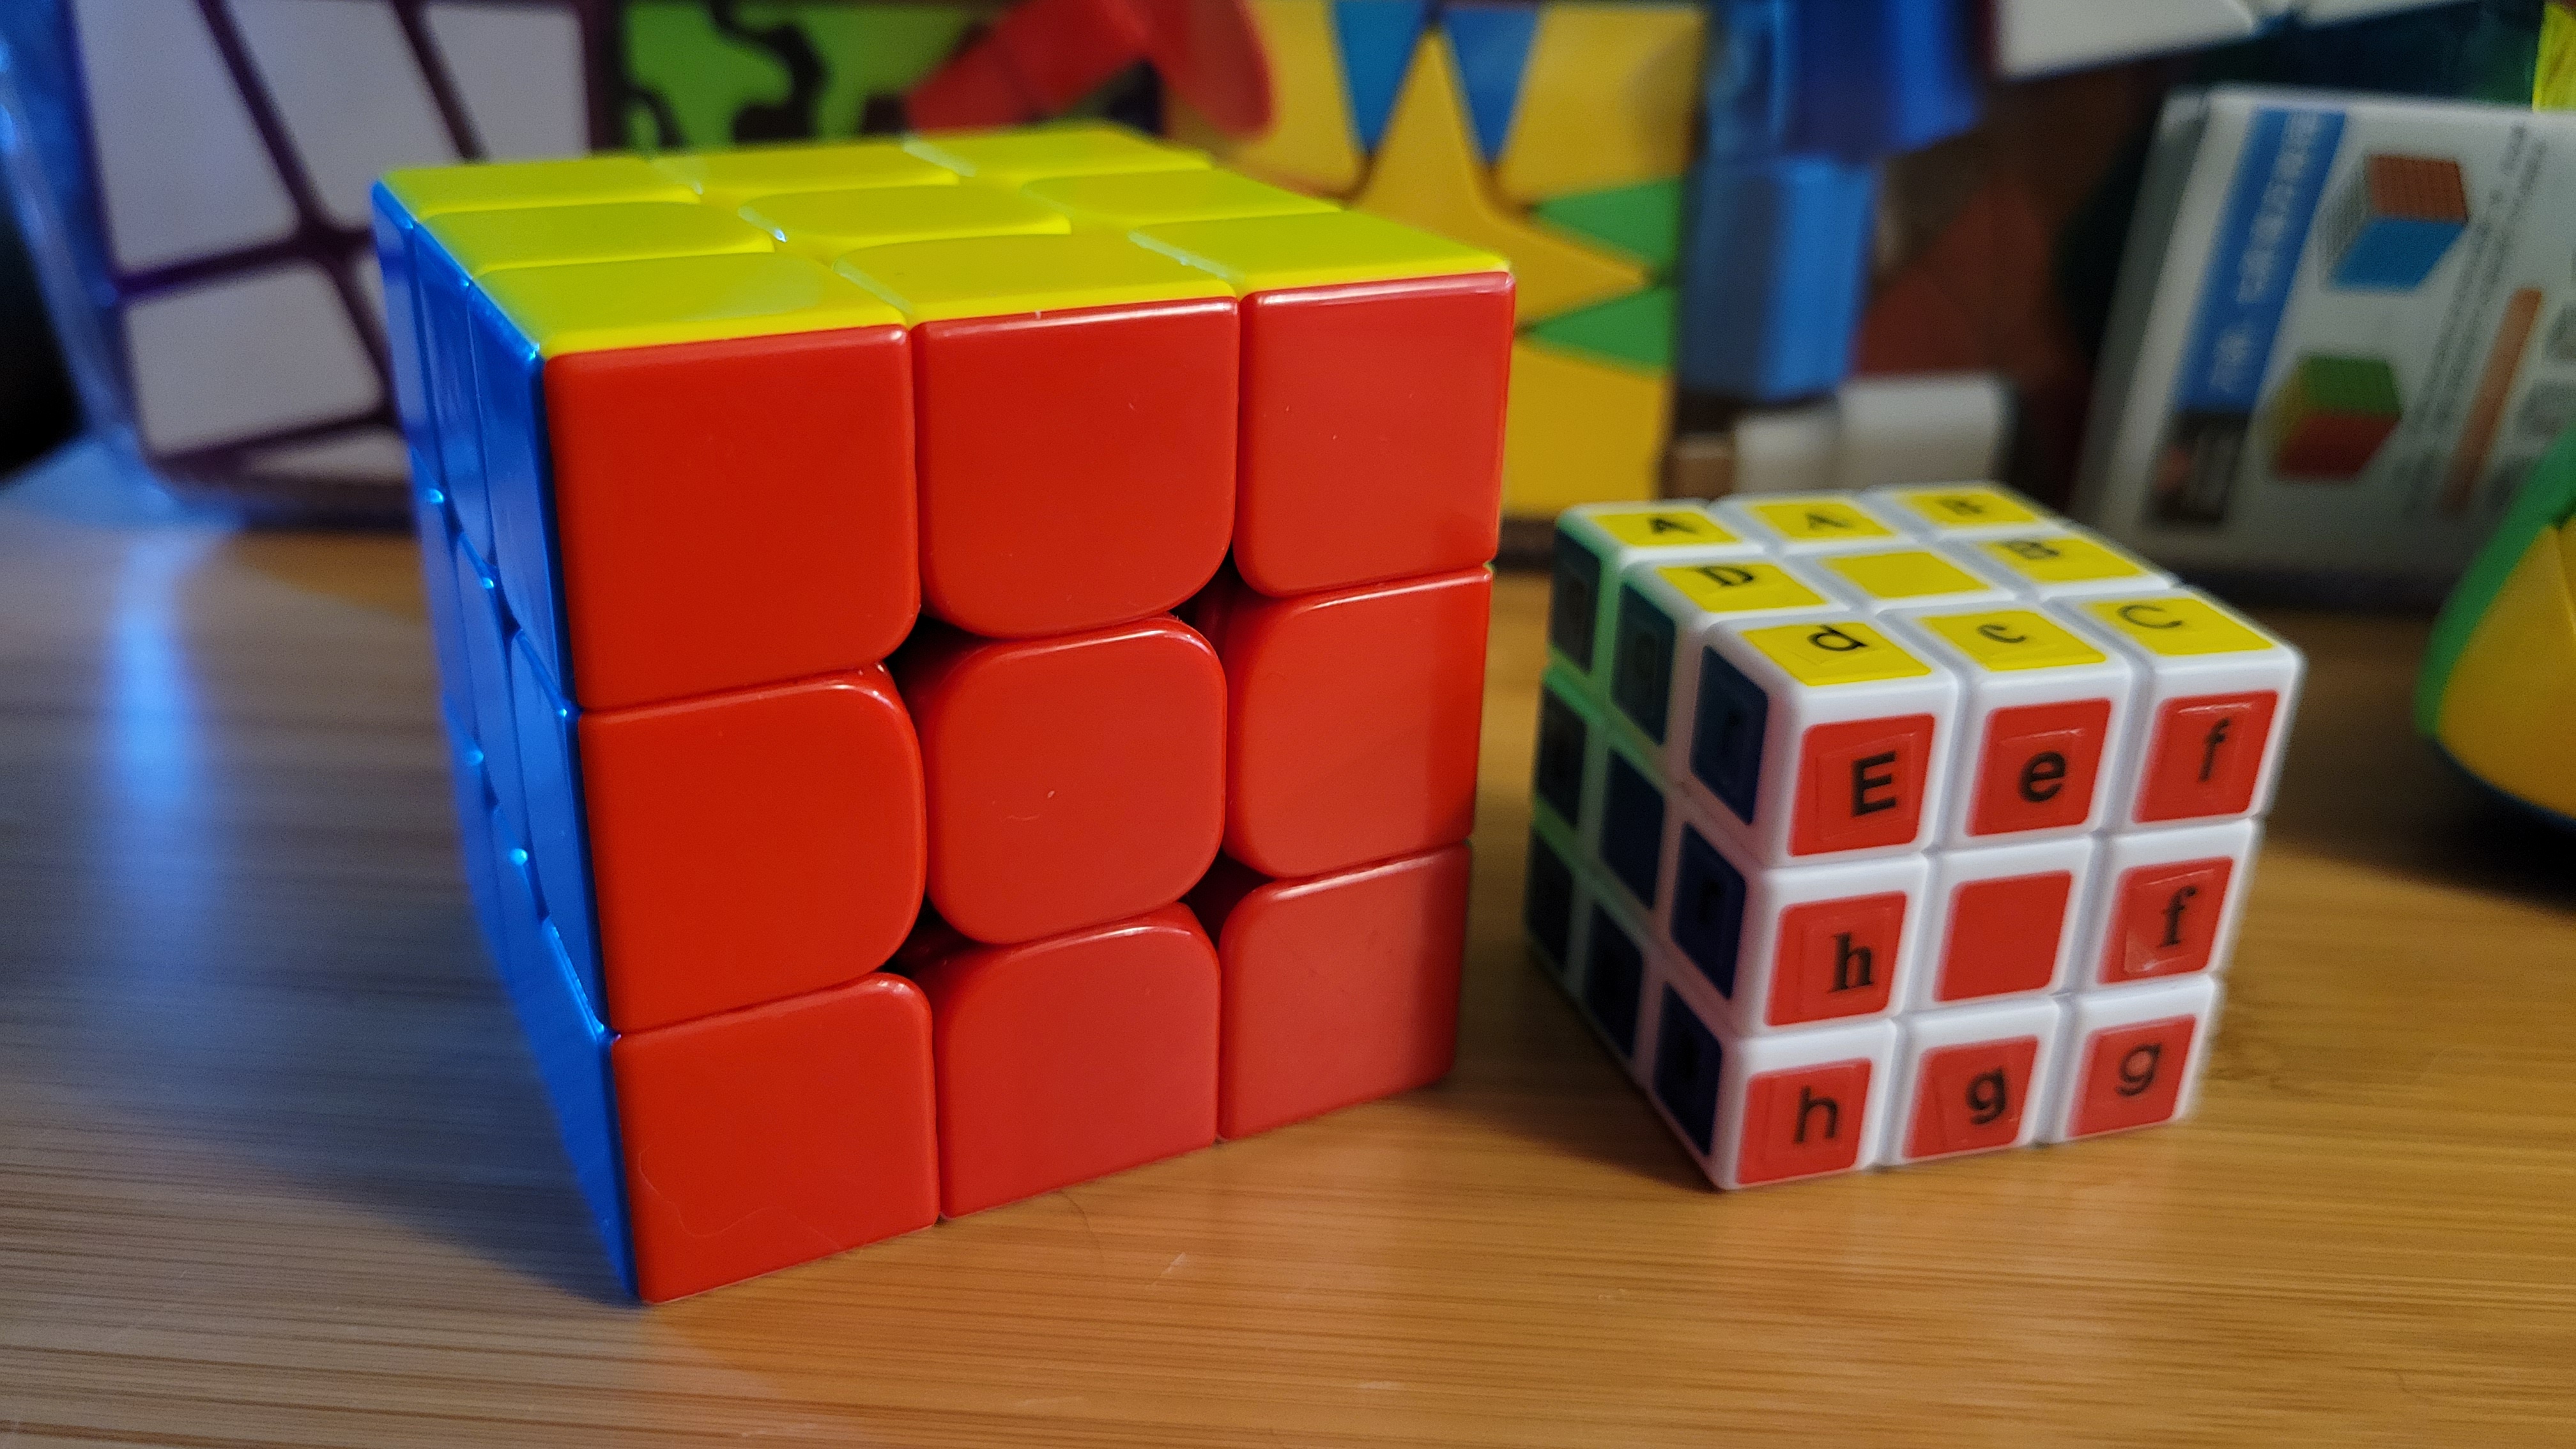
- Pick one lettering scheme that makes sense to you
- You can use a cheap cube and put letter stickers on each piece to help the learning phase
Algorithms
Blindfolded solving uses only PLL algorithms, specifically those which swap two edges and two corners at the same time.
You can solve the whole cube using just one algorithm, but I started by using T and Ja perms. I use both when solving the edges, and just Ja when solving corners.
Why these algorithms?
Because they swap a pair of edges and a pair of corners back and forth, and because we can move in targets without disturbing the pieces each algorithm moves. By just swapping known pairs back and forth, we don’t have to memorize different cube states.
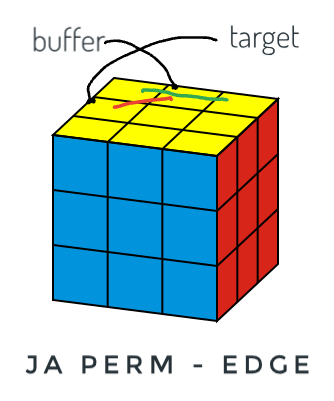
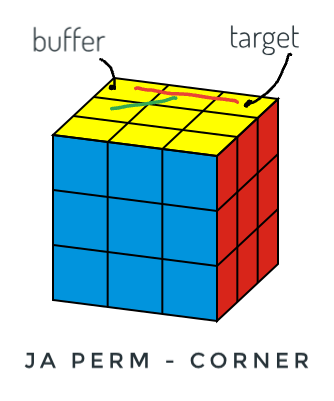
- Ja perm
- Corners: UBR, UFR
- Edges: UB, UR
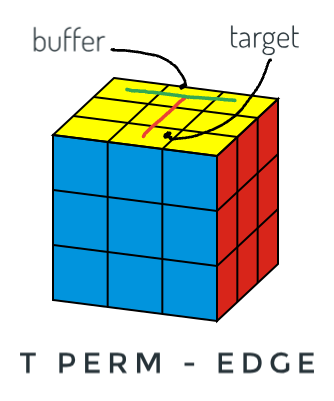
- T perm
- Corners: UBR, UFR
- Edges: UL, UR
These two algorithms also make solving “parity” easier, because you don’t have to learn a special algorithm. (See below.)
Tips
- Start with one or two PLL algorithms. Ja perm is a good choice!
- Use algorithms which swap one pair of edges and one pair of corners together.
- Practice the Ja and T permutation algorithms until you can do them with your eyes closed!
Moving the Target
While the algorithms are all PLL algos, you will always have to move the target piece to the top layer. You could memorize the moves for each piece to get it to the target position, but it will probably be easier to work intuitively. If you do want to make a list to memorize, be sure to work it against the algorithm(s) you will use.
The below images show the steps required to move the UR edge to FL. Remember, Up is yellow and Front is red.
Starting position: UR ('H' edge piece) -> FL ('H' edge target)
Use L' to move H face into staging 'D' position for T algorithm
Start to move ‘R’ from UR to FL
Work T algorithm
Use L to move 'H' edge piece into target position
Finish moving ‘H/R’ edge to target position
Corners work similarly. If you use the Ja permutation for corners, your target goes in the ‘C’ (UFR) position.
Tips
- Practice moving the edge tiles and corner tiles to their correct positions!
Inspection and Memorization
The sequence of moves
The sequence will always start with the buffer position. As you move the buffer piece into its correct target, the old target piece moves to the buffer. You can think of it like a queue with each tile moving through in turn.
Special case: if the ‘B/I’ edge moves into the buffer spot before you’ve solved all the edges, you need to find a new edge to complete the sequence.
Using the example scramble and the orientation (Up is yellow, Front is red) above, you would get this edge sequence:
K L E P Q O N X H A U .
In this example, we have all the edge pieces without a break in sequence. Count the number of letters: 11. Because we have an odd number of edges to move, we need to perform another Ja algorithm after we finish the edges but before we start the corners. This step is usually (inaccurately) called “parity.”
Now we sequence the corners. The cube has fewer corners than edges (8 vs 12), so we will probably have a shorter sequence to memorize.
We have a special case here: the buffer piece is already in the correct position. Let’s pick the ‘C’ (UFR) position to start with, because we don’t have to move a target in place.
C L R X Q F .
The ‘C’ and ‘F’ tiles are on the same corner, so we need to stop and find a new starting tile that has not been solved.
U W S .
Now we should have all the corners in the correct order.
Counting moves
- If you have an odd number of edge moves, you will have an odd number of corner moves.
- If you have an even number of edge moves, you will have an even number of corner moves.
- If one set is even and the other is odd, you are missing a move somewhere. Redo your inspection.
Tips
- Practice inspection first, writing down the sequence.
- Work off the paper first
- Then practice memorization
- Then skip the paper – WCA rules don’t allow written notes
- Use a scramble generator so you can practice the same scramble several times to understand mistakes
- During inspection, use your fingers to keep track of which pieces you’ve added to the sequence.
Working the sequences
Holding the cube
- ALWAYS KEEP UP FACE YELLOW AND FRONT FACE RED
- One of the main ways to mess up is to change the orientation. Practice keeping the faces in place in your hands.
- You want to keep a tighter grip on the cube than usual to keep the orientation correct and to keep from dropping it.
“Parity”
- If your edge move count is odd, you will have to do an extra move after the edge sequence to get the buffer and target corners back to their original positions.
- If your buffer and target corners are at UBR and UFR (for Ja and T perms), you can just do an extra Ja before starting your corners.
Flipped pieces
- If you have all the pieces in the correct placement, but the tiles are flipped, you probably wrote down/memorized the wrong tile on the correct piece.
- Edges will always be flipped in pairs (2/4/etc.).
- 2 or more corners may be rotated incorrectly.
Next steps
This post already has a lot of information to digest. For memorization, you can develop mnemonic phrases to help. For learning the target set-up moves, you can practice to see which moves for each tile feel most natural to you. If requested, I can write out an exact set of moves and algorithms to solve the example.
If you don’t understand how some part of the method works, try to find another tutorial which makes more sense to you. Or you can ask here in the comments.
Most importantly, practice. Steps which may not be clear might make more sense after you’ve tinkered with them over time.
References
- https://github.com/x4Cx58x54/rubik-image – Code used to generate illustrations
- https://jperm.net/bld – One description of Old Pochmann
- https://ruwix.com/the-rubiks-cube/how-to-solve-the-rubiks-cube-blindfolded-tutorial/ – Another Old Pochmann method
- https://www.speedcubereview.com/blind-solving-algorithms.html – List of methods and algorithms that can be used for blindfolded solving