<?xml version="1.0" encoding="utf-8"?><feed xmlns="http://www.w3.org/2005/Atom" ><generator uri="https://jekyllrb.com/" version="3.9.5">Jekyll</generator><link href="https://productionwithscissors.run/feed.xml" rel="self" type="application/atom+xml" /><link href="https://productionwithscissors.run/" rel="alternate" type="text/html" /><updated>2024-04-17T18:07:52+00:00</updated><id>https://productionwithscissors.run/feed.xml</id><title type="html">Running In Production With Scissors</title><subtitle>Techniques, stories, and rants about DevOps and site reliability engineering</subtitle><entry><title type="html">Fun with FreeBSD: Build Your Own Bare-VM k3s Cluster</title><link href="https://productionwithscissors.run/2022/10/24/fun-with-freebsd-k3s-cluster-tutorial/" rel="alternate" type="text/html" title="Fun with FreeBSD: Build Your Own Bare-VM k3s Cluster" /><published>2022-10-24T08:00:00+00:00</published><updated>2022-10-24T08:00:00+00:00</updated><id>https://productionwithscissors.run/2022/10/24/fun-with-freebsd-build-your-own-bare-vm-k3s-cluster</id><content type="html" xml:base="https://productionwithscissors.run/2022/10/24/fun-with-freebsd-k3s-cluster-tutorial/"><![CDATA[<p><em>Step-by-step tutorial for deploying a Kubernetes cluster with k3s on FreeBSD bhyve VMs</em></p>

<p><em>Note</em>: this post is an updated version of <a href="http://productionwithscissors.run/2020/12/26/adventures-in-freebernetes-tutorial-build-your-own-bare-vm-k3s-cluster/">this original k3s tutorial</a></p>

<p><a href="/freebsd-virtualization-series/">See all posts in the FreeBSD Virtualization Series</a></p>

<ol>
  <li><a href="#overview">Overview</a></li>
</ol>

<ul>
  <li><a href="#intended-audience">Intended Audience</a></li>
  <li><a href="#technical-specs">Technical Specs</a>
    <ul>
      <li><a href="#kubernetes-cluster-specs">Kubernetes Cluster Specs</a></li>
      <li><a href="#host-requirements">Host Requirements</a></li>
      <li><a href="#my-test-system">My Test System</a></li>
    </ul>
  </li>
  <li><a href="#part-1">Part 1: Required Tools</a></li>
  <li><a href="#part-2">Part 2: Building k3sup</a></li>
  <li><a href="#part-3">Part 3: Configure Networking</a></li>
  <li><a href="#part-4">Part 3: Creating VMs</a></li>
  <li><a href="#part-5">Part 5: Create the Cluster</a></li>
  <li><a href="#part-6">Part 6: Test the Cluster</a></li>
  <li><a href="#part-7">Part 7: Clean Up</a></li>
  <li><a href="#sources-references">Sources / References</a></li>
</ul>

<h2 id="overview">Overview</h2>

<p>This tutorial will build a Kubernetes cluster on FreeBSD’s <code class="language-plaintext highlighter-rouge">bhyve</code>
virtualization platform, by installing a lightweight <code class="language-plaintext highlighter-rouge">k3s</code> control plane
using the <a href="https://github.com/alexellis/k3sup"><code class="language-plaintext highlighter-rouge">k3sup</code></a> tool, which automates
much of the process.</p>

<p>Topics covered:</p>

<ul>
  <li>Compiling <code class="language-plaintext highlighter-rouge">k3sup</code> on FreeBSD</li>
  <li>Configuring CBSD to create and manage <code class="language-plaintext highlighter-rouge">bhyve</code> VMs</li>
  <li>Running <code class="language-plaintext highlighter-rouge">k3sup</code> to bring up a <code class="language-plaintext highlighter-rouge">k3s</code> cluster on <code class="language-plaintext highlighter-rouge">bhyve</code> VMs</li>
  <li>Configuring the FreeBSD firewall, DNS, and routing for cluster networking</li>
</ul>

<p>While this tutorial builds a cluster with a redundant control plane, all the VMs are on a single hypervisor, making it suitable for testing and experimentation, but it is not production grade.</p>

<p>This tutorial only covers creating a cluster. For Kubernetes basics and terminology, you should start with the <a href="https://kubernetes.io/">official Kubernetes documentation</a>.</p>

<p><strong>Important</strong>: only run this tutorial on a non-production host. It will make
some changes to your network. Most of these are temporary, unless you want to
make them persistent, but they may overwrite existing configurations.</p>

<h3 id="intended-audience">Intended Audience</h3>

<p>For this tutorial, you don’t need to know anything about Kubernetes. You do need to have a host with FreeBSD installed; an understanding of basic FreeBSD system administration tasks, such as installing software from FreeBSD ports or packages, and loading kernel modules; and familiarity with <code class="language-plaintext highlighter-rouge">csh</code> or <code class="language-plaintext highlighter-rouge">sh</code>. Experience with FreeBSD <code class="language-plaintext highlighter-rouge">bhyve</code> virtual machines and the CBSD interface is useful but not required.</p>

<h2 id="technical-specs">Technical Specs</h2>

<h3 id="kubernetes-cluster-specs">Kubernetes Cluster Specs</h3>

<p>We will use these targets for the Kubernetes cluster we’re building. Most of these settings can be adjusted.</p>

<ul>
  <li>Control plane (“K3s servers”)
    <ul>
      <li>3 VMs: 2 CPU cores, 2Gb RAM, 20Gb virtual disk each</li>
      <li>If you plan on creating more than 10 worker nodes, increase the control plane VM sizes</li>
    </ul>
  </li>
  <li>Worker nodes (“K3s agents”)
    <ul>
      <li>3 VMs: 2 CPU cores, 2Gb RAM, 10Gb virtual disk each</li>
    </ul>
  </li>
  <li>VM OS: Ubuntu Server 22.04</li>
  <li>Kubernetes version: 124.</li>
  <li>Control plane backing database: embedded <code class="language-plaintext highlighter-rouge">etcd</code>
    <ul>
      <li>K3s also supports using an external datastore, such as MySQL</li>
    </ul>
  </li>
</ul>

<p><a id="host-requirements"></a></p>
<h3 id="host-freebsd-hypervisor-requirements">Host (FreeBSD Hypervisor) Requirements</h3>

<ul>
  <li>Hardware, physical or virtual
    <ul>
      <li>CPU
        <ul>
          <li>CPUs must support FreeBSD bhyve virtualization (see <a href="https://www.freebsd.org/doc/handbook/virtualization-host-bhyve.html">the FreeBSD Handbook page on bhyve</a> for compatible CPUs)</li>
          <li>CPU core allocations for <code class="language-plaintext highlighter-rouge">bhyve</code> VMs are completely virtual, so you can have VMs running with a total virtual core count greater than your host system’s. You should use the suggested core count for VMs, as Kubernetes will use those for scheduling. You can increase the cores if you have a larger host.</li>
        </ul>
      </li>
      <li>
        <p>RAM: Minimum 2Gb per VM. You can use less for the agent VMs if necessary.</p>
      </li>
      <li>Free disk space: 100Gb</li>
    </ul>
  </li>
  <li>Operating system
    <ul>
      <li>FreeBSD: tested on 13.1-CURRENT</li>
      <li>File system: ZFS</li>
    </ul>
  </li>
</ul>

<p><a id="part-1"></a></p>
<h2 id="part-1-required-tools">Part 1: Required Tools</h2>

<p>We’re going to install the tools needed on the FreeBSD hypervisor. <a href="https://www.freebsd.org/doc/handbook/ports.html">You can compile from the</a><a href="https://www.freebsd.org/doc/handbook/ports.html"><code class="language-plaintext highlighter-rouge">ports</code></a><a href="https://www.freebsd.org/doc/handbook/ports.html">tree or install from packages</a>, whichever you prefer. The tutorial assumes you have already installed all these ports. When additional post-installation configuration is required, we will walk through it at the appropriate point in the tutorial.</p>

<p>We need to build <code class="language-plaintext highlighter-rouge">k3sup</code> locally, so this list includes the build tools for compiling from source.</p>

<p>Here is the full list of required packages, including the versions, with the <code class="language-plaintext highlighter-rouge">ports</code> section in parentheses:</p>

<ul>
  <li>Build tools
    <ul>
      <li><code class="language-plaintext highlighter-rouge">git</code> (<code class="language-plaintext highlighter-rouge">devel</code>)</li>
      <li><code class="language-plaintext highlighter-rouge">go</code> (<code class="language-plaintext highlighter-rouge">lang</code>)</li>
    </ul>
  </li>
  <li>K8s tools
    <ul>
      <li><code class="language-plaintext highlighter-rouge">kubectl</code> (<code class="language-plaintext highlighter-rouge">sysutils</code>)</li>
    </ul>
  </li>
  <li>FreeBSD system tools
    <ul>
      <li><code class="language-plaintext highlighter-rouge">CBSD</code> (<code class="language-plaintext highlighter-rouge">sysutils</code>)</li>
      <li><code class="language-plaintext highlighter-rouge">nsd</code> (<code class="language-plaintext highlighter-rouge">dns</code>)</li>
    </ul>
  </li>
  <li>Misc tools
    <ul>
      <li><code class="language-plaintext highlighter-rouge">wget</code> (<code class="language-plaintext highlighter-rouge">ftp</code>)</li>
    </ul>
  </li>
</ul>

<p>If you want to use the <code class="language-plaintext highlighter-rouge">pkg</code> system, you can run <code class="language-plaintext highlighter-rouge">pkg install git go kubectl cbsd nsd wget</code></p>

<p><a id="part-2"></a></p>
<h2 id="part-2-build-k3sup">Part 2: Build k3sup</h2>

<ul>
  <li><a href="#2-1">2.1 Setup Your Go Environment</a></li>
  <li><a href="#2-2">2.2 Check Out and Build k3sup</a></li>
</ul>

<p>We’ll need to build <code class="language-plaintext highlighter-rouge">k3sup</code> for our FreeBSD hypervisor.</p>

<p><a id="2-1"></a></p>
<h3 id="21-setup-your-go-environment">2.1 Setup Your Go Environment</h3>

<p>If you already have a working <code class="language-plaintext highlighter-rouge">golang</code> build environment on your FreeBSD hypervisor, you can skip this section.</p>

<p>First, create your <code class="language-plaintext highlighter-rouge">go</code> workspace. This tutorial will assume you are using the path <code class="language-plaintext highlighter-rouge">${HOME}/go</code>.</p>

<div class="language-shell highlighter-rouge"><div class="highlight"><pre class="highlight"><code><span class="nb">export </span><span class="nv">GOPATH</span><span class="o">=</span><span class="s2">"</span><span class="k">${</span><span class="nv">HOME</span><span class="k">}</span><span class="s2">/go"</span>
<span class="nb">mkdir</span> <span class="nt">-p</span> <span class="nv">$GOPATH</span> <span class="k">${</span><span class="nv">GOPATH</span><span class="k">}</span>/bin <span class="k">${</span><span class="nv">GOPATH</span><span class="k">}</span>/pkg <span class="k">${</span><span class="nv">GOPATH</span><span class="k">}</span>/src <span class="k">${</span><span class="nv">GOPATH</span><span class="k">}</span>/src/k8s.io <span class="k">${</span><span class="nv">GOPATH</span><span class="k">}</span>/src/github.com
</code></pre></div></div>

<p><a id="2-2"></a></p>
<h3 id="22-check-out-and-build-k3sup">2.2 Check Out and Build k3sup</h3>

<div class="language-shell highlighter-rouge"><div class="highlight"><pre class="highlight"><code><span class="nb">cd</span> <span class="nv">$GOPATH</span>/src/github.com
git clone https://github.com/alexellis/k3sup/
<span class="nb">cd </span>k3sup
git checkout 0.12.8
go build <span class="nt">-ldflags</span><span class="o">=</span><span class="s2">"-X github.com/alexellis/k3sup/cmd.Version=0.12.8"</span>
</code></pre></div></div>

<p>You should copy this <code class="language-plaintext highlighter-rouge">k3sup</code> binary somewhere in your <code class="language-plaintext highlighter-rouge">PATH</code>.</p>

<p><a id="part-3"></a></p>
<h2 id="part-3-configure-networking">Part 3: Configure Networking</h2>

<ul>
  <li><a href="#3-1">3.1 Choose Your Network Layout</a></li>
  <li><a href="#3-2">3.2 Load Kernel Modules</a></li>
  <li><a href="#3-3">3.3 Add Bridge Gateways</a></li>
  <li><a href="#3-4">3.4 Configure NAT Gateway</a></li>
  <li><a href="#3-5">3.5 Configure Local DNS</a></li>
</ul>

<p><a id="3-1"></a></p>
<h3 id="31-choose-your-network-layout">3.1 Choose Your Network Layout</h3>

<h4 id="311-select-subnets">3.1.1 Select Subnets</h4>

<p>I’m going to use a VLAN in 10.0.0.0/8 for the cluster and its pods and
services. You can use another block, but you will have to adjust commands
throughout the tutorial.</p>

<ul>
  <li>10.0.0.1/32 - VLAN gateway on bridge interface</li>
  <li>10.0.0.2/32 - VIP (round-robin virtual IP) for the Kubernetes API endpoint</li>
  <li>10.0.10.0/24 - VM block
    <ul>
      <li>10.0.10.1[1-3] - K3s servers</li>
      <li>10.0.10.2[1-3] - K3s agents (nodes)</li>
    </ul>
  </li>
  <li>10.1.0.0/16 - pod network</li>
  <li>10.2.0.0/16 - service network</li>
</ul>

<h4 id="312-pick-a-local-zone-for-dns">3.1.2 Pick a <code class="language-plaintext highlighter-rouge">.local</code> Zone for DNS</h4>

<p>This zone just needs to resolve locally on the FreeBSD host. I’m going with <code class="language-plaintext highlighter-rouge">k3s.local</code> because I’m too lazy to think of a clever pun right now.
You cannot connect to the new VMs yet. CBSD creates a <code class="language-plaintext highlighter-rouge">bridge</code> interface the first time you create a VM. We need to add gateways for our cluster VLANs to that interface so we can route from the hypervisor to the VMs and vice versa. In most cases, CBSD will use the <code class="language-plaintext highlighter-rouge">bridge1</code> interface.</p>

<p><a id="3.2"></a></p>
<h4 id="32-load-kernel-modules">3.2 Load kernel modules</h4>

<p>We need to load the virtualization and networking kernel modules.</p>

<div class="language-shell highlighter-rouge"><div class="highlight"><pre class="highlight"><code>kldload vmm if_tuntap if_bridge nmdm
</code></pre></div></div>

<p>For persistence across reboots:</p>

<div class="language-shell highlighter-rouge"><div class="highlight"><pre class="highlight"><code>sysrc kld_list+<span class="o">=</span><span class="s2">"vmm if_tuntap if_bridge nmdm"</span>
</code></pre></div></div>

<p><a id="3.3"></a></p>
<h3 id="33-add-bridge-gateway">3.3 Add Bridge Gateway</h3>

<p>CBSD creates and uses the <code class="language-plaintext highlighter-rouge">bridge1</code> network interface for connecting to the
VM network. We will pre-create it and configure it to route our selected
subnets.</p>

<p>You’ll also need to change <code class="language-plaintext highlighter-rouge">wlan0</code> to your network interface</p>

<div class="language-shell highlighter-rouge"><div class="highlight"><pre class="highlight"><code>ifconfig bridge1 create addm wlan0 up
ifconfig bridge1 <span class="nb">alias </span>10.0.0.1/32
ifconfig bridge1 <span class="nb">alias </span>10.0.10.1/24
ifconfig bridge1 <span class="nb">alias </span>10.1.0.1/16
ifconfig bridge1 <span class="nb">alias </span>10.2.0.1/16
</code></pre></div></div>

<p>For persistence across reboots:</p>

<div class="language-shell highlighter-rouge"><div class="highlight"><pre class="highlight"><code>sysrc <span class="nv">cloned_interfaces</span><span class="o">=</span><span class="s2">"bridge1"</span>
sysrc <span class="nv">ifconfig_bridge1</span><span class="o">=</span><span class="s2">"up"</span>
sysrc <span class="nv">ifconfig_bridge1_alias0</span><span class="o">=</span><span class="s2">"inet 10.0.0.1/32"</span>
sysrc <span class="nv">ifconfig_bridge1_alias1</span><span class="o">=</span><span class="s2">"inet 10.0.10.1/24"</span>
sysrc <span class="nv">ifconfig_bridge1_alias2</span><span class="o">=</span><span class="s2">"inet 10.1.0.1/16"</span>
sysrc <span class="nv">ifconfig_bridge1_alias3</span><span class="o">=</span><span class="s2">"inet 10.2.0.1/16"</span>
</code></pre></div></div>

<p><a id="3-4"></a></p>
<h3 id="34-configure-nat-gateway">3.4 Configure NAT Gateway</h3>

<p>With <code class="language-plaintext highlighter-rouge">bridge1</code> configured, we can connect to the VMs, but the VMs can’t talk to the
Internet because only the FreeBSD host can route to this <code class="language-plaintext highlighter-rouge">10.0.0.0/8</code> block.
We will use <a href="https://docs.freebsd.org/en/books/handbook/firewalls/#firewalls-ipfw"><code class="language-plaintext highlighter-rouge">ipfw</code></a> as a NAT (Network Address Translation) gateway service. These
steps will enable <code class="language-plaintext highlighter-rouge">ipfw</code> with open firewall rules and then configure the NAT.
These changes will take effect immediately.</p>

<div class="language-shell highlighter-rouge"><div class="highlight"><pre class="highlight"><code><span class="c"># Set internet-facing interface</span>
<span class="nv">net_if</span><span class="o">=</span>wlan0
kenv net.inet.ip.fw.default_to_accept<span class="o">=</span>1
sysrc <span class="nv">firewall_type</span><span class="o">=</span><span class="s2">"open"</span>
sysctl net.inet.tcp.tso<span class="o">=</span>0
sysctl net.inet.ip.fw.enable<span class="o">=</span>1
sysctl net.inet.ip.forwarding<span class="o">=</span>1
sysctl net.inet6.ip6.forwarding<span class="o">=</span>1
sysctl net.inet.tcp.tso<span class="o">=</span>0
kldload ipfw_nat ipdivert
service ipfw onestart
ipfw disable one_pass
ipfw <span class="nt">-q</span> nat 1 config <span class="k">if</span> <span class="s2">"</span><span class="nv">$net_if</span><span class="s2">"</span> same_ports unreg_only reset
ipfw add 1 allow ip from any to any via lo0 
ipfw add 200 reass all from any to any <span class="k">in
</span>ipfw add 201 check-state
ipfw add 205 nat 1 ip from 10.0.0.0/8 to any out via <span class="s2">"</span><span class="nv">$net_if</span><span class="s2">"</span> 
ipfw add 210 nat 1 ip from any to any <span class="k">in </span>via <span class="s2">"</span><span class="nv">$net_if</span><span class="s2">"</span>
</code></pre></div></div>

<p>For persistence:</p>

<p>Download <a href="https://github.com/kbruner/freebernetes/k3s/etc/ipfw.bridge.rules">this <code class="language-plaintext highlighter-rouge">ipfw</code> rules
script</a> and
place it in <code class="language-plaintext highlighter-rouge">/etc</code>. Note: this file also contains rules we will add below,
which is why we won’t load it now.</p>

<p>Then run the following:</p>

<div class="language-shell highlighter-rouge"><div class="highlight"><pre class="highlight"><code><span class="nb">echo </span>net.inet.ip.fw.default_to_accept<span class="o">=</span>1 <span class="o">&gt;&gt;</span> /boot/loader.conf
<span class="nb">echo </span>net.inet.tcp.tso<span class="o">=</span>0 <span class="o">&gt;&gt;</span> /etc/sysctl.conf
<span class="nb">echo </span>net.inet.ip.fw.enable<span class="o">=</span>1 <span class="o">&gt;&gt;</span> /etc/sysctl.conf
<span class="nb">echo </span>net.inet.ip.forwarding<span class="o">=</span>1 <span class="o">&gt;&gt;</span> /etc/sysctl.conf
<span class="nb">echo </span>net.inet6.ip6.forwarding<span class="o">=</span>1 <span class="o">&gt;&gt;</span> /etc/sysctl.conf
<span class="nb">echo </span>net.inet.tcp.tso<span class="o">=</span>0 <span class="o">&gt;&gt;</span> /etc/sysctl.conf
sysrc kld_list+<span class="o">=</span><span class="s2">"ipfw_nat ipdivert"</span>
sysrc <span class="nv">firewall_enable</span><span class="o">=</span><span class="s2">"YES"</span>
sysrc <span class="nv">firewall_nat_enable</span><span class="o">=</span><span class="s2">"YES"</span>
sysrc <span class="nv">gateway_enable</span><span class="o">=</span><span class="s2">"YES"</span>
sysrc <span class="nv">firewall_script</span><span class="o">=</span><span class="s2">"/etc/ipfw.bridge.rules"</span>
</code></pre></div></div>

<p><a id="3-5"></a></p>
<h3 id="35-configure-local-dns">3.5 Configure Local DNS</h3>

<p>We need a way to resolve our VM host names. We need to pick a private <code class="language-plaintext highlighter-rouge">.local</code> DNS domain, configure an authoritative server for the domain, and then set up a local caching server that knows about our domain but can also still resolve external addresses for us. We will follow <a href="https://blog.socruel.nu/freebsd/how-to-implement-unbound-and-nsd-on-freebsd.html">this <code class="language-plaintext highlighter-rouge">nsd</code>/<code class="language-plaintext highlighter-rouge">unbound</code> tutorial</a> closely.</p>

<h4 id="351-enable-unbound-for-recursivecaching-dns">3.5.1 Enable <code class="language-plaintext highlighter-rouge">unbound</code> for recursive/caching DNS</h4>

<p>FreeBSD has a caching (lookup-only) DNS service called <code class="language-plaintext highlighter-rouge">unbound</code> in the base system. It will use the configured nameservers for external address lookups and the local <code class="language-plaintext highlighter-rouge">nsd</code> service (configured next) for lookups to our private zone. Copy <code class="language-plaintext highlighter-rouge">unbound.conf</code> and make any edits as necessary to IP addresses or your local zone name.</p>

<p>You will also want to update the FreeBSD host’s <code class="language-plaintext highlighter-rouge">/etc/resolv.conf</code> to add your local domain to the <code class="language-plaintext highlighter-rouge">search</code> list and add an entry for <code class="language-plaintext highlighter-rouge">nameserver 127.0.0.1</code>.</p>

<div class="language-shell highlighter-rouge"><div class="highlight"><pre class="highlight"><code>wget https://raw.githubusercontent.com/kbruner/freebernetes/main/k3s/dns/unbound/unbound.conf <span class="nt">-O</span> /etc/unbound/unbound.conf
service local_unbound onestart
</code></pre></div></div>

<p>For persistence:</p>

<div class="language-shell highlighter-rouge"><div class="highlight"><pre class="highlight"><code>sysrc <span class="nv">local_unbound_enable</span><span class="o">=</span><span class="s2">"YES"</span>
</code></pre></div></div>

<p><code class="language-plaintext highlighter-rouge">/etc/resolv.conf</code>:</p>

<div class="language-plaintext highlighter-rouge"><div class="highlight"><pre class="highlight"><code>search k3s.local
nameserver 127.0.0.1
</code></pre></div></div>

<h4 id="352-configure-the-authoritative-dns-service">3.5.2 Configure the Authoritative DNS Service</h4>

<p>We will use <code class="language-plaintext highlighter-rouge">nsd</code>, a lightweight, authoritative-only service, for our local zone. After copying the files, you can edit/rename the copied files before proceeding to make changes as necessary to match your local domain or IP addresses.</p>

<div class="language-shell highlighter-rouge"><div class="highlight"><pre class="highlight"><code><span class="nb">mkdir</span> <span class="nt">-p</span> /var/nsd/var/db/nsd /var/nsd/var/run /var/nsd/var/log /var/nsd/tmp
<span class="nb">chown</span> <span class="nt">-R</span> nsd:nsd /var/nsd
<span class="nb">cd</span> /var/nsd
wget <span class="nt">-q</span> https://raw.githubusercontent.com/kbruner/freebernetes/main/k3s/dns/nsd/nsd.conf
wget <span class="nt">-q</span> https://raw.githubusercontent.com/kbruner/freebernetes/main/k3s/dns/nsd/zone.10
wget <span class="nt">-q</span> https://raw.githubusercontent.com/kbruner/freebernetes/main/k3s/dns/nsd/zone.k3s.local
nsd-control-setup <span class="nt">-d</span> /var/nsd
nsd-control <span class="nt">-c</span> /var/nsd/nsd.conf start
</code></pre></div></div>

<p>To start the service at boot:</p>

<div class="language-shell highlighter-rouge"><div class="highlight"><pre class="highlight"><code>sysrc <span class="nv">nsd_enable</span><span class="o">=</span><span class="s2">"YES"</span>
sysrc <span class="nv">nsd_config</span><span class="o">=</span><span class="s2">"/var/nsd/nsd.conf"</span>
</code></pre></div></div>

<p><a id="part-4"></a></p>
<h2 id="part-4-create-vms">Part 4: Create VMs</h2>

<h4 id="41-initialize-cbsd">4.1 Initialize CBSD</h4>

<p>If you haven’t run <a href="https://cbsd.io/">CBSD</a> on your FreeBSD host before, you will need to set it up. You can use <a href="https://github.com/kbruner/freebernetes/blob/main/k3s/cbsd/initenv.conf">this seed file</a>. Edit it first to set <code class="language-plaintext highlighter-rouge">node_name</code> to your FreeBSD host’s name and to change <code class="language-plaintext highlighter-rouge">jnameserver</code> and <code class="language-plaintext highlighter-rouge">nodeippool</code> if you are using a private network other than <code class="language-plaintext highlighter-rouge">10.0.0.0/8</code>.</p>

<div class="language-shell highlighter-rouge"><div class="highlight"><pre class="highlight"><code>sysrc <span class="nv">cbsd_workdir</span><span class="o">=</span><span class="s2">"/usr/cbsd"</span>
wget https://raw.githubusercontent.com/kbruner/freebernetes/main/k3s/cbsd/initenv.conf
vi initenv.conf
/usr/local/cbsd/sudoexec/initenv <span class="nv">inter</span><span class="o">=</span>0 <span class="sb">`</span><span class="nb">pwd</span><span class="sb">`</span>/initenv.conf
service cbsdrsyncd stop
sysrc <span class="nt">-x</span> cbsdrsyncd_enable
sysrc <span class="nt">-x</span> cbsdrsyncd_flags
</code></pre></div></div>

<p>Download <a href="https://github.com/kbruner/freebernetes/blob/main/k3s/cbsd/usr.cbsd.etc.defaults/vm-linux-cloud-ubuntuserver-k3s-amd64-22.04.conf">this Ubuntu VM configuration
file</a>
and copy it to <code class="language-plaintext highlighter-rouge">/usr/cbsd/etc/defaults</code></p>

<h4 id="42-create-vms">4.2 Create VMs</h4>

<p>Copy <a href="https://github.com/kbruner/freebernetes/blob/main/k3s/cbsd/instance.jconf">this <code class="language-plaintext highlighter-rouge">instance.jconf</code> VM template file</a> and update <code class="language-plaintext highlighter-rouge">ci_gw4</code>, <code class="language-plaintext highlighter-rouge">ci_nameserver_search</code>, and <code class="language-plaintext highlighter-rouge">ci_nameserver_address</code> fields as needed. If you want to set a password for the <code class="language-plaintext highlighter-rouge">ubuntu</code> user in case you want to log in on the console via VNC, you can assign it to <code class="language-plaintext highlighter-rouge">cw_user_pw_user</code>, but note this is a plain-text field.</p>

<p>When you run <code class="language-plaintext highlighter-rouge">cbsd bcreate</code>, if CBSD does not have a copy of the installation ISO image, it will prompt you asking to download it. After the first time, it will re-use the local image.</p>

<div class="language-shell highlighter-rouge"><div class="highlight"><pre class="highlight"><code><span class="c"># create server VMs</span>
<span class="k">for </span>i <span class="k">in </span>0 1 2<span class="p">;</span> <span class="k">do
  </span><span class="nv">jconf</span><span class="o">=</span><span class="s2">"/tmp/server-</span><span class="k">${</span><span class="nv">i</span><span class="k">}</span><span class="s2">.jconf"</span>
  <span class="nb">cp </span>instance.jconf <span class="s2">"</span><span class="nv">$jconf</span><span class="s2">"</span>
  cbsd bcreate <span class="nv">jconf</span><span class="o">=</span><span class="s2">"</span><span class="nv">$jconf</span><span class="s2">"</span> <span class="nv">jname</span><span class="o">=</span><span class="s2">"server-</span><span class="nv">$i</span><span class="s2">"</span> <span class="se">\</span>
  <span class="nv">ci_ip4_addr</span><span class="o">=</span><span class="s2">"10.0.10.1</span><span class="k">${</span><span class="nv">i</span><span class="k">}</span><span class="s2">/24"</span> <span class="nv">ci_jname</span><span class="o">=</span><span class="s2">"server-</span><span class="nv">$i</span><span class="s2">"</span> <span class="se">\</span>
  <span class="nv">ci_fqdn</span><span class="o">=</span><span class="s2">"server-</span><span class="k">${</span><span class="nv">i</span><span class="k">}</span><span class="s2">.k3s.local"</span> <span class="nv">ip_addr</span><span class="o">=</span><span class="s2">"10.0.10.1</span><span class="k">${</span><span class="nv">i</span><span class="k">}</span><span class="s2">"</span> <span class="se">\</span>
  <span class="nv">imgsize</span><span class="o">=</span><span class="s2">"20g"</span> <span class="nv">vm_cpus</span><span class="o">=</span><span class="s2">"2"</span> <span class="nv">vm_ram</span><span class="o">=</span><span class="s2">"2g"</span>
<span class="k">done</span>
<span class="c"># start server VMs</span>
<span class="k">for </span>i <span class="k">in </span>0 1 2<span class="p">;</span> <span class="k">do </span>cbsd bstart <span class="nv">jname</span><span class="o">=</span><span class="s2">"server-</span><span class="nv">$i</span><span class="s2">"</span><span class="p">;</span> <span class="k">done</span>
<span class="c"># create agent VMs</span>
<span class="k">for </span>i <span class="k">in </span>0 1 2<span class="p">;</span> <span class="k">do
  </span><span class="nv">jconf</span><span class="o">=</span><span class="s2">"/tmp/agent-</span><span class="k">${</span><span class="nv">i</span><span class="k">}</span><span class="s2">.jconf"</span>
  <span class="nb">cp </span>instance.jconf <span class="s2">"</span><span class="nv">$jconf</span><span class="s2">"</span>
  cbsd bcreate <span class="nv">jconf</span><span class="o">=</span><span class="s2">"</span><span class="nv">$jconf</span><span class="s2">"</span> <span class="nv">jname</span><span class="o">=</span><span class="s2">"agent-</span><span class="nv">$i</span><span class="s2">"</span> <span class="se">\</span>
  <span class="nv">ci_ip4_addr</span><span class="o">=</span><span class="s2">"10.0.10.2</span><span class="k">${</span><span class="nv">i</span><span class="k">}</span><span class="s2">/24"</span> <span class="nv">ci_jname</span><span class="o">=</span><span class="s2">"agent-</span><span class="nv">$i</span><span class="s2">"</span> <span class="se">\</span>
  <span class="nv">ci_fqdn</span><span class="o">=</span><span class="s2">"agent-</span><span class="k">${</span><span class="nv">i</span><span class="k">}</span><span class="s2">.k3s.local"</span> <span class="nv">ip_addr</span><span class="o">=</span><span class="s2">"10.0.10.2</span><span class="k">${</span><span class="nv">i</span><span class="k">}</span><span class="s2">"</span> <span class="se">\</span>
  <span class="nv">imgsize</span><span class="o">=</span><span class="s2">"10g"</span> <span class="nv">vm_cpus</span><span class="o">=</span><span class="s2">"2"</span> <span class="nv">vm_ram</span><span class="o">=</span><span class="s2">"2g"</span>
<span class="k">done</span>
<span class="c"># start agent VMs</span>
<span class="k">for </span>i <span class="k">in </span>0 1 2<span class="p">;</span> <span class="k">do </span>cbsd bstart <span class="nv">jname</span><span class="o">=</span><span class="s2">"agent-</span><span class="nv">$i</span><span class="s2">"</span><span class="p">;</span> <span class="k">done</span>
</code></pre></div></div>

<p><a id="part-5"></a></p>
<h2 id="part-5-create-the-cluster">Part 5: Create the Cluster</h2>

<ul>
  <li><a href="#5-1">5.1 Install Servers</a></li>
  <li><a href="#5-2">5.2 Install Agents</a></li>
  <li><a href="#5-3">5.3 Set Up Service Load Balancing</a></li>
</ul>

<p><a id="5-1"></a></p>
<h3 id="51-install-servers">5.1 Install Servers</h3>

<p>We’ll create the control plane by creating the cluster on <code class="language-plaintext highlighter-rouge">server-0</code>, then adding <code class="language-plaintext highlighter-rouge">server-1</code> and <code class="language-plaintext highlighter-rouge">server-2</code> to the cluster.</p>

<p>We want to load balance requests to the Kubernetes API endpoint across the three server VMs. For true high-availability, we would want to use a load balancer with liveness health checks. For this tutorial, though, we will just use a simple round-robin DNS entry for <code class="language-plaintext highlighter-rouge">kubernetes.k3s.local</code>.</p>

<p><em>Note</em>: This assumes Ubuntu configured each VM’s network interface as <code class="language-plaintext highlighter-rouge">enp0s6</code>.
You may need to change the arguments in the <code class="language-plaintext highlighter-rouge">ssh</code> commands if that interface
does not exist.</p>

<div class="language-shell highlighter-rouge"><div class="highlight"><pre class="highlight"><code><span class="c"># Add our VIP route</span>
ipfw add 300 fwd 10.0.10.10 ip from any to 10.0.0.2 keep-state
<span class="c"># Create VIP on server-0</span>
ssh <span class="nt">-o</span> <span class="nv">StrictHostKeyChecking</span><span class="o">=</span>no <span class="nt">-i</span> ~cbsd/.ssh/id_rsa ubuntu@10.0.10.10 <span class="nb">sudo </span>ip address add 10.0.0.2/32 dev enp0s6:1
k3sup <span class="nb">install</span> <span class="se">\</span>
  <span class="nt">--host</span> server-0 <span class="se">\</span>
  <span class="nt">--user</span> ubuntu <span class="se">\</span>
  <span class="nt">--cluster</span> <span class="se">\</span>
  <span class="nt">--k3s-channel</span> stable <span class="se">\</span>
  <span class="nt">--ssh-key</span> ~cbsd/.ssh/id_rsa <span class="se">\</span>
  <span class="nt">--tls-san</span> 10.0.0.2 <span class="se">\</span>
  <span class="nt">--k3s-extra-args</span> <span class="s1">'--cluster-cidr 10.1.0.0/16 --service-cidr 10.2.0.0/16 --cluster-dns 10.2.0.10'</span>
k3sup <span class="nb">join</span> <span class="se">\</span>
  <span class="nt">--host</span> server-1 <span class="se">\</span>
  <span class="nt">--user</span> ubuntu <span class="se">\</span>
  <span class="nt">--server</span> <span class="se">\</span>
  <span class="nt">--server-host</span> kubernetes.k3s.local <span class="se">\</span>
  <span class="nt">--server-user</span> ubuntu <span class="se">\</span>
  <span class="nt">--k3s-channel</span> stable <span class="se">\</span>
  <span class="nt">--ssh-key</span> ~cbsd/.ssh/id_rsa <span class="se">\</span>
  <span class="nt">--k3s-extra-args</span> <span class="s1">'--cluster-cidr 10.1.0.0/16 --service-cidr 10.2.0.0/16 --cluster-dns 10.2.0.10'</span>
k3sup <span class="nb">join</span> <span class="se">\</span>
  <span class="nt">--host</span> server-2 <span class="se">\</span>
  <span class="nt">--user</span> ubuntu <span class="se">\</span>
  <span class="nt">--server</span> <span class="se">\</span>
  <span class="nt">--server-host</span> kubernetes.k3s.local <span class="se">\</span>
  <span class="nt">--server-user</span> ubuntu <span class="se">\</span>
  <span class="nt">--k3s-channel</span> stable <span class="se">\</span>
  <span class="nt">--ssh-key</span> ~cbsd/.ssh/id_rsa <span class="se">\</span>
  <span class="nt">--k3s-extra-args</span> <span class="s1">'--cluster-cidr 10.1.0.0/16 --service-cidr 10.2.0.0/16 --cluster-dns 10.2.0.10'</span>
<span class="c"># Create VIPs on server-1 and server-2</span>
ssh <span class="nt">-o</span> <span class="nv">StrictHostKeyChecking</span><span class="o">=</span>no <span class="nt">-i</span> ~cbsd/.ssh/id_rsa ubuntu@10.0.10.11 <span class="nb">sudo </span>ip address add 10.0.0.2/32 dev enp0s6:1
ssh <span class="nt">-o</span> <span class="nv">StrictHostKeyChecking</span><span class="o">=</span>no <span class="nt">-i</span> ~cbsd/.ssh/id_rsa ubuntu@10.0.10.12 <span class="nb">sudo </span>ip address add 10.0.0.2/32 dev enp0s6:1
<span class="nb">export </span><span class="nv">KUBECONFIG</span><span class="o">=</span>/root/kubeconfig
kubectl config set-context default
<span class="c"># In case the server endpoint is set to localhost, we'll change it to our VIP</span>
<span class="nb">sed</span> <span class="nt">-I</span> <span class="s2">""</span> <span class="nt">-e</span> <span class="s1">'s/server: .*$/server: https:\/\/10.0.0.2:6443/'</span> <span class="nv">$KUBECONFIG</span>
kubectl get nodes <span class="nt">-o</span> wide
</code></pre></div></div>

<p><a id="5-2"></a></p>
<h3 id="52-install-agents">5.2 Install Agents</h3>

<div class="language-shell highlighter-rouge"><div class="highlight"><pre class="highlight"><code><span class="k">for </span>i <span class="k">in </span>0 1 2<span class="p">;</span> <span class="k">do
</span>k3sup <span class="nb">join</span> <span class="se">\</span>
  <span class="nt">--host</span> agent-<span class="nv">$i</span> <span class="se">\</span>
  <span class="nt">--user</span> ubuntu <span class="se">\</span>
  <span class="nt">--server-host</span> kubernetes.k3s.local <span class="se">\</span>
  <span class="nt">--server-user</span> ubuntu <span class="se">\</span>
  <span class="nt">--k3s-channel</span> stable <span class="se">\</span>
  <span class="nt">--ssh-key</span> ~cbsd/.ssh/id_rsa
<span class="k">done</span>
<span class="c"># Remove temporary firewall rule</span>
ipfw delete 300
<span class="c"># Create round-robin firewall rules</span>
ipfw add 300 prob 0.33 fwd 10.0.10.10 ip from any to 10.0.0.2 keep-state
ipfw add 301 prob 0.5 fwd 10.0.10.11 ip from any to 10.0.0.2 keep-state
ipfw add 302 fwd 10.0.10.12 ip from any to 10.0.0.2 keep-state
kubectl get nodes <span class="nt">-o</span> wide
</code></pre></div></div>

<p><a id="5-3"></a></p>
<h3 id="53-set-up-service-load-balancing">5.3 Set Up Service Load Balancing</h3>

<p>Generally, if you want to expose a Kubernetes application endpoint on an IP address outside the cluster’s network, you would create a <code class="language-plaintext highlighter-rouge">Service</code> object of type <code class="language-plaintext highlighter-rouge">LoadBalancer</code>. However, because load balancer options and implementations are unique for each cloud provider and self-hosted environment, Kubernetes expects you to have a controller running in your cluster to manage service load balancers. We have no such controller for our FreeBSD hypervisor, but we have a couple basic alternatives.</p>

<h4 id="531-routing-to-nodeport-services">5.3.1 Routing to <code class="language-plaintext highlighter-rouge">NodePort Services</code></h4>

<p>For <code class="language-plaintext highlighter-rouge">Services</code> of type <code class="language-plaintext highlighter-rouge">NodePort</code>, we can route directly to the <code class="language-plaintext highlighter-rouge">Service</code>’s virtual IP, which will be in our <code class="language-plaintext highlighter-rouge">10.2.0.0/16</code> service network block. Each service VIP is routeable by every node, so if we set up round-robin forwarding rules on the hypervisor’s firewall, we should be able to reach <code class="language-plaintext highlighter-rouge">NodePort</code> endpoints.</p>

<div class="language-shell highlighter-rouge"><div class="highlight"><pre class="highlight"><code>ipfw add 350 prob 0.333 fwd 10.0.10.20 ip from any to 10.2.0.0/16 keep-state
ipfw add 351 prob 0.5 fwd 10.0.10.21 ip from any to 10.2.0.0/16 keep-state
ipfw add 352 fwd 10.0.10.22 ip from any to 10.2.0.0/16 keep-state
</code></pre></div></div>

<h4 id="532-k3s-service-load-balancer">5.3.2 K3s Service Load Balancer</h4>

<p>K3s has its own option for load balancer services. You can read <a href="https://rancher.com/docs/k3s/latest/en/networking/#service-load-balancer">the documentation</a> for details. The service IP address will share the IP address of a node in the cluster. We will see a demonstration in the next section, when we test our cluster.</p>

<p>Note that with the K3s service load balancer, you run the risk of being unable to create a <code class="language-plaintext highlighter-rouge">LoadBalancer</code>-type service because of a high risk of port collisions, which are not usually a problem with most Kubernetes <code class="language-plaintext highlighter-rouge">LoadBalancer</code> implementations.</p>

<!--nextpage-->

<p><a id="part-6"></a></p>
<h2 id="part-6-test-the-cluster">Part 6: Test the Cluster</h2>

<p>We’ll run the following tests:</p>

<ol>
  <li>Create <code class="language-plaintext highlighter-rouge">nginx</code> deployment</li>
  <li>Port-forward to <code class="language-plaintext highlighter-rouge">nginx</code> pod</li>
  <li>Check <code class="language-plaintext highlighter-rouge">nginx</code> pod’s logs</li>
  <li>Expose <code class="language-plaintext highlighter-rouge">nginx NodePort Service</code></li>
  <li>Expose <code class="language-plaintext highlighter-rouge">nginx LoadBalancer Service</code> on port 8080</li>
  <li>Test pod-to-pod connectivity</li>
</ol>

<div class="language-shell highlighter-rouge"><div class="highlight"><pre class="highlight"><code><span class="c"># Create deployment</span>
kubectl create deployment nginx <span class="nt">--image</span><span class="o">=</span>nginx
kubectl get pods 
</code></pre></div></div>

<div class="language-shell highlighter-rouge"><div class="highlight"><pre class="highlight"><code><span class="c"># Port-forward to pod</span>
<span class="nv">POD</span><span class="o">=</span><span class="si">$(</span>kubectl get pods <span class="nt">-l</span> <span class="nv">app</span><span class="o">=</span>nginx <span class="nt">-ojsonpath</span><span class="o">=</span><span class="s2">"{.items[0].metadata.name}"</span><span class="si">)</span>
<span class="nv">PID</span><span class="o">=</span><span class="s2">"</span><span class="si">$(</span>kubectl port-forward <span class="nv">$POD</span> 8080:80 <span class="o">&gt;</span>/dev/null 2&gt;&amp;1 &amp; <span class="nb">echo</span> <span class="nv">$!</span><span class="si">)</span><span class="s2">"</span>
</code></pre></div></div>

<div class="language-shell highlighter-rouge"><div class="highlight"><pre class="highlight"><code>curl http://localhost:8080/
<span class="nb">kill</span> <span class="s2">"</span><span class="nv">$PID</span><span class="s2">"</span>
</code></pre></div></div>

<div class="language-shell highlighter-rouge"><div class="highlight"><pre class="highlight"><code><span class="c"># Create NodePort service</span>
kubectl expose deployment nginx <span class="nt">--port</span> 80 <span class="nt">--type</span> NodePort
kubectl get svc 
<span class="nv">CLUSTERIP</span><span class="o">=</span><span class="s2">"</span><span class="si">$(</span>kubectl get svc nginx <span class="nt">-ojsonpath</span><span class="o">=</span><span class="s1">'{.spec.clusterIP}'</span><span class="si">)</span><span class="s2">"</span>
curl <span class="nt">-I</span> http://<span class="k">${</span><span class="nv">CLUSTERIP</span><span class="k">}</span>/
kubectl delete svc nginx
</code></pre></div></div>

<div class="language-shell highlighter-rouge"><div class="highlight"><pre class="highlight"><code><span class="c"># Create LoadBalancer Service</span>
kubectl expose deployment nginx <span class="nt">--port</span> 8080 <span class="nt">--target-port</span> 80 <span class="nt">--type</span> LoadBalancer
kubectl get svc
<span class="nv">LBIP</span><span class="o">=</span><span class="s2">"</span><span class="si">$(</span>kubectl get svc nginx <span class="nt">-ojsonpath</span><span class="o">=</span><span class="s1">'{.status.loadBalancer.ingress[0].ip}'</span><span class="si">)</span><span class="s2">"</span>
curl <span class="nt">-I</span> http://<span class="k">${</span><span class="nv">LBIP</span><span class="k">}</span>:8080/
kubectl delete svc nginx
</code></pre></div></div>

<div class="language-shell highlighter-rouge"><div class="highlight"><pre class="highlight"><code><span class="c"># Test pod-to-pod connectivity</span>
<span class="nv">PODIP</span><span class="o">=</span><span class="s2">"</span><span class="si">$(</span>kubectl get pod <span class="s2">"</span><span class="nv">$POD</span><span class="s2">"</span> <span class="nt">-ojsonpath</span><span class="o">=</span><span class="s1">'{.status.podIP}'</span><span class="si">)</span><span class="s2">"</span>
kubectl run <span class="nt">-it</span> busybox <span class="nt">--image</span> busybox <span class="nt">--rm</span><span class="o">=</span><span class="nb">true</span> <span class="nt">--restart</span><span class="o">=</span>Never <span class="nt">--</span> wget <span class="nt">-q</span> <span class="nt">-S</span> <span class="nt">-O</span> /dev/null <span class="s2">"http://</span><span class="k">${</span><span class="nv">PODIP</span><span class="k">}</span><span class="s2">"</span>
</code></pre></div></div>

<p><a id="part-7"></a></p>
<h2 id="part-7-clean-up">Part 7: Clean Up</h2>

<p>To clean up:</p>

<ul>
  <li>Stop and remove the VMs
    <ul>
      <li><code class="language-plaintext highlighter-rouge">cbsd bstop agent-0</code> # etc</li>
      <li><code class="language-plaintext highlighter-rouge">cbsd bremove agent-0</code> # etc</li>
    </ul>
  </li>
  <li>Edit <code class="language-plaintext highlighter-rouge">/etc/rc.conf</code> to remove any settings that were added</li>
  <li>Edit <code class="language-plaintext highlighter-rouge">/etc/sysctl.conf</code> to remove any settings that were added</li>
  <li>Reboot</li>
</ul>

<hr />

<p>Please let me know if you have questions or suggestions either in the comments or <a href="https://twitter.com/fuzzyKB">on Twitter</a>.</p>

<p><a id="sources-references"></a></p>
<h2 id="sources-and-references">Sources and References</h2>

<ul>
  <li><a href="https://blog.socruel.nu/freebsd/how-to-implement-unbound-and-nsd-on-freebsd.html">https://blog.socruel.nu/freebsd/how-to-implement-unbound-and-nsd-on-freebsd.html</a></li>
  <li><a href="https://cbsd.io/">https://cbsd.io/</a></li>
  <li><a href="https://github.com/alexellis/k3sup/ ">https://github.com/alexellis/k3sup/</a></li>
  <li><a href="https://k3s.io/">https://k3s.io/</a></li>
  <li><a href="https://kubernetes.io/">https://kubernetes.io/</a></li>
  <li><a href="https://kubernetes.io/docs/concepts/services-networking/service/">https://kubernetes.io/docs/concepts/services-networking/service/</a></li>
  <li><a href="https://www.freebsd.org/doc/handbook/firewalls-ipfw.html">https://www.freebsd.org/doc/handbook/firewalls-ipfw.html</a></li>
  <li><a href="https://www.freebsd.org/doc/handbook/network-bridging.html">https://www.freebsd.org/doc/handbook/network-bridging.html</a></li>
  <li><a href="https://www.freebsd.org/doc/handbook/ports.html">https://www.freebsd.org/doc/handbook/ports.html</a></li>
</ul>]]></content><author><name></name></author><category term="FreeBSD Virtualization" /><category term="freebsd" /><category term="kubernetes" /><category term="tutorial" /><category term="virtualization" /><category term="linux" /><summary type="html"><![CDATA[Step-by-step tutorial for deploying a Kubernetes cluster with k3s on FreeBSD bhyve VMs]]></summary><media:thumbnail xmlns:media="http://search.yahoo.com/mrss/" url="https://productionwithscissors.run/assets/img/header/scissors-crop-t.png" /><media:content medium="image" url="https://productionwithscissors.run/assets/img/header/scissors-crop-t.png" xmlns:media="http://search.yahoo.com/mrss/" /></entry><entry><title type="html">Fun with FreeBSD: Run Linux Containers on FreeBSD</title><link href="https://productionwithscissors.run/2022/09/04/containerd-linux-on-freebsd/" rel="alternate" type="text/html" title="Fun with FreeBSD: Run Linux Containers on FreeBSD" /><published>2022-09-04T00:00:00+00:00</published><updated>2022-09-04T00:00:00+00:00</updated><id>https://productionwithscissors.run/2022/09/04/linux-containers-freebsd</id><content type="html" xml:base="https://productionwithscissors.run/2022/09/04/containerd-linux-on-freebsd/"><![CDATA[<p><a href="/freebsd-virtualization-series/"><em>See all posts in this series</em></a></p>

<details>
  <summary><i>Table of Contents</i></summary>

  <ul>
    <li><a href="#intro">Intro</a></li>
    <li><a href="#prerequisitites">Prerequisitites</a>
      <ul>
        <li><a href="#audience">Audience</a></li>
        <li><a href="#platform">Platform</a></li>
        <li><a href="#setup">Setup</a>
          <ul>
            <li><a href="#packagesports">Packages/ports</a></li>
            <li><a href="#set-up-go">Set up Go</a></li>
            <li><a href="#build-containerd">Build containerd</a></li>
            <li><a href="#build-runj">Build runj</a></li>
            <li><a href="#enable-linux-emulation">Enable Linux emulation</a></li>
          </ul>
        </li>
      </ul>
    </li>
    <li><a href="#run-a-linux-container">Run a Linux container!</a>
      <ul>
        <li><a href="#the-command-line">The command line</a></li>
      </ul>
    </li>
    <li><a href="#references">References</a></li>
  </ul>

</details>

<h1 id="intro">Intro</h1>

<p>This how-to will show you the basics of running a <a href="https://linuxcontainers.org/">Linux
container</a> directly on
FreeBSD, no virtual machine required!</p>

<p>Thanks to <a href="https://docs.freebsd.org/en/books/handbook/linuxemu/">FreeBSD’s Linux
emulation</a> and lots of
hard work by many people, including the contributions of everyone involved in
<a href="https://github.com/containerd/containerd/pull/7000">this containerd pull
request</a> and especially
<a href="https://samuel.karp.dev/blog/">Samuel Karp’s</a>
<a href="https://github.com/samuelkarp/runj"><code class="language-plaintext highlighter-rouge">runj</code></a>, an <a href="https://opencontainers.org/">Open Container Initiative
(OCI)</a>-compliant way to launch <a href="https://docs.freebsd.org/en/books/handbook/jails/">FreeBSD
jails</a>, we can now run
Linux containers via <code class="language-plaintext highlighter-rouge">containerd</code>.</p>

<p>This compatibility is all pretty early-stage and is not guaranteed to work for
all <code class="language-plaintext highlighter-rouge">containerd</code> use cases (yet!), but all of this work is a huge step
toward using FreeBSD hosts natively as <a href="https://kubernetes.io/docs/concepts/architecture/nodes/">Kubernetes
nodes</a></p>

<p>Please note that currently networking doesn’t seem to be implemented!</p>

<h1 id="prerequisitites">Prerequisitites</h1>

<h2 id="audience">Audience</h2>

<p>This post assumes a basic working knowing of Linux containers, compiling
source code, and basic FreeBSD system administration skills. (You can find a
<a href="https://productionwithscissors.run/2022/09/02/fun-with-freebsd-first-linux-guest/#freebsd-tips-for-linux-people">cheat sheet
here</a>)</p>

<h2 id="platform">Platform</h2>

<p>I’m running on FreeBSD
<a href="https://www.freebsd.org/releases/13.1R/installation/">13.1-RELEASE</a>. I
haven’t tested on other versions.</p>

<p>You also need a working <a href="https://docs.freebsd.org/en/books/handbook/zfs/">ZFS
pool.</a></p>

<h2 id="setup">Setup</h2>

<p>All these commands need to be run as <code class="language-plaintext highlighter-rouge">root</code>.</p>

<h3 id="packagesports">Packages/ports</h3>

<p>Install the following packages or ports:</p>

<ul>
  <li><code class="language-plaintext highlighter-rouge">bash</code> (<code class="language-plaintext highlighter-rouge">shells</code>)</li>
  <li><code class="language-plaintext highlighter-rouge">git</code> (<code class="language-plaintext highlighter-rouge">devel</code>)</li>
  <li><code class="language-plaintext highlighter-rouge">gmake</code> (<code class="language-plaintext highlighter-rouge">devel</code>)</li>
  <li><code class="language-plaintext highlighter-rouge">go</code> (<code class="language-plaintext highlighter-rouge">lang</code>)</li>
</ul>

<h3 id="set-up-go">Set up Go</h3>

<div class="language-shell highlighter-rouge"><div class="highlight"><pre class="highlight"><code><span class="c"># Check /usr/local to find the name of the installed go dir and make a        </span>
<span class="c"># symbolic link to /usr/local/go. My version of `go` is 1.19                  </span>
<span class="nb">ln</span> <span class="nt">-s</span> /usr/local/go119 /usr/local/go                                          
<span class="nb">export </span><span class="nv">GOPATH</span><span class="o">=</span>/usr/local/go
</code></pre></div></div>

<h3 id="build-containerd">Build containerd</h3>
<div class="language-shell highlighter-rouge"><div class="highlight"><pre class="highlight"><code><span class="c"># Check out containerd source</span>
git clone https://github.com/containerd/containerd.git
<span class="nb">cd </span>containerd
<span class="c"># Minimum required containerd version is v1.6.7</span>
<span class="c"># Find the latest with `git tag -l | tail`</span>
git checkout v1.6.8
<span class="c"># Use gnu make!</span>
gmake <span class="nb">install</span>
<span class="c"># Start containerd</span>
service containerd onestart
<span class="c"># For persistence across reboots, add containerd to /etc/rc.conf run at boot</span>
<span class="c"># echo 'containerd_enable="YES"' &gt;&gt; /etc/rc.conf</span>
<span class="c">#</span>
<span class="c"># This also seems to be necessary</span>
<span class="nb">mkdir</span> /var/lib/containerd/io.containerd.snapshotter.v1.zfs
</code></pre></div></div>

<h3 id="build-runj">Build runj</h3>
<div class="language-shell highlighter-rouge"><div class="highlight"><pre class="highlight"><code>git clone https://github.com/samuelkarp/runj.git
<span class="nb">cd </span>runj
gmake <span class="nb">install</span>
</code></pre></div></div>

<h3 id="enable-linux-emulation">Enable Linux emulation</h3>
<div class="language-shell highlighter-rouge"><div class="highlight"><pre class="highlight"><code>kldload linux
<span class="c"># To load the Linux module at boot, run</span>
<span class="c"># echo 'linux_load="YES"' &gt;&gt; /boot/loader.conf</span>
service linux onestart
<span class="c"># To enable Linux emulation at boot, run</span>
<span class="c"># echo 'linux_enable="YES"' &gt;&gt; /etc/rc.conf</span>
</code></pre></div></div>

<h1 id="run-a-linux-container">Run a Linux container!</h1>

<div class="language-shell highlighter-rouge"><div class="highlight"><pre class="highlight"><code><span class="c"># Pull the image</span>
ctr image pull <span class="nt">--platform</span><span class="o">=</span>linux docker.io/library/alpine:latest
<span class="c">#</span>
<span class="c"># And ....</span>
ctr run <span class="nt">--rm</span> <span class="nt">--tty</span> <span class="nt">--runtime</span> wtf.sbk.runj.v1 <span class="nt">--snapshotter</span> zfs <span class="nt">--platform</span> linux docker.io/library/alpine:latest mylinuxcontainer <span class="nb">uname</span> <span class="nt">-a</span>
</code></pre></div></div>

<div class="language-plaintext highlighter-rouge"><div class="highlight"><pre class="highlight"><code>[root@nucklehead ~]# ctr image pull --platform=linux docker.io/library/alpine:latest
docker.io/library/alpine:latest:                                                  resolved       |++++++++++++++++++++++++++++++++++++++| 
index-sha256:bc41182d7ef5ffc53a40b044e725193bc10142a1243f395ee852a8d9730fc2ad:    done           |++++++++++++++++++++++++++++++++++++++| 
manifest-sha256:1304f174557314a7ed9eddb4eab12fed12cb0cd9809e4c28f29af86979a3c870: done           |++++++++++++++++++++++++++++++++++++++| 
layer-sha256:213ec9aee27d8be045c6a92b7eac22c9a64b44558193775a1a7f626352392b49:    done           |++++++++++++++++++++++++++++++++++++++| 
config-sha256:9c6f0724472873bb50a2ae67a9e7adcb57673a183cea8b06eb778dca859181b5:   done           |++++++++++++++++++++++++++++++++++++++| 
elapsed: 2.5 s                                                                    total:  2.7 Mi (1.1 MiB/s)                                       
unpacking linux/amd64 sha256:bc41182d7ef5ffc53a40b044e725193bc10142a1243f395ee852a8d9730fc2ad...
done: 227.895869ms
[root@nucklehead ~]# ctr run --rm --tty --runtime wtf.sbk.runj.v1 --snapshotter zfs --platform linux \
&gt; docker.io/library/alpine:latest mylinuxcontainer uname -a
 
Linux 3.17.0 FreeBSD 13.1-RELEASE releng/13.1-n250148-fc952ac2212 GENERIC x86_64 Linux
[root@nucklehead ~]# uname -a
FreeBSD nucklehead 13.1-RELEASE FreeBSD 13.1-RELEASE releng/13.1-n250148-fc952ac2212 GENERIC amd64
[root@nucklehead ~]# 
</code></pre></div></div>

<h2 id="the-command-line">The command line</h2>

<p>Breaking down the command <code class="language-plaintext highlighter-rouge">ctr run --rm --tty --runtime wtf.sbk.runj.v1 --snapshotter zfs
--platform linux docker.io/library/alpine:latest mylinuxcontainer uname -a</code></p>
<ul>
  <li><code class="language-plaintext highlighter-rouge">ctr run</code> – <code class="language-plaintext highlighter-rouge">containerd</code> client and its subcommand to run a container</li>
  <li><code class="language-plaintext highlighter-rouge">--rm</code> – remove the container upon completion</li>
  <li><code class="language-plaintext highlighter-rouge">--tty</code> – attach terminal for STDIN/STDOUT to your terminal</li>
  <li><code class="language-plaintext highlighter-rouge">--runtime wtf.sbk.runj.v1</code> – use the <code class="language-plaintext highlighter-rouge">runj</code> runtime for FreeBSD</li>
  <li><code class="language-plaintext highlighter-rouge">--snapshotter zfs</code> – use ZFS as the storage backend</li>
  <li><code class="language-plaintext highlighter-rouge">--platform linux</code> – use a container image built for Linux</li>
  <li><code class="language-plaintext highlighter-rouge">docker.io/library/alpine:latest</code> – the container image name, in this case
the one we pulled earlier</li>
  <li><code class="language-plaintext highlighter-rouge">mylinuxcontainer</code> – the name I gave my container. You can use any string</li>
  <li><code class="language-plaintext highlighter-rouge">uname -a</code> – the command to run in the container</li>
</ul>

<hr />

<p>And that’s it! Wow!</p>

<p>If you have questions or comments, you can <a href="https://www.twitter.com/fuzzyKB">@ me on
Twitter</a>.</p>

<hr />

<h1 id="references">References</h1>

<ul>
  <li><a href="https://docs.freebsd.org/en/books/handbook/jails/">https://docs.freebsd.org/en/books/handbook/jails/</a></li>
  <li><a href="https://docs.freebsd.org/en/books/handbook/linuxemu/">https://docs.freebsd.org/en/books/handbook/linuxemu/</a></li>
  <li><a href="https://docs.freebsd.org/en/books/handbook/zfs/">https://docs.freebsd.org/en/books/handbook/zfs/</a></li>
  <li><a href="https://github.com/containerd/containerd">https://github.com/containerd/containerd</a></li>
  <li><a href="https://github.com/containerd/containerd/pull/7000">https://github.com/containerd/containerd/pull/7000</a></li>
  <li><a href="https://github.com/samuelkarp/runj">https://github.com/samuelkarp/runj</a></li>
  <li><a href="https://iximiuz.com/en/posts/containerd-command-line-clients/">https://iximiuz.com/en/posts/containerd-command-line-clients/</a></li>
  <li><a href="https://kubernetes.io/docs/concepts/architecture/nodes/">https://kubernetes.io/docs/concepts/architecture/nodes/</a></li>
  <li><a href="https://linuxcontainers.org/">https://linuxcontainers.org/</a></li>
  <li><a href="https://opencontainers.org/">https://opencontainers.org/</a></li>
  <li><a href="https://productionwithscissors.run/2022/09/02/fun-with-freebsd-first-linux-guest/#freebsd-tips-for-linux-people">https://productionwithscissors.run/2022/09/02/fun-with-freebsd-first-linux-guest/#freebsd-tips-for-linux-people</a></li>
  <li><a href="https://samuel.karp.dev/blog/">https://samuel.karp.dev/blog/</a></li>
  <li><a href="https://www.freebsd.org/releases/13.1R/installation/">https://www.freebsd.org/releases/13.1R/installation/</a></li>
</ul>

<hr />]]></content><author><name></name></author><category term="FreeBSD Virtualization" /><category term="freebsd" /><category term="virtualization" /><category term="linux" /><summary type="html"><![CDATA[How to run an actual Linux container directly on FreeBSD. No virtual machines!]]></summary><media:thumbnail xmlns:media="http://search.yahoo.com/mrss/" url="https://productionwithscissors.run/assets/img/header/scissors-crop-t.png" /><media:content medium="image" url="https://productionwithscissors.run/assets/img/header/scissors-crop-t.png" xmlns:media="http://search.yahoo.com/mrss/" /></entry><entry><title type="html">Fun with FreeBSD: Your First Linux Guest</title><link href="https://productionwithscissors.run/2022/09/02/fun-with-freebsd-first-linux-guest/" rel="alternate" type="text/html" title="Fun with FreeBSD: Your First Linux Guest" /><published>2022-09-02T00:00:00+00:00</published><updated>2022-09-02T00:00:00+00:00</updated><id>https://productionwithscissors.run/2022/09/02/fun-with-freebsd-first-linux</id><content type="html" xml:base="https://productionwithscissors.run/2022/09/02/fun-with-freebsd-first-linux-guest/"><![CDATA[<p><a href="/freebsd-virtualization-series/"><em>See all posts in this series</em></a></p>

<details>
  <summary><i>Table of Contents</i></summary>

  <ul>
    <li><a href="#intro">Intro</a>
      <ul>
        <li><a href="#audience">Audience</a></li>
        <li><a href="#freebsd-tips-for-linux-people">FreeBSD Tips for Linux People</a>
          <ul>
            <li><a href="#software-installation">Software installation</a></li>
            <li><a href="#text-based-user-interfaces">Text-based User Interfaces</a></li>
            <li><a href="#tools">Tools</a></li>
            <li><a href="#root-access">Root access</a></li>
          </ul>
        </li>
      </ul>
    </li>
    <li><a href="#setup-and-configuration">Setup and configuration</a>
      <ul>
        <li><a href="#host-freebsd-hypervisor-requirements">Host (FreeBSD Hypervisor) Requirements</a>
          <ul>
            <li><a href="#vnc-client">VNC Client</a></li>
            <li><a href="#zfs-storage">ZFS Storage</a></li>
          </ul>
        </li>
        <li><a href="#install-and-configure-tools">Install and Configure Tools</a>
          <ul>
            <li><a href="#tools">Tools</a></li>
            <li><a href="#initialize-cbsd">Initialize CBSD</a>
              <ul>
                <li><a href="#initialize-cbsd-the-quick-way">Initialize CBSD the Quick Way</a></li>
                <li><a href="#initialize-cbsd-the-long-way">Initialize CBSD the Long Way</a></li>
              </ul>
            </li>
            <li><a href="#enable-pf-networking">Enable <code class="language-plaintext highlighter-rouge">pf</code> Networking</a></li>
            <li><a href="#load-kernel-modules">Load kernel modules</a></li>
          </ul>
        </li>
      </ul>
    </li>
    <li><a href="#create-our-linux-virtual-machine">Create our Linux Virtual Machine</a>
      <ul>
        <li><a href="#notes">Notes</a></li>
        <li><a href="#configure-the-vm">Configure the VM</a></li>
        <li><a href="#start-the-vm">Start the VM</a></li>
        <li><a href="#install-ubuntu">Install Ubuntu</a></li>
        <li><a href="#clean-up">Clean up</a></li>
      </ul>
    </li>
    <li><a href="#references">References</a></li>
  </ul>

</details>

<h1 id="intro">Intro</h1>

<p>The <a href="https://www.freebsd.org/">FreeBSD</a> operating system contains innumerable
powerful features. One of these features is
<a href="https://wiki.freebsd.org/bhyve"><code class="language-plaintext highlighter-rouge">bhyve</code></a>, its native type 2 (OS-level)
hypervisor, which can host virtual machines running multiple different OSes,
including Linux.</p>

<p>This post will walk you through creating a Linux virtual machine on FreeBSD
using the <a href="https://cbsd.io/">CBSD</a> tool, which greatly simplifies creating
and managing <code class="language-plaintext highlighter-rouge">bhyve</code> VMs.</p>

<p><strong>Note</strong>: This tutorial is meant for a learning experiment only. It is not
meant for use setting up production systems. It
skips most security features and sets up no fault tolerance.</p>

<h2 id="audience">Audience</h2>

<p>This tutorial assumes you have basic FreeBSD or Linux command-line or system
administration skills and have gone through the process of
<a href="https://docs.freebsd.org/en/books/handbook/bsdinstall/">installing FreeBSD</a>.</p>

<h2 id="freebsd-tips-for-linux-people">FreeBSD Tips for Linux People</h2>

<h3 id="software-installation">Software installation</h3>

<p>FreeBSD has a very mature and reliable software package management system and
a library of third-party packages similar to most Linux distributions. You can
<a href="https://docs.freebsd.org/en/books/handbook/ports/#pkgng-intro">install pre-compiled binary packages using
<code class="language-plaintext highlighter-rouge">pkg</code></a> or you
can compile from source code using the <a href="https://docs.freebsd.org/en/books/handbook/ports/#ports-using"><code class="language-plaintext highlighter-rouge">ports</code>
collection</a>.</p>

<p>I generally compile from <code class="language-plaintext highlighter-rouge">ports</code>, which allows custom compile-time options and
can sometimes be more up-to-date, but <code class="language-plaintext highlighter-rouge">pkg</code> should be fine and definitely much
faster.</p>

<h3 id="text-based-user-interfaces">Text-based User Interfaces</h3>

<p>FreeBSD uses a very distinctive style of interactive menus. If you compile
from <code class="language-plaintext highlighter-rouge">ports</code>, you will see it a lot. CBSD also uses it.</p>

<div align="center">
<img src="/assets/images/2022/09/ui-example.png" alt="Screenshot of an example of the FreeBSD user interface, with its light blue background, checkboxes, and Ok and Cancel buttons" />
<br />
<i><small>
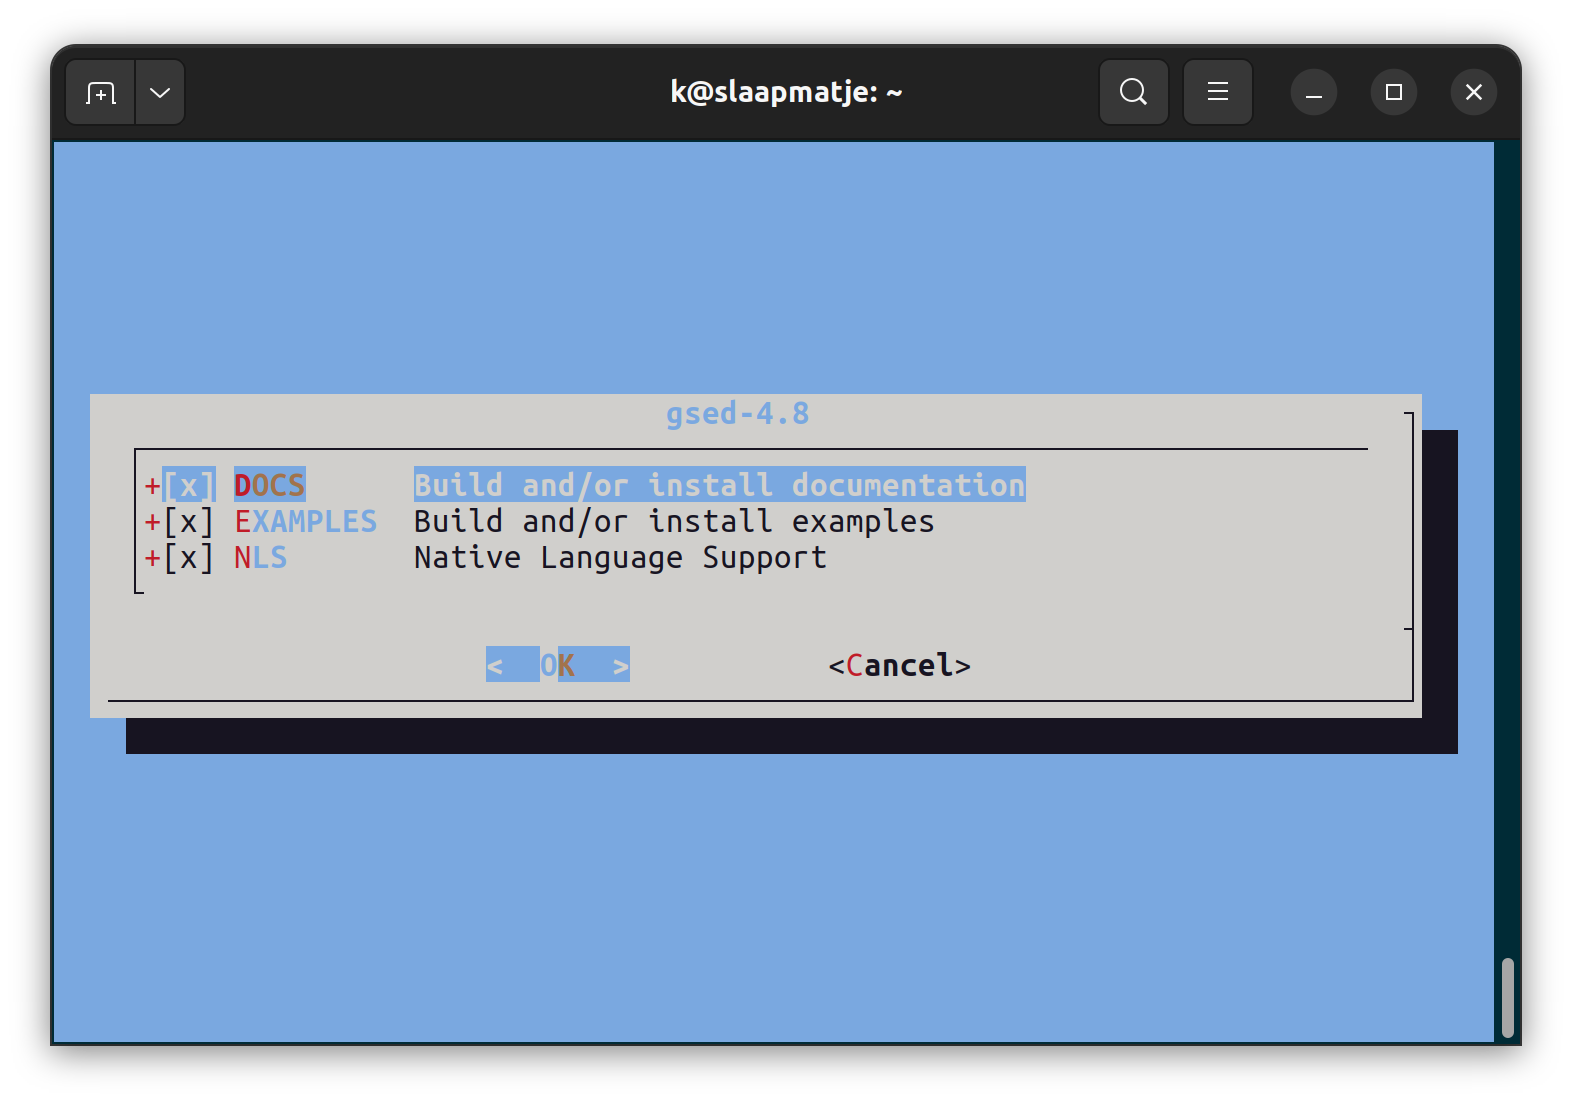
The distinctive FreeBSD interactive interface with its shadow box menu and its
light blue background
</small></i>
</div>
<p><br /></p>

<ul>
  <li>To navigate the menu: use the <code class="language-plaintext highlighter-rouge">&lt;up/down&gt;</code> arrow keys</li>
  <li>To change an option: navigate to that line, press the spacebar.
    <ul>
      <li>If the item is a checkbox, it will toggle the selection</li>
      <li>A pop-up will appear if the option is a multi-choice or a text box entry</li>
    </ul>
  </li>
</ul>

<p>When you have finished the configuration, use the <code class="language-plaintext highlighter-rouge">&lt;left&gt;/&lt;right&gt;</code> arrow keys to
navigate the options below the menu. Select <code class="language-plaintext highlighter-rouge">&lt;Ok&gt;</code> to confirm and hit enter.</p>

<h3 id="tools">Tools</h3>

<ul>
  <li>Your favorite Linux command-line tools like <code class="language-plaintext highlighter-rouge">grep</code>, <code class="language-plaintext highlighter-rouge">sed</code>, <code class="language-plaintext highlighter-rouge">awk</code>, and
<code class="language-plaintext highlighter-rouge">find</code> are all here but they sometimes behave a little differently than
on GNU/Linux.</li>
  <li>If you absolutely need the GNU versions, you can usually install them via
packages or ports, with <code class="language-plaintext highlighter-rouge">g</code> or <code class="language-plaintext highlighter-rouge">gnu</code> prefixed to the name (<code class="language-plaintext highlighter-rouge">gnugrep</code>,
<code class="language-plaintext highlighter-rouge">gsed</code>, etc.)</li>
  <li><code class="language-plaintext highlighter-rouge">bash</code> is also not installed by default. You can install it via <code class="language-plaintext highlighter-rouge">pkg</code> or
<code class="language-plaintext highlighter-rouge">ports</code></li>
</ul>

<h3 id="root-access">Root access</h3>

<p><code class="language-plaintext highlighter-rouge">sudo</code> access is <strong>not</strong> set up automatically, unlike many Linux distributions.
In the default installation, FreeBSD expects users needing root access to be
added to the <code class="language-plaintext highlighter-rouge">wheel</code> group (in <code class="language-plaintext highlighter-rouge">/etc/group</code>) and to <code class="language-plaintext highlighter-rouge">su</code> to root, using the
root password to authenticate. If this is an important or shared host, you
can <a href="https://docs.freebsd.org/en/books/handbook/security/#security-sudo">configure
sudo</a></p>

<p>The <code class="language-plaintext highlighter-rouge">root</code> user also defaults to <code class="language-plaintext highlighter-rouge">csh</code> as its login shell. You probably want
to install <code class="language-plaintext highlighter-rouge">bash</code> and use that instead.</p>

<h1 id="setup-and-configuration">Setup and configuration</h1>

<h2 id="host-freebsd-hypervisor-requirements">Host (FreeBSD Hypervisor) Requirements</h2>

<ul>
  <li>CPUs must support FreeBSD bhyve virtualization (see <a href="https://www.freebsd.org/doc/handbook/virtualization-host-bhyve.html">the FreeBSD Handbook page on bhyve</a> for compatible CPUs)</li>
  <li>FreeBSD: At least <code class="language-plaintext highlighter-rouge">13.0-CURRENT</code>. I tested this on <code class="language-plaintext highlighter-rouge">13.1-RELEASE</code></li>
  <li>File system for VM storage: <a href="https://docs.freebsd.org/en/books/handbook/zfs/">ZFS</a>
    <ul>
      <li>If you don’t want to install root on ZFS, that’s fine. You can create
a ZFS pool on another disk or disk partition.</li>
      <li>I installed <code class="language-plaintext highlighter-rouge">13.1-RELEASE</code> as ZFS-on-root and let the installer
use its default partitions. Previous FreeBSD installers may require
 <a href="/2020/10/25/adventures-in-freebernetes-installing-freebsd/#zfs-on-root">additional ZFS configuration</a>
        <ul>
          <li>Static IP. If your host’s IP address changes, you may have to
 reconfigure CBSD later.</li>
        </ul>
      </li>
    </ul>
  </li>
</ul>

<h3 id="vnc-client">VNC Client</h3>

<p>To connect to the console of the new VM during the installation phase, you
will need a VNC (Virtual Network Computing) client on a graphics-based host
(for example, Windows or a
Linux desktop). When connecting from a Linux host, I like
the <a href="https://tigervnc.org/">TigerVNC</a> client, which is available as a
pre-built package for many Linux distros.</p>

<h3 id="zfs-storage">ZFS Storage</h3>

<p>These instructions assume you have a
<a href="https://docs.freebsd.org/en/books/handbook/zfs/">ZFS pool</a> of reasonable
size and it’s named <code class="language-plaintext highlighter-rouge">zpool</code>. “Reasonable size” depends on how many VMs you
want to create, but let’s assume a bare minimum of 10-20Gb per VM.</p>

<h2 id="install-and-configure-tools">Install and Configure Tools</h2>

<h3 id="tools-1">Tools</h3>

<p>You will need to install the following via the <code class="language-plaintext highlighter-rouge">pkg</code> command or by compiling
the <code class="language-plaintext highlighter-rouge">port</code>. The <code class="language-plaintext highlighter-rouge">port</code> group is in parentheses.</p>

<ul>
  <li><code class="language-plaintext highlighter-rouge">git</code> (<code class="language-plaintext highlighter-rouge">devel</code>)</li>
  <li><code class="language-plaintext highlighter-rouge">CBSD</code> (<code class="language-plaintext highlighter-rouge">sysutils</code>)</li>
  <li><code class="language-plaintext highlighter-rouge">nsd</code> (<code class="language-plaintext highlighter-rouge">dns</code>)</li>
  <li><code class="language-plaintext highlighter-rouge">tmux</code> (<code class="language-plaintext highlighter-rouge">sysutils</code>)</li>
</ul>

<h3 id="initialize-cbsd">Initialize CBSD</h3>

<p>Before we run CBSD the first time, we need to
initialize its configuration. You can find the default values in 
<code class="language-plaintext highlighter-rouge">/usr/local/cbsd/share/initenv.conf</code> but we’re going to change a few of those.</p>

<p>In addition to populating <code class="language-plaintext highlighter-rouge">/usr/cbsd</code> (the “workdir”) and writing
configuration files, the <code class="language-plaintext highlighter-rouge">initenv</code> subcommand given the
above values will also append boot-time CBSD options to <code class="language-plaintext highlighter-rouge">/etc/rc.conf</code> and
<code class="language-plaintext highlighter-rouge">/boot/loader.conf</code>.</p>

<p>You can run the <code class="language-plaintext highlighter-rouge">initenv</code> subcommand one of two ways:</p>
<ol>
  <li>Interactively. This is long and rather confusing if you don’t know what
you’re doing.</li>
  <li>Using a seed file with the values pre-set.</li>
</ol>

<p><strong>Important: all <code class="language-plaintext highlighter-rouge">CBSD</code> commands need to be run as <code class="language-plaintext highlighter-rouge">root</code></strong></p>

<p><strong>Notes:</strong></p>
<ul>
  <li>My host has the hostname <code class="language-plaintext highlighter-rouge">nucklehead</code> and the IP address
192.168.1.76. You should use your own host’s values for those options.</li>
  <li>For the RSYNC and RACCT questions, because this is a non-production system,
you probably want to answer disable them to save resources</li>
  <li>CBSD version 13.1.13 seems to ignore the <code class="language-plaintext highlighter-rouge">racct=0</code> option (don’t enable
accounting). After initialization is done, you can remove the line
<code class="language-plaintext highlighter-rouge">kern.racct.enable=1</code> from <code class="language-plaintext highlighter-rouge">/boot/loader.conf</code></li>
  <li><code class="language-plaintext highlighter-rouge">initenv</code> may offer different configuration questions depending on answers
to previous questions</li>
</ul>

<h4 id="initialize-cbsd-the-quick-way">Initialize CBSD the Quick Way</h4>

<details>
  <summary><b>Configure CBSD from the command line</b></summary>

  <ol>
    <li>Save the following to a file called <code class="language-plaintext highlighter-rouge">initenv.conf</code>
      <div class="language-shell highlighter-rouge"><div class="highlight"><pre class="highlight"><code><span class="c"># cbsd initenv preseed file for nucklehead host</span>
<span class="c"># refer to the /usr/local/cbsd/share/initenv.conf</span>
<span class="c"># for description.</span>
<span class="c">#</span>
<span class="nv">nodeip</span><span class="o">=</span><span class="s2">"192.168.1.76"</span>
<span class="nv">nodename</span><span class="o">=</span><span class="s2">"nucklehead"</span>
<span class="nv">jnameserver</span><span class="o">=</span><span class="s2">"10.0.0.1"</span>
<span class="nv">nodeippool</span><span class="o">=</span><span class="s2">"10.0.0.0/16"</span>
<span class="nv">nat_enable</span><span class="o">=</span><span class="s2">"pf"</span>
<span class="nv">fbsdrepo</span><span class="o">=</span><span class="s2">"1"</span>
<span class="nv">zfsfeat</span><span class="o">=</span><span class="s2">"1"</span>
<span class="nv">parallel</span><span class="o">=</span><span class="s2">"0"</span>
<span class="nv">stable</span><span class="o">=</span><span class="s2">"0"</span>
<span class="nv">sqlreplica</span><span class="o">=</span><span class="s2">"0"</span>
<span class="nv">statsd_bhyve_enable</span><span class="o">=</span><span class="s2">"0"</span>
<span class="nv">statsd_jail_enable</span><span class="o">=</span><span class="s2">"0"</span>
<span class="nv">statsd_hoster_enable</span><span class="o">=</span><span class="s2">"0"</span>
<span class="nv">ipfw_enable</span><span class="o">=</span><span class="s2">"0"</span>
<span class="nv">racct</span><span class="o">=</span><span class="s2">"0"</span>
<span class="nv">natip</span><span class="o">=</span><span class="s2">"10.0.0.1"</span>
<span class="nv">initenv_modify_sudoers</span><span class="o">=</span><span class="s2">""</span>
<span class="nv">initenv_modify_rcconf_hostname</span><span class="o">=</span><span class="s2">""</span>
<span class="nv">initenv_modify_rcconf_cbsd_workdir</span><span class="o">=</span><span class="s2">"1"</span>
<span class="nv">initenv_modify_rcconf_cbsd_enable</span><span class="o">=</span><span class="s2">"1"</span>
<span class="nv">initenv_modify_rcconf_rcshutdown_timeout</span><span class="o">=</span><span class="s2">"1"</span>
<span class="nv">initenv_modify_syctl_rcshutdown_timeout</span><span class="o">=</span><span class="s2">""</span>
<span class="nv">initenv_modify_rcconf_cbsdrsyncd_enable</span><span class="o">=</span><span class="s2">""</span>
<span class="nv">initenv_modify_rcconf_cbsdrsyncd_flags</span><span class="o">=</span><span class="s2">""</span>
<span class="nv">initenv_modify_cbsd_homedir</span><span class="o">=</span><span class="s2">"1"</span>
<span class="nv">workdir</span><span class="o">=</span><span class="s2">"/usr/cbsd"</span>
</code></pre></div>      </div>
    </li>
    <li>Edit <code class="language-plaintext highlighter-rouge">nodeip</code> to you FreeBSD’s IP address and <code class="language-plaintext highlighter-rouge">nodename</code> to the hostname</li>
    <li>Run
      <div class="language-shell highlighter-rouge"><div class="highlight"><pre class="highlight"><code><span class="nb">env </span><span class="nv">workdir</span><span class="o">=</span>/usr/cbsd /usr/local/cbsd/sudoexec/initenv <span class="nv">inter</span><span class="o">=</span>0 <span class="sb">`</span><span class="nb">pwd</span><span class="sb">`</span>/initenv.conf
</code></pre></div>      </div>
    </li>
  </ol>

</details>

<h4 id="initialize-cbsd-the-long-way">Initialize CBSD the Long Way</h4>

<details>
  <summary><b>Configure CBSD interactively</b></summary>

  <p>This example shows a run-through of an interactive configuration, using the
command</p>

  <p><code class="language-plaintext highlighter-rouge">env workdir=/usr/cbsd /usr/local/cbsd/sudoexec/initenv</code></p>

  <script src="https://gist.github.com/kbruner/d76c7823d519a1af46f1c52dedf00057.js"></script>

</details>

<h3 id="enable-pf-networking">Enable <code class="language-plaintext highlighter-rouge">pf</code> Networking</h3>

<p>The <a href="https://docs.freebsd.org/en/books/handbook/firewalls/#firewalls-pf"><code class="language-plaintext highlighter-rouge">pf</code>
firewall</a>
needs some additional setup.</p>

<div class="language-shell highlighter-rouge"><div class="highlight"><pre class="highlight"><code><span class="c"># Create the configuration file</span>
<span class="nb">cp</span> /usr/local/examples/pf.conf /etc/pf.conf
<span class="c"># Enable the NAT gateway</span>
<span class="nb">echo</span> <span class="s1">'gateway_enable="YES"'</span> <span class="o">&gt;&gt;</span> /etc/rc.conf
<span class="c"># Start</span>
service start
</code></pre></div></div>

<h3 id="load-kernel-modules">Load kernel modules</h3>

<p>We need to set up several kernel modules. We load them now then add them to
<code class="language-plaintext highlighter-rouge">/boot/loader.conf</code> so they will load automatically at boot time.</p>

<div class="language-shell highlighter-rouge"><div class="highlight"><pre class="highlight"><code><span class="k">for </span>module <span class="k">in </span>vmm if_tuntap if_bridge nmdm<span class="p">;</span> <span class="k">do
    </span>kldload <span class="s2">"</span><span class="nv">$module</span><span class="s2">"</span>
    <span class="nb">echo</span> <span class="s2">"</span><span class="k">${</span><span class="nv">module</span><span class="k">}</span><span class="s2">_load=</span><span class="se">\"</span><span class="s2">YES</span><span class="se">\"</span><span class="s2">"</span> <span class="o">&gt;&gt;</span> /boot/loader.conf
<span class="k">done</span>
</code></pre></div></div>

<h1 id="create-our-linux-virtual-machine">Create our Linux Virtual Machine</h1>

<p>We’re finally ready to create our VM.</p>

<p>We’re going to select the latest available supported version of Ubuntu. Note
that this may not be the current Ubuntu release. We’ll cover how to configure
releases with no CBSD support in a later post.</p>

<h2 id="notes">Notes</h2>

<ul>
  <li>In this example, we are going to use Ubuntu Server 22.04.</li>
  <li>Your menu options may differ if you’re using a different version of CBSD.</li>
  <li>We will configure the VM manually through the UI. A later post will show how
to configure from a template file instead.</li>
</ul>

<h2 id="configure-the-vm">Configure the VM</h2>

<p>Run <code class="language-plaintext highlighter-rouge">cbsd bconstruct-tui</code> to start the VM configuration.</p>

<div align="center">
<img src="/assets/images/2022/09/bconstruct-tui.png" alt="Screenshot of a menu to cover a VM in CBSD. The available options include OS type, hostname, and network options" />
<br />
<i><small>
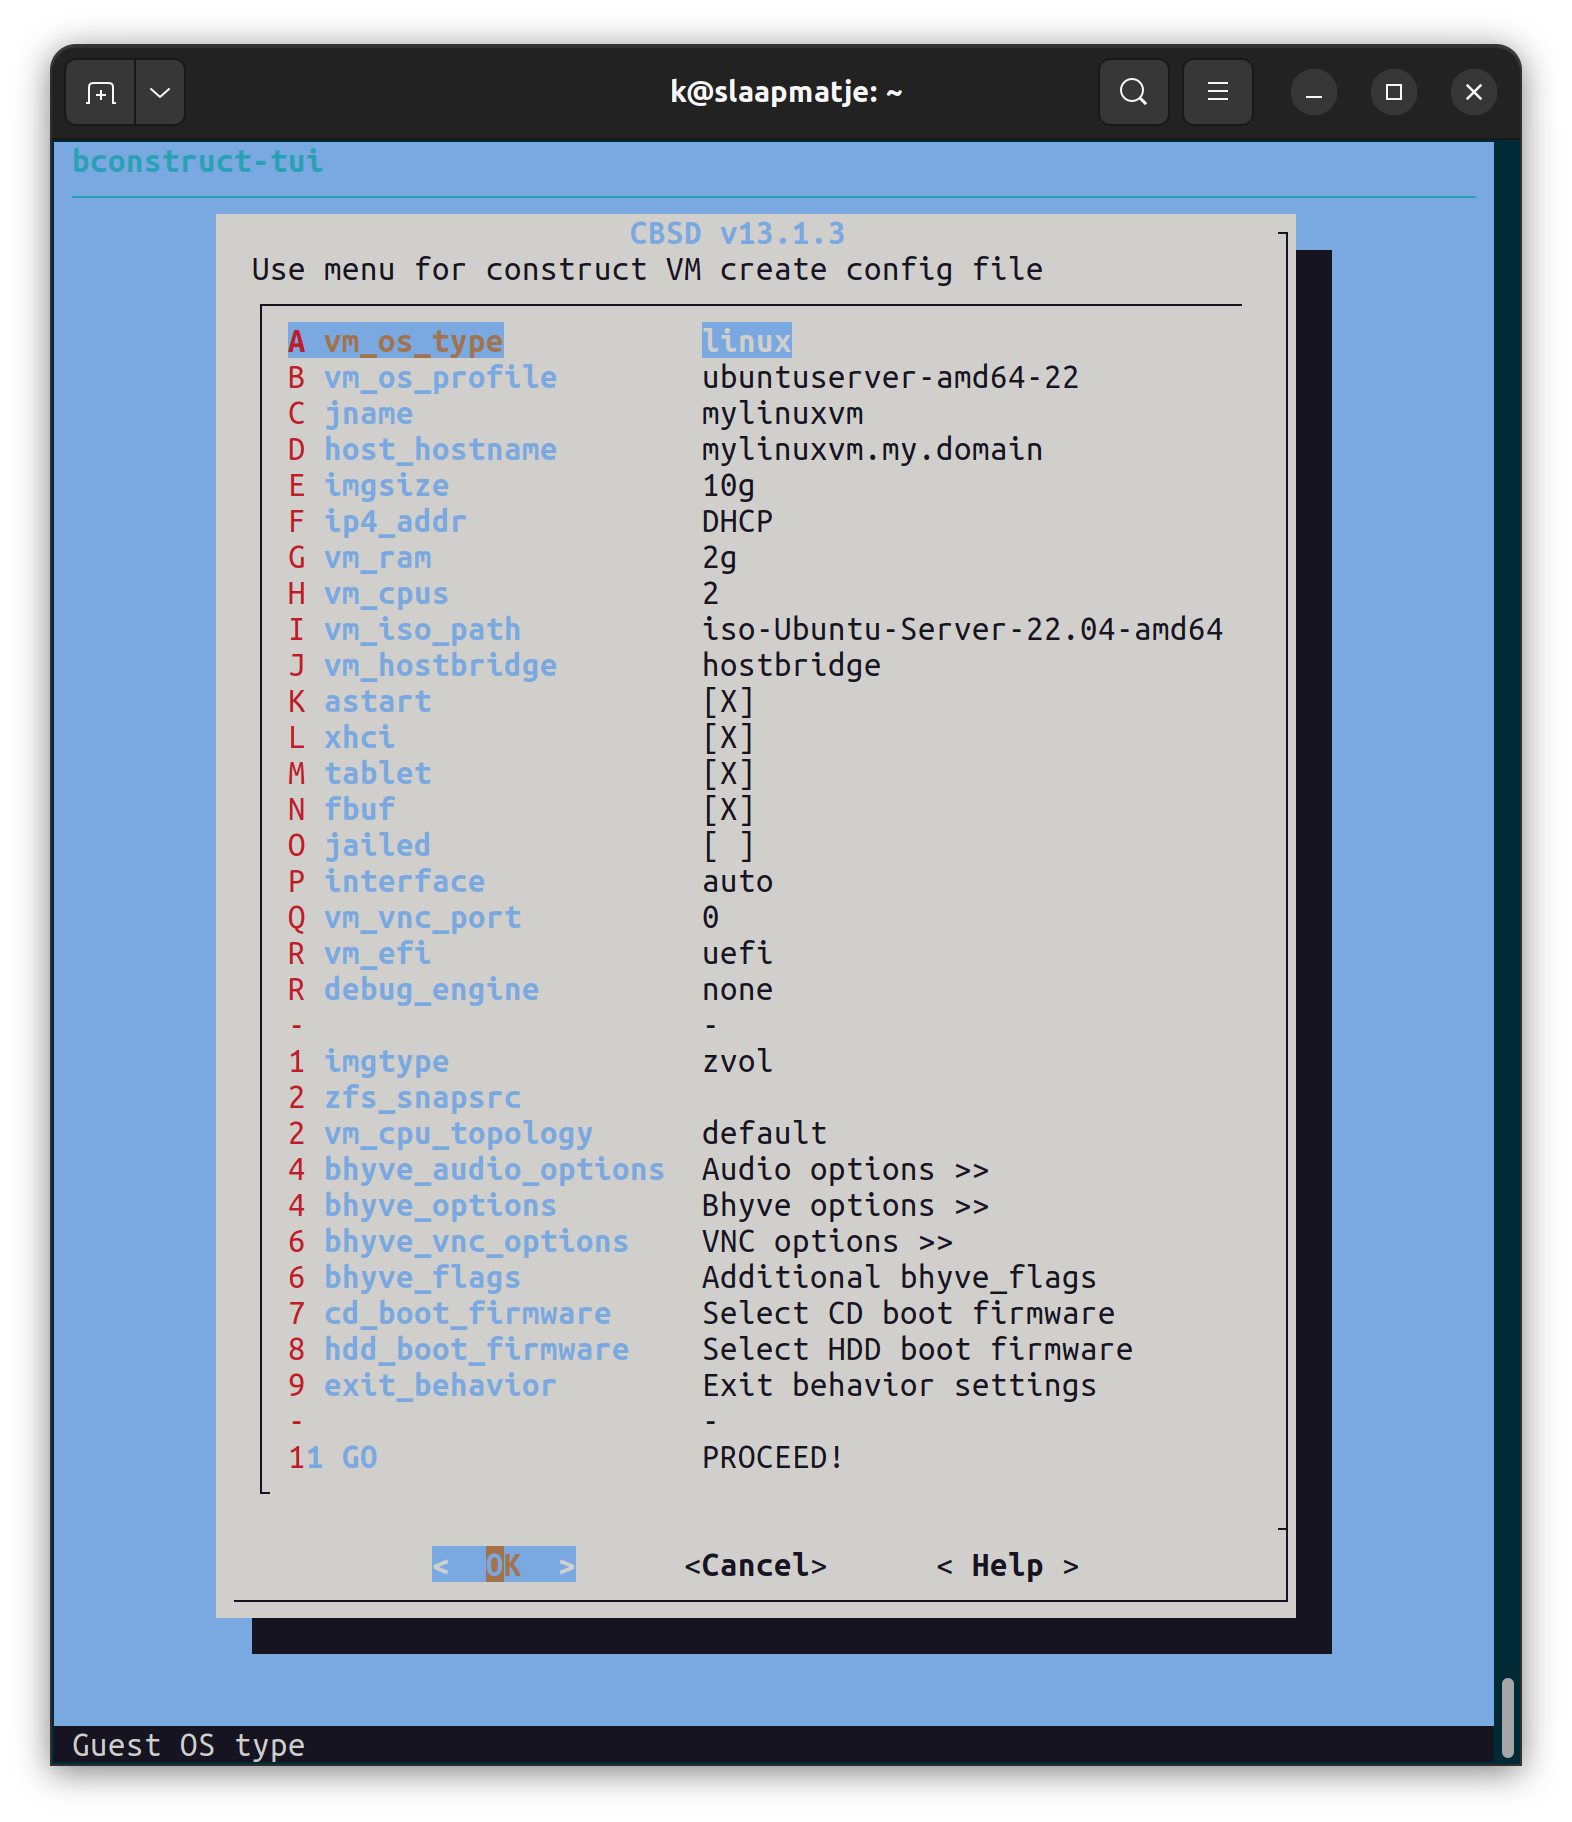
This menu shows my configuration. You may want to tweak `jname` (the VM's
identifying name), `host_hostname`, or network options.
</small></i>
</div>
<p><br /></p>

<p>We also want to set up our VNC endpoint so we can connect to the VM after it
boots.</p>

<p>Navigate to the <code class="language-plaintext highlighter-rouge">bhyve_vnc_options</code> option and
press enter to bring up the sub-menu.</p>

<div align="center">
<img src="/assets/images/2022/09/vnc-menu.png" alt="Screenshot of the bconstruct-tui sub-menu for configuring the VNC endpoint" />
<br />
<i><small>
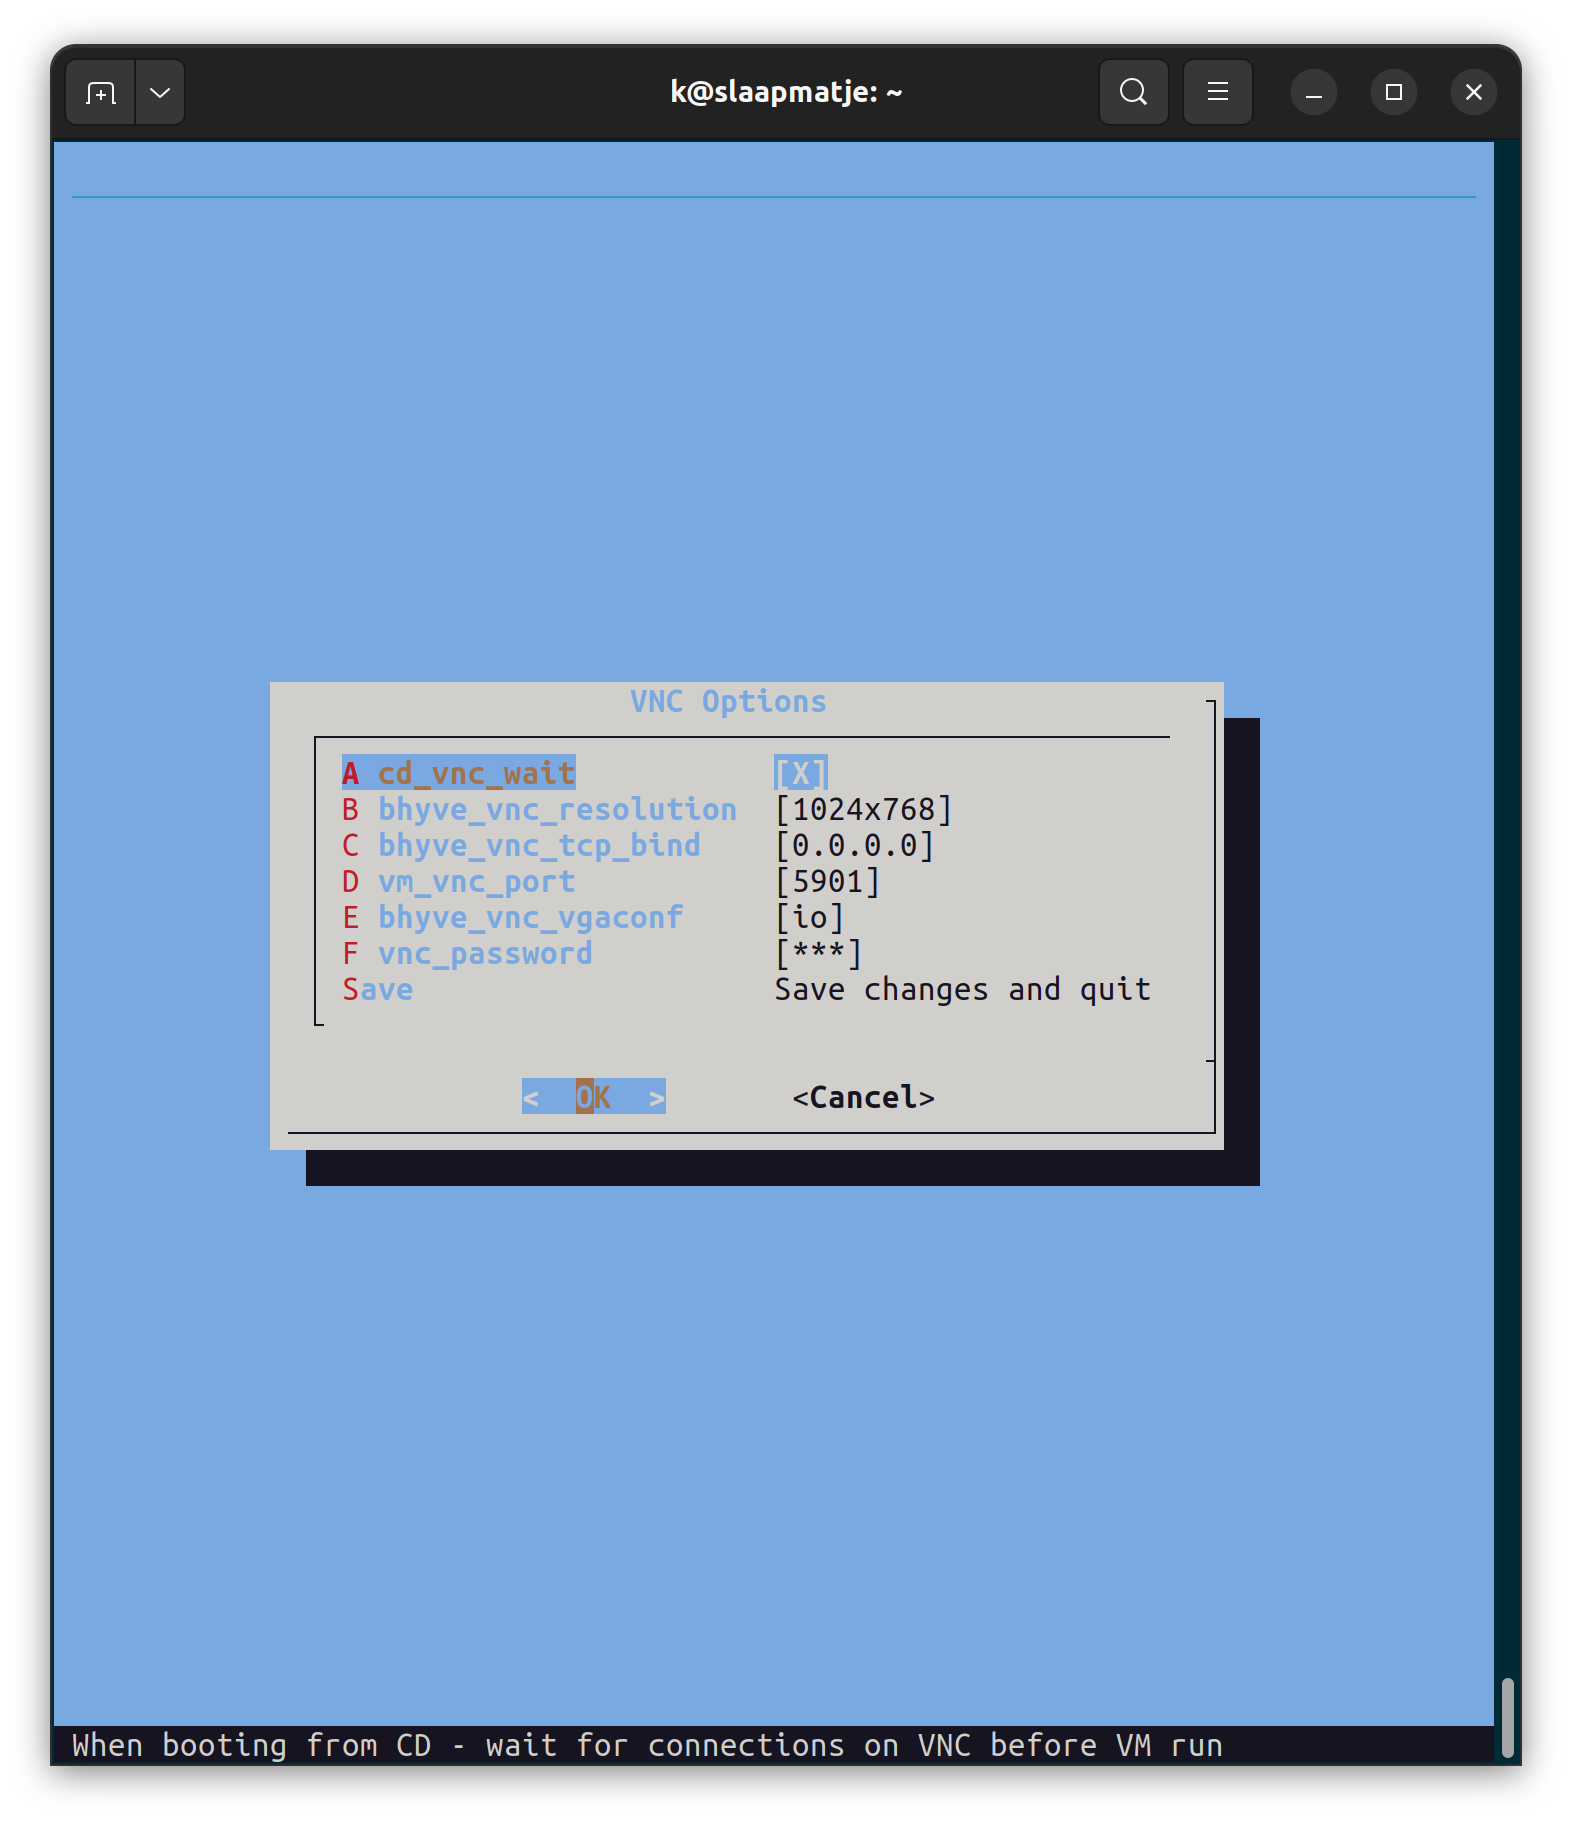
VNC configuration sub-menu
</small></i>
</div>
<p><br /></p>

<p>VNC options:</p>

<ul>
  <li>If you connect to your hypervisor via SSH, you want to change the bind IP
(<code class="language-plaintext highlighter-rouge">bhyve_vnc_tcp_bind</code>) to
that host’s IP address. You can also set it to 0.0.0.0 to bind it to all the
network interfaces on the host hypervisor.</li>
  <li>If the <code class="language-plaintext highlighter-rouge">vm_vnc_port</code> is set to 0, a random port number will be assigned.
We’ll set it here to 5901. Be careful of port collisions if you have more
than one VM on the host. They each need a unique VNC port.</li>
  <li>Be sure to set the password!</li>
  <li>Select <code class="language-plaintext highlighter-rouge">Save</code> when done to go back to the main menu.</li>
</ul>

<p>Once you’ve finished the configuration, select <code class="language-plaintext highlighter-rouge">Ok</code> in the main menu.
You will then be asked if you want to create the vm immediately. We’ll select
<code class="language-plaintext highlighter-rouge">yes</code> here.</p>

<h2 id="start-the-vm">Start the VM</h2>

<p>Our VM still hasn’t started running, but CBSD has created its configuration.
We can start the VM by running one more command.</p>

<p><code class="language-plaintext highlighter-rouge">cbsd bstart mylinuxvm</code></p>

<p>The first time you start an image with a specific operating system, you will
need to wait as the image is pulled from the internet, which can take take
several minutes or more, depending on the speed of your internet connection.
CBSD will try to find the fastest mirror for you. Once the image for a
specific Linux version has been downloaded, though, you can re-use it for more
VMs with the same version, which will speed up the process greatly.</p>

<div class="language-text highlighter-rouge"><div class="highlight"><pre class="highlight"><code>[root@nucklehead ~]# cbsd bstart mylinuxvm
init_systap: waiting for link: em0
Looks like /usr/cbsd/vm/mylinuxvm/dsk1.vhd is empty.
May be you want to boot from CD?
[yes(1) or no(0)]
1
Temporary boot device: cd
vm_iso_path: iso-Ubuntu-Server-22.04-amd64
No such media: /usr/cbsd/src/iso/cbsd-iso-ubuntu-22.04-live-server-amd64.iso in /usr/cbsd/src/iso
Shall i download it from: http://mirror.truenetwork.ru/ubuntu-releases/22.04/ http://ubnt-releases.xfree.com.ar/ubuntu-releases/22.04/ http://mirror.pop-sc.rnp.br/mirror/ubuntu-releases/22.04/ http://mirror.easyspeedy.com/ubuntu-iso/22.04/ http://ubuntu.mirrors.ovh.net/ubuntu-releases/22.04/ http://ftp.halifax.rwth-aachen.de/ubuntu-releases/22.04/ http://ubuntu.connesi.it/22.04/ http://mirror.nl.leaseweb.net/ubuntu-releases/22.04/ http://releases.ubuntu.com/22.04/ http://mirror.waia.asn.au/ubuntu-releases/22.04/ ?
[yes(1) or no(0)]
1
Download to: /usr/cbsd/src/iso/cbsd-iso-ubuntu-22.04-live-server-amd64.iso
Scanning for fastest mirror...
             Mirror source:                       bytes/sec:
 * [ 1/17  ] http://electro.bsdstore.ru:          0
 * [ 2/17  ] http://ftp.halifax.rwth-aachen.de:   failed (http://ftp.halifax.rwth-aachen.de/ubuntu-releases/22.04/ubuntu-22.04-live-server-amd64.iso)
 * [ 3/17  ] http://mirror.easyspeedy.com:        failed (http://mirror.easyspeedy.com/ubuntu-iso/22.04/ubuntu-22.04-live-server-amd64.iso)
 * [ 4/17  ] http://mirror.nl.leaseweb.net:       failed (http://mirror.nl.leaseweb.net/ubuntu-releases/22.04/ubuntu-22.04-live-server-amd64.iso)
 * [ 5/17  ] http://mirror.pop-sc.rnp.br:         failed (http://mirror.pop-sc.rnp.br/mirror/ubuntu-releases/22.04/ubuntu-22.04-live-server-amd64.iso)
 * [ 6/17  ] http://mirror.truenetwork.ru:        failed (http://mirror.truenetwork.ru/ubuntu-releases/22.04/ubuntu-22.04-live-server-amd64.iso)
 * [ 7/17  ] http://mirror.waia.asn.au:           failed (http://mirror.waia.asn.au/ubuntu-releases/22.04/ubuntu-22.04-live-server-amd64.iso)
 * [ 8/17  ] http://releases.ubuntu.com:          failed (http://releases.ubuntu.com/22.04/ubuntu-22.04-live-server-amd64.iso)
 * [ 9/17  ] http://ubnt-releases.xfree.com.ar:   failed (http://ubnt-releases.xfree.com.ar/ubuntu-releases/22.04/ubuntu-22.04-live-server-amd64.iso)
 * [ 10/17 ] http://ubuntu.connesi.it:            failed (http://ubuntu.connesi.it/22.04/ubuntu-22.04-live-server-amd64.iso)
 * [ 11/17 ] http://ubuntu.mirrors.ovh.net:       failed (http://ubuntu.mirrors.ovh.net/ubuntu-releases/22.04/ubuntu-22.04-live-server-amd64.iso)
 * [ 12/17 ] https://clonos.ca.ircdriven.net:     593920
 * [ 13/17 ] https://clonos.us.ircdriven.net:     643072
 * [ 14/17 ] https://electrode.bsdstore.ru:       0
 * [ 15/17 ] https://mirror.bsdstore.ru:          0
 * [ 16/17 ] https://mirror2.bsdstore.ru:         0
 * [ 17/17 ] https://plug-mirror.rcac.purdue.edu: 8125098
 Winner: https://plug-mirror.rcac.purdue.edu/cbsd/iso/
Processing: https://plug-mirror.rcac.purdue.edu/cbsd/iso/ubuntu-22.04-live-server-amd64.iso
retrieve ubuntu-22.04-live-server-amd64.iso from plug-mirror.rcac.purdue.edu, size: 1g
/usr/cbsd/src/iso/cbsd-iso-ubuntu-22.04-live-s        1398 MB   10 MBps 02m08s
Checking CRC sum: 84aeaf7823c8c61baa0ae862d0a06b03409394800000b3235854a6b38eb4856f...Passed
Automatically register iso as: cbsd-iso-ubuntu-22.04-live-server-amd64.iso
Path already exist for: iso-Ubuntu-Server-22.04-amd64
VRDP is enabled. VNC bind/port: 192.168.1.76:5901
For attach VM console, use: vncviewer 192.168.1.76:5901
Resolution: 1024x768.
VNC pass: vncpass

Warning!!! You are running a system with open VNC port to the world wich is not secure
Please use IP filter or balancer with password to restrict VNC port access
Or change vnc_bind params to 127.0.0.1 and reboot VM after maintenance work

bhyve renice: 1
Waiting for PID.
PID: 75699
bstart done in 4 minutes and 16 seconds
[root@nucklehead ~]#
</code></pre></div></div>

<p>We can check the status of our vm:</p>

<p><code class="language-plaintext highlighter-rouge">cbsd bls mylinuxvm</code></p>
<div class="language-plaintext highlighter-rouge"><div class="highlight"><pre class="highlight"><code>[root@nucklehead ~]# cbsd bls mylinuxvm
JNAME      JID    VM_RAM  VM_CURMEM  VM_CPUS  PCPU  VM_OS_TYPE  IP4_ADDR  STATUS  VNC
mylinuxvm  75699  2048    0          2        0     linux       DHCP      On      0.0.0.0:5901
</code></pre></div></div>

<p>Once it starts, we can open our VNC client. For the VNC server, you need to
enter the IP address of your FreeBSD host and the port that you assigned
during configuration, e.g. <code class="language-plaintext highlighter-rouge">192.168.1.76:5901</code></p>

<h2 id="install-ubuntu">Install Ubuntu</h2>

<p>A window should open showing the the Linux boot. Depending on how long it
takes you to connect, you may see the <code class="language-plaintext highlighter-rouge">grub</code> boot menu or the Ubuntu installer
may have already started. Go through the installation process.</p>

<div align="center">
<img src="/assets/images/2022/09/vnc1.png" alt="Screenshot of a VNC client showing the console of a booting Linux server" />
<br />
<i><small>
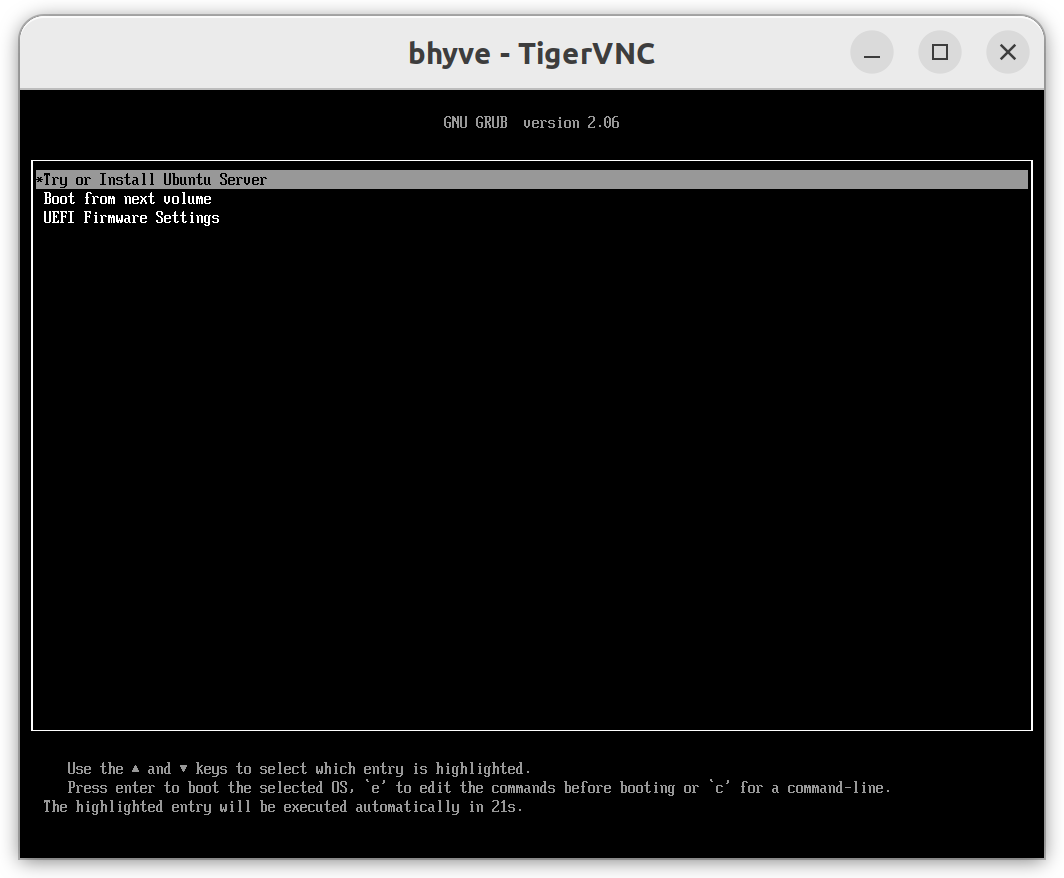
Success! We're booting!
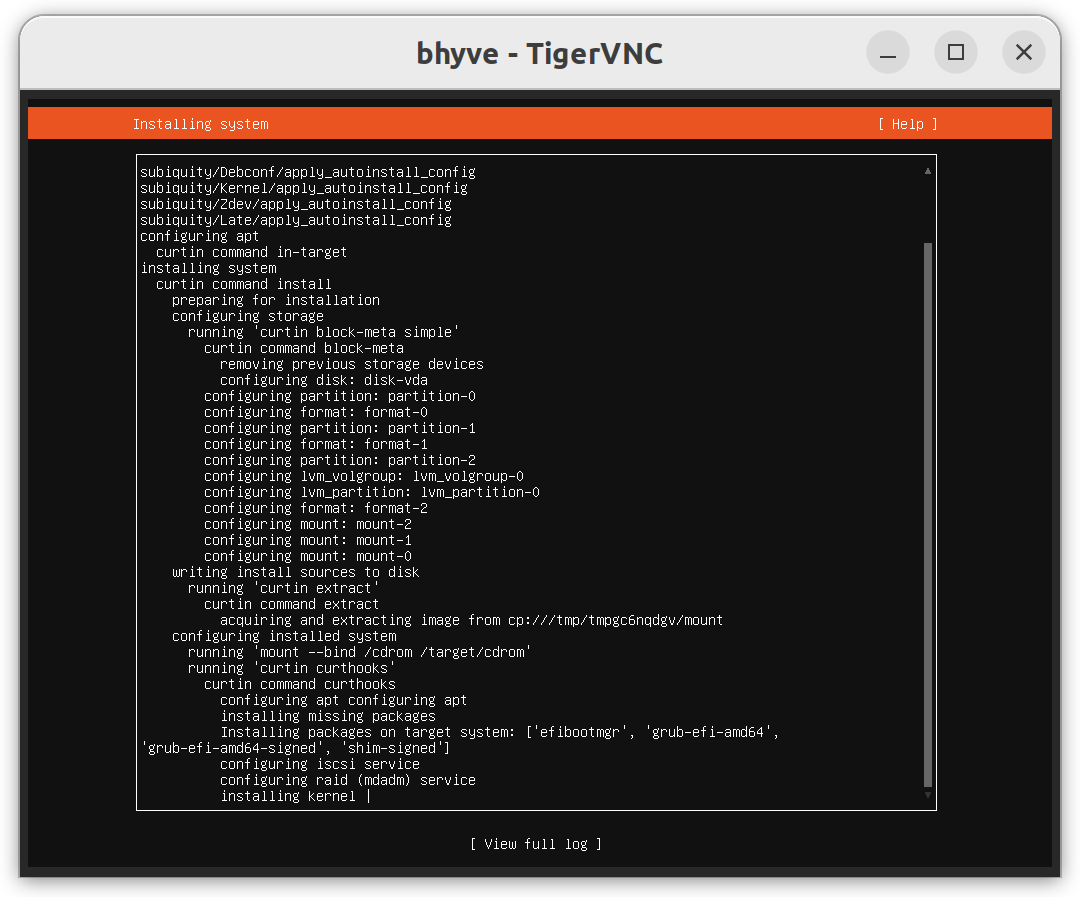
</small></i>
</div>
<p><br /></p>

<div align="center">
<img src="/assets/images/2022/09/vnc2.png" alt="Screenshot of Ubuntu text installer completing the installation process" />
<br />
<i><small>
And installing!
</small></i>
</div>
<p><br /></p>

<p>Rebooting will usually close the VNC client, forcing reconnection. The host
should boot to console, allowing you to log in with the username and password
you chose during installation.
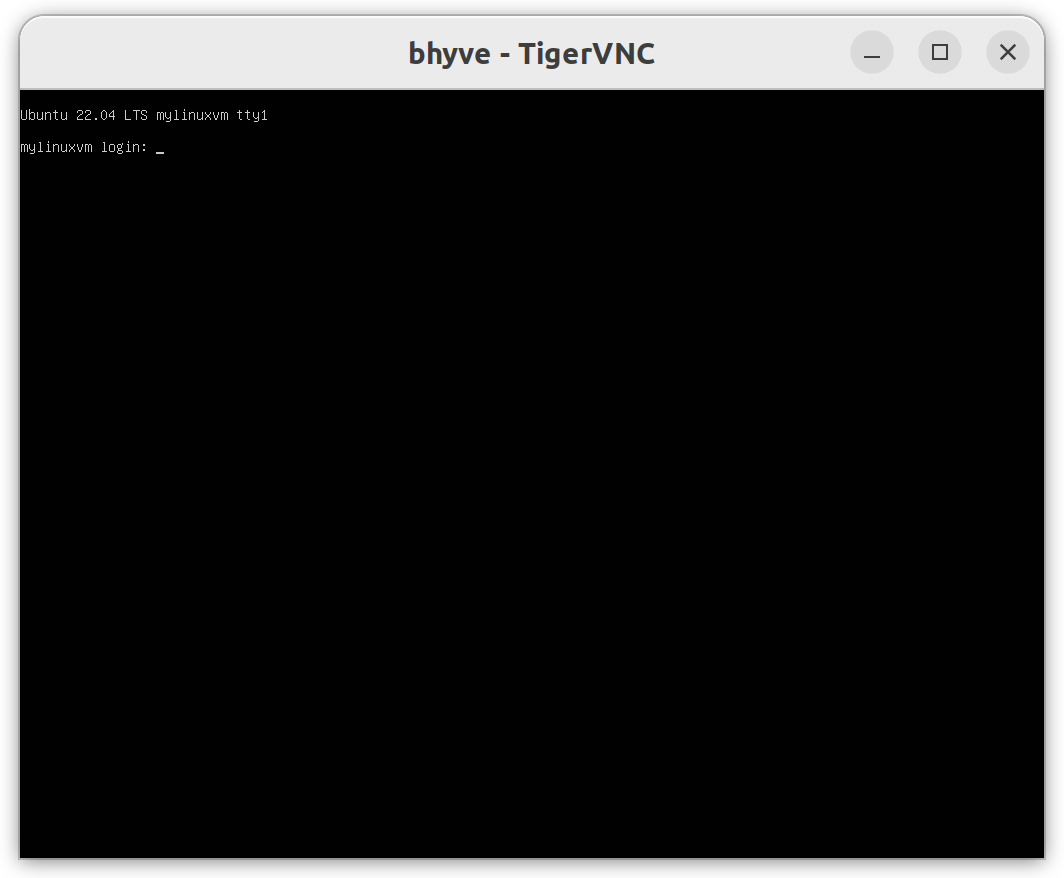
</p>

<div align="center">
<img src="/assets/images/2022/09/mylinuxvm.png" alt="Screenshot of a VNC client showing a Linux console at the text login prompt!" />
<br />
<i><small>
Voila!
</small></i>
</div>
<p><br /></p>

<h2 id="clean-up">Clean up</h2>

<p>Once you’re done with the VM, you can run the following to stop and free the
resources.</p>
<div class="language-shell highlighter-rouge"><div class="highlight"><pre class="highlight"><code><span class="c"># Stop the VM</span>
cbsd bstop <span class="nv">jname</span><span class="o">=</span>mylinuxvm
<span class="c"># Delete the VM configuration and ZFS volume</span>
cbsd bdestroy <span class="nv">jname</span><span class="o">=</span>mylinuxvm
</code></pre></div></div>

<ul>
  <li>CBSD added some configuration options to the files to <code class="language-plaintext highlighter-rouge">/etc/rc.conf</code>
and <code class="language-plaintext highlighter-rouge">/boot/loader.conf</code> that you will want to remove.</li>
</ul>

<p>You can reboot your system to clear the following two changes, or manually
revert them. Leaving them in place until the next reboot is probably
harmless, though.</p>
<ul>
  <li>Unload the kernel modules you added via <code class="language-plaintext highlighter-rouge">kldload</code> above</li>
  <li>Remove the VM’s network interfaces, probably named <code class="language-plaintext highlighter-rouge">bridge1</code>
and <code class="language-plaintext highlighter-rouge">tap1</code>, depending how many VMs you created. You can remove these with
the command for each interface. (<strong>DO NOT</strong> try to destroy any other
interfaces! Leave <code class="language-plaintext highlighter-rouge">lo0</code> and <code class="language-plaintext highlighter-rouge">em0</code> alone!)
    <div class="language-shell highlighter-rouge"><div class="highlight"><pre class="highlight"><code>ifconfig tap1 down
ifconfig tap1 destroy
</code></pre></div>    </div>
  </li>
</ul>

<hr />

<p>And that’s it! Now you know how to create a basic Linux VM on FreeBSD bhyve!</p>

<p>If you have questions or comments, you can <a href="https://www.twitter.com/fuzzyKB">@ me on
Twitter</a>.</p>

<hr />

<h1 id="references">References</h1>

<ul>
  <li><a href="https://cbsd.io/">https://cbsd.io/</a></li>
  <li><a href="https://docs.freebsd.org/en/books/handbook/bsdinstall/">https://docs.freebsd.org/en/books/handbook/bsdinstall/</a></li>
  <li><a href="https://docs.freebsd.org/en/books/handbook/firewalls/#firewalls-pf">https://docs.freebsd.org/en/books/handbook/firewalls/#firewalls-pf</a></li>
  <li><a href="https://docs.freebsd.org/en/books/handbook/ports/#pkgng-intro">https://docs.freebsd.org/en/books/handbook/ports/#pkgng-intro</a></li>
  <li><a href="https://docs.freebsd.org/en/books/handbook/ports/#ports-using">https://docs.freebsd.org/en/books/handbook/ports/#ports-using</a></li>
  <li><a href="https://docs.freebsd.org/en/books/handbook/security/#security-sudo">https://docs.freebsd.org/en/books/handbook/security/#security-sudo</a></li>
  <li><a href="https://docs.freebsd.org/en/books/handbook/zfs/">https://docs.freebsd.org/en/books/handbook/zfs/</a></li>
  <li><a href="https://tigervnc.org/">https://tigervnc.org/</a></li>
  <li><a href="https://www.freebsd.org/">https://www.freebsd.org/</a></li>
  <li><a href="https://www.freebsd.org/doc/handbook/virtualization-host-bhyve.html">https://www.freebsd.org/doc/handbook/virtualization-host-bhyve.html</a></li>
</ul>

<hr />]]></content><author><name></name></author><category term="FreeBSD Virtualization" /><category term="freebsd" /><category term="zfs" /><category term="virtualization" /><category term="linux" /><summary type="html"><![CDATA[Getting up and running with CBSD on FreeBSD]]></summary><media:thumbnail xmlns:media="http://search.yahoo.com/mrss/" url="https://productionwithscissors.run/assets/img/header/scissors-crop-t.png" /><media:content medium="image" url="https://productionwithscissors.run/assets/img/header/scissors-crop-t.png" xmlns:media="http://search.yahoo.com/mrss/" /></entry><entry><title type="html">Mermaid Markdown for Procrastinators</title><link href="https://productionwithscissors.run/2022/08/30/mermaid-markdown/" rel="alternate" type="text/html" title="Mermaid Markdown for Procrastinators" /><published>2022-08-30T00:00:00+00:00</published><updated>2022-08-30T00:00:00+00:00</updated><id>https://productionwithscissors.run/2022/08/30/mermaid-markdown</id><content type="html" xml:base="https://productionwithscissors.run/2022/08/30/mermaid-markdown/"><![CDATA[<p>I went down the rabbit hole to look at the <a href="https://mermaid-js.github.io/mermaid/#/">Mermaid
diagram tool</a> that allows you to
generate graphs and charts of various kinds using a markdown-like syntax. A
number of <a href="https://www.markdownguide.org/">markdown</a> systems support Mermaid
now without additional tooling, including GitHub.
<a href="https://jekyllrb.com/">Jekyll</a>, which powers this site, also has a Mermaid
plugin, and it seems like it might be useful at some
point, so I decided to experiment, because what else was I going to do with
my time?</p>

<div class="mermaid">
gitGraph
   commit id: "Need a project"
   commit id: "Play with FreeBSD again"
   branch write-blog-post-on-freebsd
   checkout write-blog-post-on-freebsd
   commit id: "Start writing markdown"
   branch reinstall-freebsd
   checkout reinstall-freebsd
   commit id: "Get FreeBSD reinstalled"
   checkout write-blog-post-on-freebsd
   merge reinstall-freebsd
   commit id: "Write more markdown"
   branch install-nvim-markdown-plugin
   checkout install-nvim-markdown-plugin
   commit id: "Spend 4 hours trying to get it working"
   branch write-blog-post-about-nvim-plugins
   checkout write-blog-post-about-nvim-plugins
   commit id: "Write a post to save others from my fate"
   checkout install-nvim-markdown-plugin
   merge write-blog-post-about-nvim-plugins
   checkout write-blog-post-on-freebsd
   merge install-nvim-markdown-plugin
   branch tweak-blog-settings
   checkout tweak-blog-settings
   commit id: "Fix formatting and other shit"
   checkout write-blog-post-on-freebsd
   merge tweak-blog-settings
   branch play-with-mermaid
   checkout play-with-mermaid
   commit id: "Here we are"
</div>

<center><small><i>GitHub repo graph showing how my focus jumps between current
projects, like experimenting with FreeBSD and making superfluous updates to
this site</i></small></center>
<p><br /></p>

<p>The mermaid markdown (mmd) for this graph:</p>
<div class="language-plaintext highlighter-rouge"><div class="highlight"><pre class="highlight"><code>gitGraph
   commit id: "Need a project"
   commit id: "Play with FreeBSD again"
   branch write-blog-post-on-freebsd
   checkout write-blog-post-on-freebsd
   commit id: "Start writing markdown"
   branch reinstall-freebsd
   checkout reinstall-freebsd
   commit id: "Get FreeBSD reinstalled"
   checkout write-blog-post-on-freebsd
   merge reinstall-freebsd
   commit id: "Write more markdown"
   branch install-nvim-markdown-plugin
   checkout install-nvim-markdown-plugin
   commit id: "Spend 4 hours trying to get it working"
   branch write-blog-post-about-nvim-plugins
   checkout write-blog-post-about-nvim-plugins
   commit id: "Write a post to save others from my fate"
   checkout install-nvim-markdown-plugin
   merge write-blog-post-about-nvim-plugins
   checkout write-blog-post-on-freebsd
   merge install-nvim-markdown-plugin
   branch tweak-blog-settings
   checkout tweak-blog-settings
   commit id: "Fix formatting and other shit"
   checkout write-blog-post-on-freebsd
   merge tweak-blog-settings
   branch play-with-mermaid
   checkout play-with-mermaid
   commit id: "Here we are"
</code></pre></div></div>

<p><br /></p>

<p>To embed in an <code class="language-plaintext highlighter-rouge">.md</code> file, you can wrap it like this:
<script src="https://gist.github.com/kbruner/51023f98a7fdaffbe9d7882271ca9c97.js"></script></p>

<h2 id="rendering-to-a-file">Rendering to a file</h2>

<p>You can use the <a href="https://github.com/mermaid-js/mermaid-cli">cli</a> to write
directly to a file. You can install the cli as an <code class="language-plaintext highlighter-rouge">npm</code> package locally, but
I got dependency errors and I’m not a node person, so forget that.</p>

<p>Fortunately, they distribute a docker container. If you already have <code class="language-plaintext highlighter-rouge">docker</code>
installed, you just need to pull the image, and you’re good to go.</p>

<p>The cli supports <code class="language-plaintext highlighter-rouge">svg</code>, <code class="language-plaintext highlighter-rouge">png</code>, <code class="language-plaintext highlighter-rouge">md</code>, and <code class="language-plaintext highlighter-rouge">pdf</code> output formats. I want an image
file, so first I tried <code class="language-plaintext highlighter-rouge">png</code> but the file wasn’t loadable in one image viewer
I tried. Instead I output to <code class="language-plaintext highlighter-rouge">svg</code> and then used <code class="language-plaintext highlighter-rouge">gimp</code> to convert it to
<code class="language-plaintext highlighter-rouge">png</code>. (Plenty of other tools exist for that image conversion.)</p>

<div class="language-plaintext highlighter-rouge"><div class="highlight"><pre class="highlight"><code>k@slaapmatje:~$ mkdir mermaid
k@slaapmatje:~$ mv my-brain.mmd mermaid
k@slaapmatje:~$ cd mermaid
k@slaapmatje:~/mermaid$ chmod 777 .
k@slaapmatje:~/mermaid$ sudo docker pull minlag/mermaid-cli
Using default tag: latest
latest: Pulling from minlag/mermaid-cli
Digest: sha256:bf130e7ce53fa2269d4d7784c4d7d3edea63185f2fb72d337148224ffd22f1ec
Status: Image is up to date for minlag/mermaid-cli:latest
docker.io/minlag/mermaid-cli:latest
k@slaapmatje:~/mermaid$ sudo docker run -it -v `pwd`:/data minlag/mermaid-cli -i /data/my-brain.mmd -o /data/my-brain.svg
Generating single mermaid chart
k@slaapmatje:~/mermaid$ ls
my-brain.mmd  my-brain.svg
k@slaapmatje:~/mermaid$
</code></pre></div></div>

<p>(We give the <code class="language-plaintext highlighter-rouge">mermaid</code> directory global write permissions so the <code class="language-plaintext highlighter-rouge">docker</code> user
can write to it.)</p>

<hr />

<p>Mermaid supports a number of graph and diagram formats, and it’s fun
to write!</p>]]></content><author><name></name></author><category term="Tech Tools" /><category term="documentation" /><category term="tech-tools" /><summary type="html"><![CDATA[An example of the Mermaid Markdown-ish graph generator]]></summary><media:thumbnail xmlns:media="http://search.yahoo.com/mrss/" url="https://productionwithscissors.run/assets/img/header/scissors-crop-t.png" /><media:content medium="image" url="https://productionwithscissors.run/assets/img/header/scissors-crop-t.png" xmlns:media="http://search.yahoo.com/mrss/" /></entry><entry><title type="html">Install Neovim Plugins tl;dr</title><link href="https://productionwithscissors.run/2022/08/26/nvim-plugins/" rel="alternate" type="text/html" title="Install Neovim Plugins tl;dr" /><published>2022-08-26T00:00:00+00:00</published><updated>2022-08-26T00:00:00+00:00</updated><id>https://productionwithscissors.run/2022/08/26/nvim-plugins</id><content type="html" xml:base="https://productionwithscissors.run/2022/08/26/nvim-plugins/"><![CDATA[<p>I recently spent way too much time trying to get <code class="language-plaintext highlighter-rouge">neovim</code> plugins working.
Hopefully this will keep you from staying up until 2AM.</p>

<p>This assumes you’re on a Linux/BSD-ish system and you know basic <code class="language-plaintext highlighter-rouge">vi/vim/nvim</code>
commands such as how to quit out of the editor.</p>

<ol>
  <li><a href="https://github.com/neovim/neovim/wiki/Installing-Neovim">Install
<code class="language-plaintext highlighter-rouge">neovim</code>.</a> Even
if your OS package manager has an <code class="language-plaintext highlighter-rouge">neovim</code> package, it may not be a recent
version that works with newer plugins. I suggest using the correct package
for the <a href="https://github.com/neovim/neovim/releases/latest">latest stable
version</a></li>
  <li>Install the <a href="https://github.com/wbthomason/packer.nvim">packer plugin
manager</a>
    <div class="language-plaintext highlighter-rouge"><div class="highlight"><pre class="highlight"><code> git clone --depth 1 https://github.com/wbthomason/packer.nvim \
  ~/.local/share/nvim/site/pack/packer/start/packer.nvim
</code></pre></div>    </div>
  </li>
  <li>Create the neovim configuration directory
    <div class="language-plaintext highlighter-rouge"><div class="highlight"><pre class="highlight"><code> mkdir -p "${HOME}/.config/nvim/lua"
</code></pre></div>    </div>
  </li>
  <li>Create the <code class="language-plaintext highlighter-rouge">plugins.lua</code> file to load Packer
    <div class="language-plaintext highlighter-rouge"><div class="highlight"><pre class="highlight"><code> cat &lt;&lt;EOF &gt;&gt;"${HOME}/.config/nvim/lua/plugins.lua"
 local vim = vim
 local execute = vim.api.nvim_command
 local fn = vim.fn
    
 -- ensure that packer is installed
 local install_path = fn.stdpath('data')..'/site/pack/packer/opt/packer.nvim'
    
 if fn.empty(fn.glob(install_path)) &gt; 0 then
     execute('!git clone https://github.com/wbthomason/packer.nvim '..install_path)
     execute 'packadd packer.nvim'
 end
    
 vim.cmd('packadd packer.nvim')
 local packer = require'packer'
 local util = require'packer.util'
    
 packer.init({
   package_root = util.join_paths(vim.fn.stdpath('data'), 'site', 'pack')
 })
    
 return require('packer').startup(function()
   use 'wbthomason/packer.nvim'
    
   -- Add plugins here!
    
 end)
 EOF
</code></pre></div>    </div>
  </li>
  <li>Configure nvim to load the <code class="language-plaintext highlighter-rouge">plugins.lua</code>
    <div class="language-plaintext highlighter-rouge"><div class="highlight"><pre class="highlight"><code> cat &lt;&lt;EOF &gt;&gt;"${HOME}/.config/nvim/init.vim"
 lua require('plugins')
 EOF
</code></pre></div>    </div>
  </li>
  <li>Install/update Packer and your plugins
    <ol>
      <li>Run <code class="language-plaintext highlighter-rouge">nvim</code> (no file necessary)</li>
      <li>Type <code class="language-plaintext highlighter-rouge">:PackerSync</code></li>
      <li>Reply <code class="language-plaintext highlighter-rouge">y</code></li>
      <li>Exit <code class="language-plaintext highlighter-rouge">nvim</code></li>
    </ol>
  </li>
</ol>

<p>You should now be able to add Packer-compatible plugins around the <code class="language-plaintext highlighter-rouge">-- Add
plugins here!</code> comment.</p>

<p>If you try to execute <code class="language-plaintext highlighter-rouge">:PackerSync</code> and get an error, I don’t really have any
debugging tips. Try to clean out your <code class="language-plaintext highlighter-rouge">~/.config/nvim</code> directory and try
again?</p>]]></content><author><name></name></author><category term="Tech Tools" /><category term="documentation" /><category term="tech-tools" /><summary type="html"><![CDATA[Very Very Basic Guide to Get Neovim Plug-ins to Work]]></summary><media:thumbnail xmlns:media="http://search.yahoo.com/mrss/" url="https://productionwithscissors.run/assets/img/header/scissors-crop-t.png" /><media:content medium="image" url="https://productionwithscissors.run/assets/img/header/scissors-crop-t.png" xmlns:media="http://search.yahoo.com/mrss/" /></entry><entry><title type="html">Olipop Flavor Stack Ranking</title><link href="https://productionwithscissors.run/2022/07/21/olipop-flavor-stack-ranking/" rel="alternate" type="text/html" title="Olipop Flavor Stack Ranking" /><published>2022-07-22T01:06:51+00:00</published><updated>2022-07-22T01:06:51+00:00</updated><id>https://productionwithscissors.run/2022/07/21/olipop-flavor-stack-ranking</id><content type="html" xml:base="https://productionwithscissors.run/2022/07/21/olipop-flavor-stack-ranking/"><![CDATA[<p><em>Disclaimer: we were not in any way paid or solicited by <a href="http://drinkolipop.com">drinkolipop.com</a> to write this review, but if they would like to give us a couple cases, we wouldn’t say no.</em></p>

<p>A couple months ago, Dan and Ana introduced me (i.e., got me addicted) to <a href="http://drinkolipop.com">Olipop</a> soft drinks. Olipop is a “new kind of soda,” one of those newfangled “functional drinks,” that are supposed to be both tasty and have some health benefits. In Olipop’s case, each can says that it supports digestive health. I can’t speak to that, but they are damn tasty.</p>

<p>There are 10 flavors available now, with Banana Cream being the newest addition. Even though we had tried most or all the flavors, Ana, Dan, and I decided to do a systematic review of each flavor. <em>(Note: we later learned that Orange Cream is a “seasonal” flavor, and a previous seasonal flavor, Blackberry Vanilla, is currently not available.)</em></p>

<p>These tastings were split over several days, because that’s a lot of soda to consume at once. Comments have been reconstituted from hastily taken notes.</p>

<h1 id="day-one-banana-cream-tropical-punch-classic-grape">Day One: Banana Cream, Tropical Punch, Classic Grape</h1>

<p>We tried these three flavors together in person when I visited Dan and Ana.</p>

<h2 id="banana-cream"><a href="https://drinkolipop.com/products/banana-cream">Banana Cream</a></h2>

<div align="center">
<img src="/assets/images/2022/07/20220716_141622.jpg" alt="Photo of can of OLIPOP Banana Cream soda with a yellow cartoon minion waving from it. Behind are three glasses with various levels of a hazy, lemonade-colored liquid" />
<br />
<i><small>
Someone didn't swirl the can enough before pouring
</small></i>
</div>
<p><br /></p>

<p>Banana Cream comes in a very yellow can emblazoned with, of all things, a Minion. This co-branding seems to be a first for Olipop, and Ana asked how this came to be, aside from the story on the side of the can.</p>

<h3 id="bouquet">Bouquet</h3>

<p>Me: It smells like banana candy<br />
Dan: Like banana candy or banana bread<br />
Ana: Like banana bread with a hint of vanilla</p>

<h3 id="color">Color</h3>

<p>Ana: It looks milkier with a slight thickness<br />
Me: It looks like lemonade<br />
Dan: I dunno, yellow?</p>

<h3 id="taste">Taste</h3>

<p>Ana: It tastes less intense than it smells. It has light carbonation<br />
Dan: Smooth mouthfeel, slight tingle<br />
Me: What Ana said. It tastes sweet but not as chemical as it smells. It’s more like a tonic.</p>

<h3 id="overall">Overall</h3>

<p>Me: Potable but not my first choice.<br />
Dan: It’s ok I guess. An amusing novelty.<br />
Ana: I think it’s nicely refreshing. Also not my first choice.<br />
After I admit that I’d never seen of the Minion movies, Dan asks if I’m more likely to watch <em>The Rise of Gru</em> after drinking the Banana Cream. (No, I am not.)</p>

<h2 id="tropical-punch"><a href="https://drinkolipop.com/products/tropical-punch">Tropical Punch</a></h2>

<div align="center">
<img src="/assets/images/2022/07/20220716_161522.jpg" alt="Photo of can of OLIPOP Tropical Punch sparkling tonic in a sea blue can with stylized palm trees. Behind the car are three glasses with a yellow liquid" />
<br />
<i><small>
Thankfully it's not dyed Hawaiian Punch red
</small></i>
</div>
<p><br /></p>

<p>Dan had previously noted that the name Tropical Punch reminded him of Hawaiian Punch, that faux-tropical and vert faux-red soft drink purveying to suburban kids. (I can remember the color, although I can’t remember how it tastes. If I did taste it again, though, I would know.)</p>

<h3 id="color-1">Color</h3>

<p>Me: Not dyed red like Hawaiian Punch<br />
Ana notes this flavor isn’t as cloudy as the Banana Cream.<br />
Dan: Looks like pee</p>

<h3 id="bouquet-1">Bouquet</h3>

<p>Ana: Pineapple, much less intense than the banana<br />
Dan: Smells like pineapple, although it doesn’t smell artificial like the banana<br />
Me: Pineapple</p>

<h3 id="taste-1">Taste</h3>

<p>Ana: Pineapple juice without the acidity, more sweetness<br />
Me: Slight afternotes of passion fruit?<br />
Dan: Not acidic. I can’t taste anything except the pineapple</p>

<h3 id="overall-1">Overall</h3>

<p>Ana: It tastes like pineapple and very sweet. It’s not as carbonated as the banana.<br />
Me: Very sweet<br />
Dan: It makes me want to try real Hawaiian Punch again</p>

<h2 id="classic-grape"><a href="https://drinkolipop.com/products/classic-grape">Classic Grape</a></h2>

<div align="center">
<img src="/assets/images/2022/07/20220716_183601.jpg" alt="Photo of can of OLIPOP Classic Grape sparkling tonic in a light purple can with a stylized cluster or purple grapes. Behind the car are three glasses with a ruby red liquid" />
<br />
<i><small>
Ana really liked the ruby red color
</small></i>
</div>
<p><br /></p>

<h3 id="color-2">Color</h3>

<p>Ana: I can see bubbles. Prettiest color so far, like a deep red ruby<br />
Dan and I agree it is very clear</p>

<h3 id="bouquet-2">Bouquet</h3>

<p>Ana: The smell is not that strong. It smells like candy.<br />
Dan: It smells like Welch’s Grape Juice<br />
Me: Yeah, like the can of concentrate you’d get in the frozen food aisle</p>

<h3 id="taste-2">Taste</h3>

<p>Ana: It feels less sweet than the others.<br />
Dan: It has a sweet aftertaste that lingers<br />
Ana: Tastes more artificial.<br />
Me: I would drink it but probably only if it was the last can in the fridge</p>

<h2 id="day-one-summary">Day One summary</h2>

<p>We all agree that the Tropical Punch is probably our favorite so far.</p>

<h1 id="day-two-classic-root-beer--strawberry-vanilla">Day Two: Classic Root Beer &amp; Strawberry Vanilla</h1>

<p><em>We performed this and the following tastings virtually over Zoom.</em></p>

<h2 id="classic-root-beer"><a href="https://drinkolipop.com/products/classic-root-beer">Classic Root Beer</a></h2>

<p>Ana, a naturalized American, starts by noting that she thinks of root beer as “one of those American things only Americans like.” Dan says that when they send her to American reprogramming camp, they will have A&amp;W Root Beer there. I assume there will also be Hawaiian Punch and Welch’s grape juice.</p>

<h3 id="appearance">Appearance</h3>

<p>Clear and slightly carbonated</p>

<h3 id="bouquet-3">Bouquet</h3>

<p>Me: No real smell<br />
Ana: Smells like medicine<br />
Me: Smells like root beer</p>

<h3 id="taste-3">Taste</h3>

<p>Ana: Makes me think of something I get at the dentist, like mouthwash or toothpaste or something. Vague mint aftertaste<br />
Dan: Like root beer but with some olipopness with it. No bite, more like being gently gummed.<br />
Me: Definitely tastes weaker than A&amp;W<br />
Ana: I would definitely drink this if I was lost on a desert island and the others were gone. It’s less bad than I thought it would be.<br />
Me: Tastes a little watered down.<br />
Dan: It’s still one of my favorites<br />
Dan (reading the label): “organic root beer flavor extract”</p>

<p>At this point I launch into my story about living in Pennsylvania as a kid, where the local pizza parlor had both a player piano and birch beer. We google to figure out the difference (the kind of tree roots used, unsurprisingly.) I can’t remember the taste difference after this many decades, though.</p>

<h2 id="strawberry-vanilla"><a href="https://drinkolipop.com/products/strawberry-vanilla">Strawberry Vanilla</a></h2>

<h3 id="colorbouquet">Color/Bouquet</h3>

<p>Dan: Some solids<br />
Me: It does smell a bit like candy strawberry<br />
Ana: Yes, less intense<br />
Dan: Smells like strawberry ice cream<br />
Me: Maybe a little like strawberry medicine?</p>

<h3 id="taste-4">Taste</h3>

<p>Me: Not a strong taste<br />
Ana: Kind of pleasant, not very obviously strawberry. Mild compared to the root beer</p>

<h3 id="impressions">Impressions</h3>

<p>Dan, reading the can: “Himalayan pink salt”<br />
(A discussion about the pros, cons, and general questions around Himalayan pink salt ensued.)<br />
Ana: I quite like this but closer to flavored sparkling water. Like it has been in the same room as a strawberry. Tastes less sweet than it smells, less sweet than the banana cream. (To Dan: Where’s the cat?)<br />
Me: Pleasant unlike the powerwash of Cherry Vanilla (full review to follow)<br />
Ana: tastes very one-note<br />
Me: Less like Olipop pop<br />
Dan: I’m still surprised by the Himalayan pink salt</p>

<h2 id="day-two-summary">Day Two summary</h2>

<p>Current stack rankings after 2 days and 5 pops:</p>

<p>Ana: Strawberry Vanilla, Tropical Punch, and Banana Cream are close together, a bit higher than Classic Grape. Classic Root Beer is decisively at the bottom.</p>

<p>Dan: Classic Root Beer is top, following by Tropical Punch, Banana Cream, Classic Grape, and Strawberry Vanilla</p>

<p>Me: Strawberry Vanilla is barely on top, then Tropical Punch, Classic Root Beer, Banana Cream, and Classic Grape</p>

<h1 id="day-three-battle-of-the-oranges">Day Three: Battle of the Oranges</h1>

<p>Olipop has two orange-themed flavors, Orange Squeeze and Orange Cream. We decided to try these two side-by-side as the best way to compare their orange-iness.</p>

<h2 id="orange-squeeze"><a href="https://drinkolipop.com/products/orange-squeeze">Orange Squeeze</a></h2>

<h3 id="colorbouquet-1">Color/Bouquet</h3>

<p>Me: Smells like orangeade<br />
Dan: More pulp than orangeade. It looks like a Tropicana orange product that has been puréed then added back.<br />
Ana: Smells more like orange juice than soda.<br />
Me: It smells a little like Tang.</p>

<h3 id="taste-5">Taste</h3>

<p>Me: Sedate taste<br />
Ana: Like a more pleasant Tang<br />
Dan: I like it<br />
Ana: Quite good, my favorite so far<br />
Me: Not too sweet<br />
Ana: It actually has more sugar than some of the others<br />
Dan: Light Olipop light carbonations<br />
Ana: Like more diluted Orange Fanta but in a good way</p>

<h3 id="overall-2">Overall</h3>

<p>Ana: It’s just nice</p>

<h2 id="orange-cream"><a href="https://drinkolipop.com/products/orange-cream">Orange Cream</a></h2>

<h3 id="colorbouquet-2">Color/Bouquet</h3>

<p>Me: Does it live up to the hype?<br />
Ana: Slightly cloudier than Orange Squeeze<br />
Me: Smells more vanilla than Orange Squeeze</p>

<h3 id="taste-6">Taste</h3>

<p>Dan: They really have nailed that creamsicle flavor<br />
Me: I taste the orange first and then the “cream”<br />
(Notes both Orange Squeeze and Orange Cream have 12% juice)<br />
Me: it’s not like there’s milkfat or some solid to give it that cream feel</p>

<h3 id="impressions-1">Impressions</h3>

<p>Ana: When I’m thirsty I’d just go for the Orange Squeeze. Orange Cream isn’t really chuggable. Orange Cream is sweeter.<br />
Dan: I feel like these would make good ice cream floats.<br />
Me: Orange Cream would make a better after-dinner faux-liqueur</p>

<h2 id="day-three-summary">Day Three summary</h2>

<p>New stack ranks:</p>

<p>Ana: Orange Squeeze and Orange Cream are at the top, depends on which I need</p>

<p>Dan: Orange Cream, Classic Root Beer, Orange Squeeze</p>

<p>Me: Orange Cream, Orange Squeeze, then Strawberry Vanilla</p>

<h1 id="day-four-vintage-cola-cherry-vanilla-ginger-lemon">Day Four: Vintage Cola, Cherry Vanilla, Ginger Lemon</h1>

<h2 id="vintage-cola"><a href="https://drinkolipop.com/products/vintage-cola">Vintage Cola</a></h2>

<p>Note: Vintage Cola seems to be the only flavor with caffeine in it, which comes from some green tea.</p>

<h3 id="colorbouquet-3">Color/Bouquet</h3>

<p>Dan: It smells like coke on an airplane<br />
Ana: Yeah, it absolutely does smell like that, why is that?<br />
We agree it has the traditional coke/cola/pop color, although it’s not as fizzy<br />
I try to describe how I think maybe it smells a little like RC Cola, but only because I can’t remember how that smells (as opposed to Coke or Pepsi)<br />
Ana: It smells of cola in a way Coke doesn’t<br />
Mostly I think it smells flat</p>

<h3 id="taste-7">Taste</h3>

<p>I also think it tastes flat<br />
Dan: It feels even flatter than their (Olipop’s) root beer<br />
Ana: I enjoy it because it is more lightweight<br />
We talk a lot about how we can’t help but compare it to the mainstream colas, good or bad.<br />
Dan: I still like it<br />
Me: I just think it tastes like flat off-brand cola</p>

<h2 id="cherry-vanilla"><a href="https://drinkolipop.com/products/cherry-vanilla">Cherry Vanilla</a></h2>

<p>Dan always calls this flavor Cherry Pie, because he likened drinking one to the experience of having a McDonalds cherry pie shoved into one’s mouth.</p>

<p>Ana, looking at the color: Garnet<br />
Dan: Black cherry<br />
Both: very pretty color<br />
Ana: I barely notice a scent, it’s almost herbal<br />
Me: Light medicinal overtone<br />
Dan: We’re starting to get closer to its true horrible nature<br />
Dan: It smells like maraschino cherry<br />
Me: No, not nearly as sweet as maraschino, and this also tastes like it was near an actual cherry<br />
Dan (reads label): “White cherry flavor”</p>

<p>At this point we come to realize that while we’re definitely trying the same flavor, the cans’ labels and lists of ingredients differ slightly. Apparently my deliveries of some flavors are from more recent stock. We decide any differences are probably negligible.</p>

<p>Back to the Cherry Vanilla:<br />
Ana: I like the flavor<br />
Dan: I want to put a shot glass of this on top of an ice cream sundae.<br />
Me: Yeah, it does seem one step away from a hyper-concentrated syrup. Vintage Cola is too diluted and this one isn’t diluted enough.</p>

<p>Here Dan wonders what goes in actual cherry pie filling, leading the conversation into a rabbit hole involving black birds and other avian pies, down to a poisoned pigeon pie in a Game of Thrones episode.</p>

<h2 id="ginger-lemon"><a href="https://drinkolipop.com/products/ginger-lemon">Ginger Lemon</a></h2>

<p>This is our final flavor of the ten available!</p>

<h3 id="colorbouquet-4">Color/Bouquet</h3>

<p>Ana: It looks like lemonade<br />
Dan: Nice smelling. I smell some ginger and some lemon<br />
Ana: A little cloudy<br />
Me: I smell more ginger</p>

<h3 id="taste-8">Taste</h3>

<p>Dan: I’m not a big fan of ginger<br />
Ana: I really like this. It’s one of my favorites. It’s not very sweet at all.<br />
Me: I really like strong ginger. I wish this had more bite. It’s very sedate. The lemon is more just an aftertaste, like a hint of acid.<br />
Ana: It tastes less like a soda because it’s less sweet. It tastes more sophisticated.</p>

<h3 id="impressions-2">Impressions</h3>

<p>Dan: I’m not sure I could tell when this goes flat. Very little carbonation.<br />
We agree it’s probably the most “mature” of the flavors.</p>

<h1 id="final-rankings">Final Rankings</h1>

<p>After some discussion and contemplation, we came up with our personal stack ranks. Ana notes that she doesn’t really have a favorite as much as a drink she’s more likely to select for different needs. We all agree that none of the flavors are completely bad.</p>

<p>Me: There’s nothing I would absolutely refuse to drink again.<br />
Ana: I think the root beer is there for me.</p>

<table>
  <tbody>
    <tr>
      <td> </td>
      <td>Ana</td>
      <td>Dan</td>
      <td>Karen</td>
    </tr>
    <tr>
      <td>1</td>
      <td>Orange Squeeze</td>
      <td>Orange Cream</td>
      <td>Orange Cream</td>
    </tr>
    <tr>
      <td>2</td>
      <td>Ginger Lemon</td>
      <td>Classic Root Beer</td>
      <td>Ginger Lemon</td>
    </tr>
    <tr>
      <td>3</td>
      <td>Orange Cream</td>
      <td>Orange Squeeze</td>
      <td>Strawberry Vanilla</td>
    </tr>
    <tr>
      <td>4</td>
      <td>Vintage Cola</td>
      <td>Vintage Cola</td>
      <td>Orange Squeeze</td>
    </tr>
    <tr>
      <td>5</td>
      <td>Cherry Vanilla</td>
      <td>Tropical Punch</td>
      <td>Tropical Punch</td>
    </tr>
    <tr>
      <td>6</td>
      <td>Strawberry Vanilla</td>
      <td>Ginger Lemon</td>
      <td>Classic Root Beer</td>
    </tr>
    <tr>
      <td>7</td>
      <td>Classic Grape</td>
      <td>Banana Cream</td>
      <td>Banana Cream</td>
    </tr>
    <tr>
      <td>8</td>
      <td>Tropical Punch</td>
      <td>Classic Grape</td>
      <td>Cherry Vanilla</td>
    </tr>
    <tr>
      <td>9</td>
      <td>Banana Cream</td>
      <td>Cherry Vanilla</td>
      <td>Vintage Cola</td>
    </tr>
    <tr>
      <td>10</td>
      <td>Classic Root Beer</td>
      <td>Strawberry Vanilla</td>
      <td>Classic Grape</td>
    </tr>
  </tbody>
</table>

<hr />

<p>Well, that’s our take on the existing Olipop flavors we can get our hands on! Maybe as we get to try more, we’ll add them here! Or not, we have short attention spans.</p>]]></content><author><name></name></author><category term="Running With Scissors" /><category term="taste tests" /><category term="not-tech" /><summary type="html"><![CDATA[Drinking Our Olipop Addiction]]></summary><media:thumbnail xmlns:media="http://search.yahoo.com/mrss/" url="https://productionwithscissors.run/assets/img/header/scissors-crop-t.png" /><media:content medium="image" url="https://productionwithscissors.run/assets/img/header/scissors-crop-t.png" xmlns:media="http://search.yahoo.com/mrss/" /></entry><entry><title type="html">Twisty Puzzles: Learning to Solve a Cube Blindfolded</title><link href="https://productionwithscissors.run/2022/02/21/twisty-puzzles-learning-to-solve-a-cube-blindfolded/" rel="alternate" type="text/html" title="Twisty Puzzles: Learning to Solve a Cube Blindfolded" /><published>2022-02-21T11:36:42+00:00</published><updated>2022-02-21T11:36:42+00:00</updated><id>https://productionwithscissors.run/2022/02/21/twisty-puzzles-learning-to-solve-a-cube-blindfolded</id><content type="html" xml:base="https://productionwithscissors.run/2022/02/21/twisty-puzzles-learning-to-solve-a-cube-blindfolded/"><![CDATA[<p>This post describes the basics on learning to solve 3x3x3 cubes blindfolded. You can find a lot of good guides and videos, but I’m going to describe what finally clicked for me and how I do it. There are a couple other approaches, but most work pretty similarly.</p>

<p>Solving blindfolded can look really hard at first, but like most skills, you need to learn the basics and then practice a lot.</p>

<h1 id="why-learn-to-solve-blindfolded">Why Learn to Solve Blindfolded</h1>

<p>Learning how to solve a cube blindfolded is a good challenge, and once you learn how to do it, it’s a good way to exercise your short-term memory and your concentration. It may also be a cool party trick if people want to watch you for 5-10 minutes.</p>

<h1 id="basic-description">Basic Description</h1>

<p>I use the <a href="https://www.speedcubereview.com/blind-solving-algorithms.html">Old Pochmann</a> method. It’s not the fastest method, but it’s relatively straightforward, and I’m not trying to set any records.</p>

<h2 id="outline">Outline</h2>

<ol>
  <li>Each tile of each piece is assigned a letter, A-X. Each letter will be used twice, once for an edge piece and once for a corner.</li>
  <li>Edges have 2 letters</li>
  <li>Corners have 3 letters</li>
  <li>All algorithms are <a href="https://www.speedsolving.com/wiki/index.php/PLL">PLL moves</a>. They only move pieces on the top layer.</li>
  <li>To get the next target place into the top layer, you also need to perform a few intuitive moves.</li>
  <li>We solve all the edges first, then the corners.</li>
  <li>Inspecting the cube and memorizing the sequence.</li>
</ol>

<h2 id="tutorial-conventions">Tutorial Conventions</h2>

<ul>
  <li>Cube orientation
    <ul>
      <li>Up – yellow</li>
      <li>Front – red</li>
    </ul>
  </li>
  <li><a href="https://meep.cubing.net/wcanotation.html">WCA Notation</a></li>
  <li>Algorithms
    <ul>
      <li><a href="https://www.speedsolving.com/wiki/index.php/PLL#T_Permutation">T perm</a> – R U R’ U’ R’ F R2 U’ R’ U’ R U R’ F’</li>
      <li><a href="https://www.speedsolving.com/wiki/index.php/PLL#J_Permutation_:_a">Ja perm</a> – L U’ R’ U L’ U2 R U’ R’ U2 R</li>
      <li><a href="https://www.speedsolving.com/wiki/index.php/PLL#J_Permutation_:_b">Jb perm</a> – L’ U R U’ L U2 R’ U R U2 R’</li>
    </ul>
  </li>
  <li>Practice scramble – R’ F’ Rw Uw’ Rw’ F2 R’ U’ Rw F R2 Fw’ Rw’ F’ R
    <ul>
      <li><img src="//assets/images/2022/02/scramble.png" alt="Image of a scrambled speed cube" /></li>
    </ul>
  </li>
  <li>Terminology
    <ul>
      <li>
        <p>Buffer piece – the next piece to move into the correct, target position</p>
      </li>
      <li>
        <p>Target – the correct position for the current piece in the buffer</p>
      </li>
    </ul>
  </li>
</ul>

<h2 id="lettering-the-tiles">Lettering the Tiles</h2>

<p>Each face of each piece, except the center pieces, get a unique letter. Each letter will be used twice, once for a corner and once for an edge.</p>

<p>I use this convention illustrated below. You can pick any lettering you like as long as you can remember it easily with some practice.</p>

<div align="center">
<img src="/assets/images/2022/02/screenshot-2022-02-20-13.47.29-01.jpeg" alt="Image of flattened cube with each edge and corner lettered in order around each face" />
</div>
<p><br /></p>

<div align="center">
<img src="/assets/images/2022/02/20220219_162739.jpg" alt="Photo of two solved cubes, one with letter stickers on each piece" />
</div>
<p><br /></p>

<h3 id="tips">Tips</h3>

<ul>
  <li>Pick one lettering scheme that makes sense to you</li>
  <li>You can use a cheap cube and put letter stickers on each piece to help the learning phase</li>
</ul>

<h2 id="algorithms">Algorithms</h2>

<p>Blindfolded solving uses only <a href="https://www.speedsolving.com/wiki/index.php/PLL">PLL algorithms</a>, specifically those which swap two edges and two corners at the same time.</p>

<p>You can solve the whole cube using just one algorithm, but I started by using T and Ja perms. I use both when solving the edges, and just Ja when solving corners.</p>

<style>
.piccol {
  float: left;
  width: 32%;
  padding: 5px;
}

/* Clear floats after image containers */
.picrow::after {
  content: "";
  clear: both;
  display: table;
}
</style>

<div class="picrow">
<div class="piccol">
<img src="/assets/images/2022/02/tperm-edge.png" alt="Image of puzzle cube showing the T permutation" />
</div>
<div class="piccol">
<img src="/assets/images/2022/02/japerm-edge.png" alt="Image of puzzle cube showing the Ja edge permutation" />
<br />
</div>
<div class="piccol">
<img src="/assets/images/2022/02/japerm-corner.png" alt="Image of puzzle cube showing the Ja corner permutation" />
<br />
</div>
</div>

<center><small><i>Diagrams showing piece movement between buffer and targets using T and Ja algorithms</i></small></center>
<p><br /></p>

<h3 id="why-these-algorithms">Why these algorithms?</h3>

<p>Because they swap a pair of edges and a pair of corners back and forth, and because we can move in targets without disturbing the pieces each algorithm moves. By just swapping known pairs back and forth, we don’t have to memorize different cube states.</p>

<ul>
  <li>Ja perm
    <ul>
      <li>Corners: UBR, UFR</li>
      <li>Edges: UB, UR</li>
    </ul>
  </li>
  <li>T perm
    <ul>
      <li>Corners: UBR, UFR</li>
      <li>Edges: UL, UR</li>
    </ul>
  </li>
</ul>

<p>These two algorithms also make solving “parity” easier, because you don’t have to learn a special algorithm. (See below.)</p>

<h3 id="tips-1">Tips</h3>

<ul>
  <li>Start with one or two PLL algorithms. Ja perm is a good choice!</li>
  <li>Use algorithms which swap one pair of edges and one pair of corners together.</li>
  <li><strong>Practice the Ja and T permutation algorithms until you can do them with your eyes closed!</strong></li>
</ul>

<h2 id="moving-the-target">Moving the Target</h2>

<p>While the algorithms are all PLL algos, you will always have to move the target piece to the top layer. You could memorize the moves for each piece to get it to the target position, but it will probably be easier to work intuitively. If you do want to make a list to memorize, be sure to work it against the algorithm(s) you will use.</p>

<p>The below images show the steps required to move the UR edge to FL. Remember, <mark style="background-color:#ffffff;" class="has-inline-color">Up</mark> is yellow and Front is red.</p>

<div align="center">
<img src="/assets/images/2022/02/wp-1645396347464.jpg" alt="Photo of jumbled puzzle cube" />
<br />
<i><small>
Starting position: UR ('H' edge piece) -&gt; FL ('H' edge target)
</small></i>
</div>
<p><br /></p>

<div align="center">
<img src="/assets/images/2022/02/wp-1645396347447.jpg" alt="Photo of jumbled puzzle cube" />
<br />
<i><small>
Use L' to move H face into staging 'D' position for T algorithm
</small></i>
</div>
<p><br /></p>

<p><em>Start to move ‘R’ from UR to FL</em>
<br /></p>

<div align="center">
<img src="/assets/images/2022/02/wp-1645396347430.jpg" alt="Photo of a scrambled speed cube" />
<br />
<i><small>
Work T algorithm
</small></i>
</div>
<p><br /></p>

<div align="center">
<img src="/assets/images/2022/02/wp-1645396347407.jpg" alt="Photo of a scrambled speed cube" />
<br />
<i><small>
Use L to move 'H' edge piece into target position
</small></i>
</div>
<p><br /></p>

<p><em>Finish moving ‘H/R’ edge to target position</em>
<br /></p>

<p>Corners work similarly. If you use the Ja permutation for corners, your target goes in the ‘C’ (UFR) position.</p>

<h3 id="tips-2">Tips</h3>

<ul>
  <li><strong>Practice moving the edge tiles and corner tiles to their correct positions!</strong></li>
</ul>

<h2 id="inspection-and-memorization">Inspection and Memorization</h2>

<h3 id="the-sequence-of-moves">The sequence of moves</h3>

<p>The sequence will always start with the buffer position. As you move the buffer piece into its correct target, the old target piece moves to the buffer. You can think of it like a queue with each tile moving through in turn.</p>

<p>Special case: if the ‘B/I’ edge moves into the buffer spot before you’ve solved all the edges, you need to find a new edge to complete the sequence.</p>

<p>Using the example scramble and the orientation (Up is yellow, Front is red) <a href="#tutorial-conventions">above</a>, you would get this edge sequence:</p>

<p>K L E P Q O N X H A U .</p>

<p>In this example, we have all the edge pieces without a break in sequence. Count the number of letters: 11. Because we have an odd number of edges to move, we need to perform another Ja algorithm after we finish the edges but before we start the corners. This step is usually (inaccurately) called “parity.”</p>

<p>Now we sequence the corners. The cube has fewer corners than edges (8 vs 12), so we will probably have a shorter sequence to memorize.</p>

<p>We have a special case here: the buffer piece is already in the correct position. Let’s pick the ‘C’ (UFR) position to start with, because we don’t have to move a target in place.</p>

<p>C L R X Q F .</p>

<p>The ‘C’ and ‘F’ tiles are on the same corner, so we need to stop and find a new starting tile that has not been solved.</p>

<p>U W S .</p>

<p>Now we should have all the corners in the correct order.</p>

<h3 id="counting-moves">Counting moves</h3>

<ul>
  <li>If you have an odd number of edge moves, you will have an odd number of corner moves.</li>
  <li>If you have an even number of edge moves, you will have an even number of corner moves.</li>
  <li>If one set is even and the other is odd, you are missing a move somewhere. Redo your inspection.</li>
</ul>

<h3 id="tips-3">Tips</h3>

<ul>
  <li>Practice inspection first, writing down the sequence.
    <ul>
      <li>Work off the paper first</li>
      <li>Then practice memorization</li>
      <li>Then skip the paper – WCA rules don’t allow written notes</li>
    </ul>
  </li>
  <li>Use a scramble generator so you can practice the same scramble several times to understand mistakes</li>
  <li>During inspection, use your fingers to keep track of which pieces you’ve added to the sequence.</li>
</ul>

<h2 id="working-the-sequences">Working the sequences</h2>

<h3 id="holding-the-cube">Holding the cube</h3>

<ul>
  <li><strong>ALWAYS KEEP UP FACE YELLOW AND FRONT FACE RED</strong></li>
  <li>One of the main ways to mess up is to change the orientation. Practice keeping the faces in place in your hands.</li>
  <li>You want to keep a tighter grip on the cube than usual to keep the orientation correct and to keep from dropping it.</li>
</ul>

<h3 id="parity">“Parity”</h3>

<ul>
  <li>If your edge move count is odd, you will have to do an extra move after the edge sequence to get the buffer and target corners back to their original positions.</li>
  <li>If your buffer and target corners are at UBR and UFR (for Ja and T perms), you can just do an extra Ja before starting your corners.</li>
</ul>

<h3 id="flipped-pieces">Flipped pieces</h3>

<ul>
  <li>If you have all the pieces in the correct placement, but the tiles are flipped, you probably wrote down/memorized the wrong tile on the correct piece.</li>
  <li>Edges will always be flipped in pairs (2/4/etc.).</li>
  <li>2 or more corners may be rotated incorrectly.</li>
</ul>

<h2 id="next-steps">Next steps</h2>

<p>This post already has a lot of information to digest. For memorization, you can develop mnemonic phrases to help. For learning the target set-up moves, you can practice to see which moves for each tile feel most natural to you. If requested, I can write out an exact set of moves and algorithms to solve the example.</p>

<p>If you don’t understand how some part of the method works, try to find another tutorial which makes more sense to you. Or you can ask here in the comments.</p>

<p>Most importantly, practice. Steps which may not be clear might make more sense after you’ve tinkered with them over time.</p>

<h1 id="references">References</h1>

<ul>
  <li><a href="https://github.com/x4Cx58x54/rubik-image">https://github.com/x4Cx58x54/rubik-image</a> – Code used to generate illustrations</li>
  <li><a href="https://jperm.net/bld">https://jperm.net/bld</a> – One description of Old Pochmann</li>
  <li><a href="https://ruwix.com/the-rubiks-cube/how-to-solve-the-rubiks-cube-blindfolded-tutorial/">https://ruwix.com/the-rubiks-cube/how-to-solve-the-rubiks-cube-blindfolded-tutorial/</a> – Another Old Pochmann method</li>
  <li><a href="https://www.speedcubereview.com/blind-solving-algorithms.html">https://www.speedcubereview.com/blind-solving-algorithms.html</a> – List of methods and algorithms that can be used for blindfolded solving</li>
</ul>]]></content><author><name></name></author><category term="Twisty Puzzles" /><category term="not-tech" /><category term="puzzles" /><summary type="html"><![CDATA[Describes one method to learn to solve a puzzle cube blindfolded]]></summary><media:thumbnail xmlns:media="http://search.yahoo.com/mrss/" url="https://productionwithscissors.run/assets/img/header/scissors-crop-t.png" /><media:content medium="image" url="https://productionwithscissors.run/assets/img/header/scissors-crop-t.png" xmlns:media="http://search.yahoo.com/mrss/" /></entry><entry><title type="html">Twisty Puzzles: 4x4 Pyramorphix (Megamorphix) Center Parity</title><link href="https://productionwithscissors.run/2022/01/12/twisty-puzzles-4x4-pyramorphix-megamorphix-center-parity/" rel="alternate" type="text/html" title="Twisty Puzzles: 4x4 Pyramorphix (Megamorphix) Center Parity" /><published>2022-01-13T01:19:15+00:00</published><updated>2022-01-13T01:19:15+00:00</updated><id>https://productionwithscissors.run/2022/01/12/twisty-puzzles-4x4-pyramorphix-megamorphix-center-parity</id><content type="html" xml:base="https://productionwithscissors.run/2022/01/12/twisty-puzzles-4x4-pyramorphix-megamorphix-center-parity/"><![CDATA[<p><em>You can find a lot of great videos showing you how to fix megamorphix parities. I prefer to learn by reading and following pictures, so I hope this post helps some people. There are other methods to solve a megamorphix, but this post shows the solutions that I use.</em></p>

<p>Previously I wrote about how I figured out <a href="https://productionwithscissors.run/2021/05/06/twisty-puzzles-3x3-pyramorphix-solution/">how to solve the 3x3 pyramorphix</a> (note: I wrote this post before I learned the <a href="https://www.speedsolving.com/wiki/index.php/CFOP_method">CFOP</a><a href="https://www.speedsolving.com/wiki/index.php/CFOP_method">method</a> for cubes; you can use either!) and the <a href="https://productionwithscissors.run/2021/06/10/twisty-puzzles-5x5-pyramorphix-gigamorphix-solution/">5x5 gigamorphix</a>. You can use that 5x5 guide to solve a most parity issues for a megamorphix, but with the 4x4 puzzle and other morphix puzzles with an even number of layers, you may encounter one parity not found in the puzzles with an odd number of layers.</p>

<p>On these even layer puzzles, the center block on the last layer can be rotated 90° with respect to its edges and corners. We don’t see this issue with standard 4x4x4 speed cubes because those centers don’t have any visible difference if a center gets rotated.</p>

<p>In the megamorphix, this parity often isn’t obvious until you have tried to orient and permutate the last layer. If the corners and edges are in place, the center will be rotated. If the edges along with the center block, two corners will be swapped.</p>

<h2 id="1-solve-the-first-3-layers">1. Solve the first 3 layers</h2>

<ol>
  <li>Group the centers and the edge groups. You can solve edge groups (“dedges”) using the standard 4x4x4 speed cube methods. When solving the center groups, be sure to orient each center’s pieces. You can use the method from <a href="https://productionwithscissors.run/2021/06/10/twisty-puzzles-5x5-pyramorphix-gigamorphix-solution/">my 5x5x5 post.</a></li>
</ol>

<p>You can use the <a href="https://www.speedsolving.com/wiki/index.php/CFOP_method">CFOP method</a> or whatever method you want to solve the first 3 layers.</p>

<h2 id="2-start-solving-the-last-layer">2. Start solving the last layer</h2>

<p>To orient and permute the edges and corners on the last layer, you can adopt the CFOP method. Correct a single flipped edge using a <a href="https://www.speedsolving.com/wiki/index.php/4x4x4_parity_algorithms#One_dedge_flip">4x4x4 dedge algorithm</a>.</p>

<p>Next, pick the solution that matches your puzzle’s current configuration.</p>

<p>If you have solved the puzzle without a parity, you can stop now!</p>

<div align="center">
<img src="/assets/images/2022/01/20220111_143344_edited.png" alt="Photo of a solved megamorphix puzzle" />
<br />
<i><small>
This megamorphix puzzle appears to be solved except for two corners on the last layer which are swapped
</small></i>
</div>
<p><br /></p>

<h2 id="3-re-align-edges">3. Re-align edges</h2>

<p><em>If the edges and corners of your puzzle’s top layer are solved, you can skip to Step 4.</em></p>

<p>If your puzzle looks like this, although any two corners can be swapped on the last layer (instead of three possible corners, which we can fix using a <a href="https://www.speedsolving.com/wiki/index.php/PLL#U_Permutation_:_a">U algorithm</a>), use these algorithms to move the edge pieces around the center into their final configuration.</p>

<p><strong>Note: U algorithms will rotate some centers by 180</strong> °. Don’t worry, we will fix these at the end using an OLL algorithm. You can also cancel out the rotated centers by using two Ua permutations instead of one Ub permutation, or two Ub permutations instead of one Ua.</p>

<div align="center">
<img src="/assets/images/2022/01/20220111_141531_edited.png" alt="Two corners are swapped in otherwise solved 4x4 megamorphix" />
<br />
<i><small>
This megamorphix puzzle appears to be solved except for two corners on the last layer which are swapped
</small></i>
</div>
<p><br /></p>

<p>Use a U permutation to move the edges in a quarter .</p>

<p>Two of your edges should be flipped out like bird wings (the red edges in the example).</p>

<div align="center">
<img src="/assets/images/2022/01/20220111_141936_edited.png" alt="Photo of partially solved megamorphix with last layer edges permuted 90 degrees around the center block" />
<br />
<i><small>
First we rotate the edges around the last layer center block by 90 degrees
</small></i>
</div>
<p><br /></p>

<div align="center">
<img src="/assets/images/2022/01/20220111_142122_edited.png" alt="4x4 megamorphix with edges rotated 90 degrees around the last layer center" />
<br />
<i><small>
Then we flip the pair of edges across from the other two, properly oriented edges around the last layer center block
</small></i>
</div>
<p><br /></p>

<p>Holding one of the second set of edges in UF and the other in UR, use the following algorithm to flip them into wings:</p>

<p>R B (M’ U’ M’ U’ M’ U M U’ M U’ M U2) B’ R’</p>

<p>The top layer of your puzzle should now look something like this, although the corners may be in different positions.</p>

<h2 id="4-rotate-last-center-90">4. Rotate last center 90°</h2>

<p>Now we need to rotate the center blocks so they fit the edges around them.</p>

<p>The easiest way to do this is to pick one of the solid center pieces and use commutators to rotate the whole block in 3 steps. The example here assumes the block needs to be rotated +90°.</p>

<div align="center">
<img src="/assets/images/2022/01/20220111_142834_edited.png" alt="4x4 megamorphix with center pieces out of place" />
<br />
<i><small>
Permuting the rotated center to the correct orientation on a 4x4 megamorphix puzzle
</small></i>
</div>
<p><br /></p>

<p><strong>Note:</strong> Lower case letter in this notation mean move the inner slice only instead of the outer slice.</p>

<p><strong>Always hold the “last” layer face as F. Always use the same color piece for each commatation.</strong> (The pictured example uses the red piece.) You will need to repeat the commutator algorithm 3 times. Be careful not to break up edge groups. Try to rotate the F and U faces back after each commutation to keep the first 3 layers solved.</p>

<h3 id="to-move-the-center-clockwise">To move the center clockwise</h3>

<p>Match the solid pieces in positions UBR and UFR.</p>

<p>Algorithm: r U’ l’ U r’ U’ l U</p>

<h3 id="to-move-the-center-counterclockwise">To move the center counterclockwise</h3>

<p>Match solid pieces in UBL and UFL.</p>

<p>Algorithm: l’ U r U’ l U r’ U’</p>

<p>In this example, the center needed to be rotated clockwise. I matched the red piece in the centers each tim. The picture shows the progress after the first commutation.</p>

<h2 id="5-solve-corners-on-last-layer">5. Solve corners on last layer</h2>

<p>If you didn’t solve the corners with the edges before rotation the center, do that now.</p>

<p>After that, your puzzle should be solved!</p>

<div align="center">
<img src="/assets/images/2022/01/20220111_143141_edited.png" alt="Megamorphix with first 3 layers solved, and with top layer edges and center solved. Corners still need to be permutated." />
<br />
<i><small>
In this example, we just need to use the A* permutations twice to position the corners. We may also need to flip one or two of the 3-color corners.
</small></i>
</div>
<p><br /></p>

<h2 id="references">References</h2>

<ul>
  <li><a href="https://www.reddit.com/r/Cubers/comments/3y7q36/megamorphix_help_please/">https://www.reddit.com/r/Cubers/comments/3y7q36/megamorphix_help_please/</a></li>
  <li><a href="https://www.speedsolving.com/wiki/index.php/4x4x4_parity_algorithms">https://www.speedsolving.com/wiki/index.php/4x4x4_parity_algorithms</a></li>
  <li><a href="https://www.speedsolving.com/wiki/index.php/CFOP_method">https://www.speedsolving.com/wiki/index.php/CFOP_method</a></li>
  <li><a href="https://www.speedsolving.com/wiki/index.php/Commutator">https://www.speedsolving.com/wiki/index.php/Commutator</a></li>
  <li><a href="https://www.speedsolving.com/wiki/index.php/NxNxN_Notation">https://www.speedsolving.com/wiki/index.php/NxNxN_Notation</a></li>
  <li><a href="https://www.speedsolving.com/wiki/index.php/Reduction_Method">https://www.speedsolving.com/wiki/index.php/Reduction_Method</a></li>
  <li><a href="https://youtu.be/8KzCzqmHk88">https://youtu.be/8KzCzqmHk88</a></li>
</ul>]]></content><author><name></name></author><category term="Twisty Puzzles" /><category term="puzzles" /><category term="not-tech" /><summary type="html"><![CDATA[Solving the 4x4 megamorphix twisty puzzle's rotated center parity]]></summary><media:thumbnail xmlns:media="http://search.yahoo.com/mrss/" url="https://productionwithscissors.run/assets/img/header/scissors-crop-t.png" /><media:content medium="image" url="https://productionwithscissors.run/assets/img/header/scissors-crop-t.png" xmlns:media="http://search.yahoo.com/mrss/" /></entry><entry><title type="html">Star Wars: Imperial Engineering Fails</title><link href="https://productionwithscissors.run/2022/01/10/star-wars-imperial-engineering-fails/" rel="alternate" type="text/html" title="Star Wars: Imperial Engineering Fails" /><published>2022-01-10T21:17:28+00:00</published><updated>2022-01-10T21:17:28+00:00</updated><id>https://productionwithscissors.run/2022/01/10/star-wars-imperial-engineering-fails</id><content type="html" xml:base="https://productionwithscissors.run/2022/01/10/star-wars-imperial-engineering-fails/"><![CDATA[<p><em>Disclaimer: This post is chock full of spoilers for several Star Wars movies.</em></p>

<p>Anyone who has watched <em>Star Wars: A New Hope</em> will, of course, remember that the Rebel Alliance was able to destroy the humongous Death Star. Blueprints of the space station, smuggled out of the Empire, revealed that the Death Star could be destroyed by just one well-aimed torpedo.</p>

<p>However, the failure of the Death Star was just one Imperial engineering disaster of many, albeit a very critical failure. Like many projects that don’t live up to their original ideal, a lack of focus on reliability and resiliency in the design phase, poor or missing design review, useless or nonexistent operational procedures, all tracing back to abysmal product management and arrogant leadership, doomed the Death Star and, ultimately, the Empire itself.</p>

<p>So, let’s break down Imperial engineering project failures in the films Episodes IV-VI. We’ll skip Episodes I-III, which predated the Empire, and VII-IX, because I don’t even want to try to pretend that I can explain what’s going on there. As a bonus, we will also throw in <em>Rogue One</em>, the direct prequel to Episode IV.</p>

<h2 id="episode-iv-a-new-hope">Episode IV: <em>A New Hope</em></h2>

<p>Let’s start with the obvious issue in the original installment: the Death Star comprised many systems with their own single points of failure (SPoFs; we’re going to use this acronym a lot). Of course, the most serious SPoF allowed a proton torpedo fired into an exterior exhaust vent to destroy the entire moon-sized space station. (We’ll get deeper into that design flaw when we break down <em>Rogue One</em> below.)</p>

<h3 id="design-issues">Design issues</h3>

<ol>
  <li>The Death Star tractor beam used to pull the <em>Millennium Falcon</em> onto the battle station had not one but multiple single points of failure (SPoFs; we’re going to use this acronym even more): the entire tractor beam system could be disabled at any one of seven power couplings.<br />
<em>Lesson: Redundancy of critical components over redundancy of engineering failure points.</em></li>
  <li>That whole “you just need to shoot one proton torpedo into this exhaust vent and the whole Death Star will go boom!” issue has been well-covered.<br />
<em>Lesson: You need better threat modeling.</em></li>
</ol>

<h3 id="operational-issues">Operational issues</h3>

<p>While design and engineering issues built major vulnerabilities into the Death Star, the poor quality of the Empire’s operational practices and the limited ability of their personnel to carry out those procedures also created serious problems.</p>

<ol>
  <li>The gunners on the star destroyer in orbit above Tatooine were picking off escape pods leaving the captured Rebel ship. However, when they found no life signs in one of the pods, they let it go. Were laser blasts in such short supply?<br />
<em>Lesson: Apply your security enforcement practices consistently</em>.</li>
  <li>Luke Skywalker, Han Solo, and Obi-Wan Kenobi leverage social engineering on multiple occasions to infiltrate and then escape from the Death Star. Luring Imperial stormtroopers onto the <em>Millennium Falcon</em> and stealing their armor; feigning com issues to trick the deck commander into opening their blast door; using Chewbacca as a “prisoner” to gain access to the detention block. While no single measure or procedure could have prevented all of these breaches, social engineering exploits start here and will continue to pose an ongoing problem for the Empire.<br />
<em>Lesson: Don’t ignore non-technical security vulnerabilities.</em></li>
  <li>At one point, we see two stormtroopers asking each other if they knew what was going on. “Maybe it’s another drill.” While it’s important to practice for incident readiness, the Death Star command and crew have apparently been missing critical attack vectors in their drill plans.<br />
<em>Lesson: Practice only makes perfect if you’re practicing the right things the right way.</em></li>
</ol>

<p>One last question: when the Death Star jumped into orbit around the planet Yavin IV, why didn’t they jump closer to the moon where the Rebellion was headquartered?</p>

<h2 id="episode-v-empire-strikes-back">Episode V: <em>Empire Strikes Back</em></h2>

<p>This installment doesn’t really expose major Imperial engineering failures, although the bit about the <em>Millennium Falcon</em> hiding by clamping onto the back of a star destroyer’s command tower also seems a little inexplicable, even taking into account the Empire’s questionable engineering prowess.</p>

<p>The most relevant takeaway from this film: The expressions of people frozen in carbonite bear an uncanny resemblance to DMV photos in our universe.</p>

<h2 id="episode-vi-return-of-the-jedi">Episode VI: <em>Return of the Jedi</em></h2>

<p>The Empire’s brilliant new plan: build a new Death Star! Could they pull out a win this time? Let’s find out!</p>

<ul>
  <li><em>Win:</em> While the main reactor in the original design could be destroyed by a torpedo fired into an external exhaust port, the main reactor in this new design could only be destroyed by direct blaster fire. <br />
<strong>Score: +1</strong></li>
  <li><em>Loss:</em> Conveniently for the Rebellion, the design also included navigable shafts that ran from the surface to the reactor core.<br />
<strong>Score: -2</strong></li>
  <li><em>Win:</em> The Death Star construction project did include a force field to prevent unauthorized access to these access shafts.<br />
<strong>Score: +5</strong></li>
  <li><em>Loss</em>: During construction, the Death Star’s shield had only a single generator, situated on the forest moon of Endor. Unfortunately for the Empire, any firewall, when built or operated with SPoFs at critical load-bearing points, can provide only severely limited and unreliable protection (yup, still seeing those single points of failure in action).<br />
<strong>Score: -10</strong></li>
  <li><em>Win:</em> The force field generator was well-guarded and housed in a unit with multiple blast doors, in an area heavily patrolled by Imperial scout transports.<br />
<strong>Score: +1</strong> (limited points because it’s still unnecessarily a SPoF)</li>
  <li><em>Loss</em>: Those safeguards were doomed to failure with the Empire’s typical lack of attention to social engineering exploits and non-standard combat styles.<br />
<strong>Score: -5</strong></li>
</ul>

<p>Hubris coming from the top down ultimately doomed the second Death Star and the entire Empire. Large projects can be more prone to failure if no one believes they can fail. This arrogance fuels the neglect to exploring or adopting measures that could increase the chance of success and mitigate clear risk. The Emperor had tied his success to this new Death Star. When that project failed, it cost him his job, among other losses.</p>

<h2 id="rogue-one"><em>Rogue One</em></h2>

<p>While this film, “the prequel we never knew we needed,” takes place immediately before <em>A New Hope</em>, we’re covering it last on this list, and not just because of the chronological release order. This whole movie functions as the consummate how-to guide to ruining your most critical engineering projects.</p>

<p><em>With our step-by-step instructions, you will learn how to</em></p>

<ul>
  <li><em>Motivate by threats</em>!</li>
  <li><em>Alienate your workforce and key talent</em>!</li>
  <li><em>Skip design reviews!</em></li>
  <li><em>Promote the people least capable of doing the job!</em></li>
  <li><em>Miss all your deadlines!</em></li>
  <li><em>Do whatever it takes to get your promotion and vanity title!</em></li>
  <li><em>Deliver a flawed but shiny product!</em></li>
  <li><em>Destroy the Empire!</em></li>
</ul>

<p><em>All with pictures!</em> (There are no pictures.)</p>

<h3 id="get-your-vanity-title-while-trying-to-cover-your-ass"><em>Get your vanity title while trying to cover your ass!</em></h3>

<p>Orson Krennic, who apparently holds the vanity title of “Director of Advanced Weapons Research,” is clearly an asshole, but he’s also reporting to even more tyrannical executives. Risk of being “managed out” or even missing out on regular job title inflation motivates many product managers. Krennic’s superiors constantly remind him that failure of the Death Star project would be met with a very tall enforcer who can force-choke Krennic just by making some squeezy hand gestures.</p>

<p><em>Lesson: Promote bad managers and motivate them with threats to get the worst out of them!</em></p>

<h3 id="steal-credit-when-a-project-looks-successful"><em>Steal credit when a project looks successful!</em></h3>

<p>Krennic seems to expend as much energy trying to secure a promotion as he does overseeing the actual Death Star project. While politics generally do win out over actual job competence in too many organizations, failing to deliver a critical project still doesn’t generally work in one’s favor. When Krennic proceeds with a successful, but unsanctioned, test of the Death Star’s weapon, he not only fails to gain favor with his superiors, he also gets kicked off the project because someone else wants to take credit. Ouch.</p>

<p><em>Lesson: Be sure to leverage an apparently successful project for a promotion, but watch out for someone else who wants to steal credit</em>!</p>

<h3 id="adopt-involuntary-recruitment-and-other-methods-to-alienate-your-design-engineers"><em>Adopt involuntary recruitment and other methods to alienate your design engineers!</em></h3>

<p>Krennic forces the brilliant researcher Galen Erso to create the Death Star only after murdering the scientist’s wife. That sort of antisocial behavior generally leads to disgruntled employees who might want to sabotage the project they’re working on, which is unsurprisingly the case here. Krennic also “motivates” Erso by threatening to kill his co-workers, who have as little freedom as Erso himself. The scientist feels he must continue to work on the Death Star, but he also hides a dangerous flaw in its implementation.</p>

<p><em>Lesson: Forcibly hire and torture your workforce for the most disastrous results!</em></p>

<h3 id="skip-design-reviews-and-quality-assurance-to-ensure-failure"><em>Skip design reviews and quality assurance</em> <em>to ensure failure!</em></h3>

<p>The Death Star project also proceeds again a backdrop of poor engineering design and brittle operational practices. Incompetent and dictatorial management has no idea how to design robust engineering infrastructure and does not understand the necessity of investing into these “overhead” areas. Such deficiencies often arise from an organizational focus limited to feature delivery, without recognizing the results of operational failures and the necessity of trying to prevent outages and limit the blast radius when they do occur, sometimes literally. They are also endemic to a culture that does not respect the expertise of its engineers.</p>

<p><em>Lesson: Leave out design reviews because quality and reliability assurances have no place in your product!</em></p>

<p>_ <strong>Now you should have all the skills you need to create an unsuccessful product and destabilize your entire organization!</strong> _</p>

<h2 id="if-youre-part-of-the-rebel-alliance-you-may-also-want-to-check-out-our-new-book"><em>If you’re part of the Rebel Alliance, you may also want to check out our new book!</em></h2>

<p><em>Learn how to</em></p>

<ul>
  <li><em>Reprogram Imperial droids!</em></li>
  <li><em>Make those droids snarky!</em></li>
  <li><em>Steal Imperial transports and landing codes!</em></li>
  <li><em>Retrieve disks from Imperial archives!</em></li>
  <li><em>Run data cables to transmit stolen blueprints!</em></li>
  <li><em>Reposition satellite dishes!</em></li>
  <li><em>Take out planetary force fields!</em></li>
  <li><em>Disable star destroyers with ion blasts!</em></li>
  <li><em>And more!</em></li>
</ul>

<hr />

<p>In closing, we have a good idea of why the Empire failed. Don’t repeat their mistakes, unless, of course, you’re working from within to sabotage and destabilize your whole organization, too!</p>]]></content><author><name></name></author><category term="Running With Scissors" /><category term="Star Wars" /><category term="architecture" /><category term="engineering culture" /><category term="engineering fails" /><category term="not-tech" /><category term="entertainment" /><summary type="html"><![CDATA[While this series of engineering failures may have happened a long, long ago in a galaxy far, far away, it also happened last week in a tech company not too far from here.]]></summary><media:thumbnail xmlns:media="http://search.yahoo.com/mrss/" url="https://productionwithscissors.run/assets/img/header/scissors-crop-t.png" /><media:content medium="image" url="https://productionwithscissors.run/assets/img/header/scissors-crop-t.png" xmlns:media="http://search.yahoo.com/mrss/" /></entry><entry><title type="html">“Essential” Star Wars Animated Episodes</title><link href="https://productionwithscissors.run/2022/01/04/essential-star-wars-animated-episodes/" rel="alternate" type="text/html" title="“Essential” Star Wars Animated Episodes" /><published>2022-01-04T12:47:51+00:00</published><updated>2022-01-04T12:47:51+00:00</updated><id>https://productionwithscissors.run/2022/01/04/essential-star-wars-animated-episodes</id><content type="html" xml:base="https://productionwithscissors.run/2022/01/04/essential-star-wars-animated-episodes/"><![CDATA[<p>Way back in 2020, immediately prior to the release of <em>The Mandalorian</em> season 2, I put together a list of essential episodes from the animated series <em>The Clone Wars</em> and <em>Rebels</em>, focusing mainly on Ahsoka Tano and on the history of Mandalore and the Darksaber. I shoved that into a Google Doc that I shared around to prep people who had never watched the animated series <em>The Clone Wars</em> and <em>Rebels</em> with a quickstart guide for characters making their live-action debut in <em>The Mandalorian</em>.</p>

<p>With the release of <em>The Book of Boba Fett</em> and the Disney+ slate of upcoming series, apparently one each for just about every character in the Star Wars universe, I’ve updated the list with a few more characters.</p>

<h3 id="a-few-notes">A few notes</h3>

<ul>
  <li>This list contains episodes which I personally think are important or interesting. Other people who have also sat through a bajillion hours of these shows and movies are entitled to make their own lists.</li>
  <li>For table entries with multiple episodes, the episodes comprise a story arc.</li>
  <li>I use the season.episode number convention. (<em>Example</em>: episode 3 of season 1 would be 1.3. An arc of episodes 12-14 from season 2 would be 2.12-14)</li>
  <li>Main characters/entities for an arc are <strong>in bold</strong>.</li>
  <li>Currently supported characters/entities
    <ul>
      <li>Ahsoka Tano</li>
      <li>Mandalore
        <ul>
          <li>Bo-Katan Kryze</li>
          <li>Darksaber</li>
        </ul>
      </li>
      <li>Boba Fett</li>
      <li>Asajj Ventress (<em>Clone Wars</em> series villain)</li>
      <li>Maul (oops, spoiler)</li>
    </ul>
  </li>
  <li>Disney+ lists <em>The Clone Wars</em> in their original release order, which does not correspond at all with the actual story chronology until the final seasons. The list below conforms to <a href="https://www.starwars.com/news/star-wars-the-clone-wars-chronological-episodeorder">the proper order</a>.</li>
  <li><em>Bad Batch</em> season 1 features many supporting characters we’ve seen in other series. I haven’t added any of them here, although that may change.</li>
  <li><em>Rebels</em> has a more linear, self-contained storyline. You can watch the whole thing or not. Warning: Ezra Bridger is just so ducking annoying.</li>
</ul>

<h3 id="the-clone-wars"><em>The Clone Wars</em></h3>

<table>
  <thead>
    <tr>
      <th>Season . Episodes(s)</th>
      <th>Featured Characters</th>
      <th>Importance</th>
      <th>Notes</th>
    </tr>
  </thead>
  <tbody>
    <tr>
      <td>Movie</td>
      <td><strong>Ahsoka</strong> , Asajj</td>
      <td><strong>High</strong></td>
      <td>Introduces Ahsoka as Anakin Skywalker’s new padawan, Introduces villain Asajj Ventress</td>
    </tr>
    <tr>
      <td>1.2-4</td>
      <td><strong>Ahsoka</strong></td>
      <td>Medium</td>
      <td>Fills in Ahsoka’s background and explains her character; Ahsoka is only a major character in 1.2 and 1.3</td>
    </tr>
    <tr>
      <td>1.9-10</td>
      <td><strong>Ahsoka, Asajj</strong></td>
      <td>Medium</td>
      <td>Ahsoka and Asajj are only major characters in episode 1.9</td>
    </tr>
    <tr>
      <td>1.13-14</td>
      <td><strong>Ahsoka</strong></td>
      <td>Low</td>
      <td> </td>
    </tr>
    <tr>
      <td>1.17-18</td>
      <td><strong>Ahsoka</strong></td>
      <td>Low</td>
      <td> </td>
    </tr>
    <tr>
      <td>1.19</td>
      <td><strong>Ahsoka</strong></td>
      <td>Medium</td>
      <td>Ahsoka learns important lesson</td>
    </tr>
    <tr>
      <td>2.1-3</td>
      <td><strong>Ahsoka</strong></td>
      <td><strong>High</strong></td>
      <td>Major ties to future SW plots</td>
    </tr>
    <tr>
      <td>2.17</td>
      <td><strong>Ahsoka</strong></td>
      <td>Low</td>
      <td>Introduces Hondo Ohnaka, who makes frequent appearances in future plot lines</td>
    </tr>
    <tr>
      <td>2.6-8</td>
      <td><strong>Ahsoka</strong></td>
      <td><strong>High</strong></td>
      <td>Introduces a pivotal character for Ahsoka’s future</td>
    </tr>
    <tr>
      <td>2.11</td>
      <td><strong>Ahsoka</strong></td>
      <td>Medium</td>
      <td> </td>
    </tr>
    <tr>
      <td>2.12-14</td>
      <td><strong>Mandalore, Darksaber</strong></td>
      <td><strong>High</strong></td>
      <td>Provides important background for Mandalore and also Bo-Katan Kryze, although she does not appear</td>
    </tr>
    <tr>
      <td>2.20-22</td>
      <td><strong>Boba Fett</strong></td>
      <td>Medium</td>
      <td>Catches up with Boba Fett after the death of his “father” in Episode II</td>
    </tr>
    <tr>
      <td>3.5-6</td>
      <td><strong>Ahsoka</strong> , Mandalore</td>
      <td>Medium</td>
      <td> </td>
    </tr>
    <tr>
      <td>3.7</td>
      <td><strong>Ahsoka</strong></td>
      <td>Low</td>
      <td> </td>
    </tr>
    <tr>
      <td>3.10-11</td>
      <td><strong>Ahsoka</strong></td>
      <td>Medium</td>
      <td>Introduces an important character for Ahsoka’s future</td>
    </tr>
    <tr>
      <td>3.12-14</td>
      <td><strong>Asajj</strong></td>
      <td>Medium</td>
      <td>Asajj’s backstory and her relationship with another major villain</td>
    </tr>
    <tr>
      <td>3.15-17</td>
      <td><strong>Ahsoka</strong></td>
      <td><strong>Highest</strong></td>
      <td> </td>
    </tr>
    <tr>
      <td>3.21-22</td>
      <td><strong>Ahsoka</strong></td>
      <td>Medium</td>
      <td> </td>
    </tr>
    <tr>
      <td>4.11-13</td>
      <td><strong>Ahsoka</strong></td>
      <td>Medium</td>
      <td> </td>
    </tr>
    <tr>
      <td>4.14</td>
      <td><strong>Ahsoka</strong> , Bo-Katan Kryze, Darksaber</td>
      <td><strong>High</strong></td>
      <td>First appearance of Bo-Katan</td>
    </tr>
    <tr>
      <td>4.19-20</td>
      <td><strong>Asajj</strong> , Boba Fett</td>
      <td>High</td>
      <td>Boba Fett only appears in 4.20</td>
    </tr>
    <tr>
      <td>4.21-22</td>
      <td><strong>Maul</strong></td>
      <td><strong>High</strong></td>
      <td>Maul really hates Obi-Wan Kenobi (This arc’s storyline is picked up later in 5.1)</td>
    </tr>
    <tr>
      <td>5.2-5</td>
      <td><strong>Ahsoka</strong></td>
      <td>Medium</td>
      <td>Important character development for Ahsoka, also introduces Saw Gerrera from Rogue One</td>
    </tr>
    <tr>
      <td>5.6-9</td>
      <td><strong>Ahsoka</strong></td>
      <td>Low</td>
      <td> </td>
    </tr>
    <tr>
      <td>5.1</td>
      <td><strong>Maul</strong></td>
      <td>Medium</td>
      <td>Maul really, really hates Kenobi</td>
    </tr>
    <tr>
      <td>5.14-16</td>
      <td><strong>Maul, Bo-Katan Kryze, Mandalore, Darksaber</strong></td>
      <td><strong>High</strong></td>
      <td>Maul really, really, really hates Kenobi</td>
    </tr>
    <tr>
      <td>5.17-20</td>
      <td><strong>Ahsoka</strong> , Asajj</td>
      <td><strong>Highest</strong></td>
      <td>The most critical turning point in Ahsoka’s life. Asajj appears in 5.19-20</td>
    </tr>
    <tr>
      <td>6.1-4</td>
      <td> </td>
      <td><strong>High</strong></td>
      <td>Important background for the clone troopers and Order 66</td>
    </tr>
    <tr>
      <td>6.10-13</td>
      <td>Yoda</td>
      <td>Low</td>
      <td>Not vital, but shows origins of an important piece of Jedi mythology</td>
    </tr>
    <tr>
      <td>7.5-8</td>
      <td><strong>Ahsoka</strong> , Bo-Katan, Maul</td>
      <td><strong>High</strong></td>
      <td>Bo-Katan and Maul briefly appear in episodes 7-8</td>
    </tr>
    <tr>
      <td>7.9-12</td>
      <td><strong>Ahsoka, Maul, Bo-Katan, Mandalore</strong></td>
      <td><strong>Highest</strong></td>
      <td>The final gut-punch episodes. Also, Maul still really hates Kenobi</td>
    </tr>
  </tbody>
</table>

<center><small><i>Must-see The Clone Wars story arcs for selected characters (Ahsoka, it's all Ahsoka)</i></small></center>

<h3 id="rebels"><em>Rebels</em></h3>

<table>
  <thead>
    <tr>
      <th>Season . Episode(s)</th>
      <th>Featured Characters</th>
      <th>Importance</th>
      <th>Notes</th>
    </tr>
  </thead>
  <tbody>
    <tr>
      <td>2.1-2</td>
      <td><strong>Ahsoka</strong></td>
      <td><strong>High</strong></td>
      <td>Catches up with Ahsoka after the fall of the Republic</td>
    </tr>
    <tr>
      <td>2.3-4</td>
      <td><strong>Ahsoka</strong></td>
      <td>Low</td>
      <td>Ahsoka appears only briefly in both episodes but it focuses on an important character from her past</td>
    </tr>
    <tr>
      <td>2.10</td>
      <td><strong>Ahsoka</strong></td>
      <td><strong>High</strong></td>
      <td>Ties with <em>Clone Wars</em> episodes 2.1-3</td>
    </tr>
    <tr>
      <td>2.13</td>
      <td><strong>Mandalore</strong></td>
      <td>Medium</td>
      <td>Introduction to Mandalore under the Empire</td>
    </tr>
    <tr>
      <td>2.18</td>
      <td><strong>Ahsoka</strong></td>
      <td><strong>High</strong></td>
      <td> </td>
    </tr>
    <tr>
      <td>2.21-22</td>
      <td><strong>Ahsoka, Maul</strong></td>
      <td><strong>Highest</strong></td>
      <td>Maul also really hates the Emperor</td>
    </tr>
    <tr>
      <td>3.7</td>
      <td><strong>Mandalore</strong></td>
      <td>Low</td>
      <td> </td>
    </tr>
    <tr>
      <td>3.11</td>
      <td><strong>Darksaber</strong></td>
      <td>Low</td>
      <td> </td>
    </tr>
    <tr>
      <td>3.15-16</td>
      <td><strong>Mandalore, Darksaber</strong></td>
      <td><strong>High</strong></td>
      <td> </td>
    </tr>
    <tr>
      <td>3.20</td>
      <td><strong>Maul</strong></td>
      <td><strong>High</strong></td>
      <td>And Maul just still really hates Kenobi</td>
    </tr>
    <tr>
      <td>4.1-2</td>
      <td><strong>Mandalore, Bo-Katan, Darksaber</strong></td>
      <td><strong>High</strong></td>
      <td> </td>
    </tr>
    <tr>
      <td>4.15-16</td>
      <td><strong>Ahsoka</strong></td>
      <td><strong>High</strong></td>
      <td> </td>
    </tr>
  </tbody>
</table>

<center><small><i>Must-see Rebels story arcs for selected characters (as much Ahsoka as possible)</i></small></center>

<h2 id="viewing-chronology">Viewing chronology</h2>

<ol>
  <li>Theatrical Episodes I &amp; II</li>
  <li>A few stray episodes from <em>The Clone Wars</em></li>
  <li>2.16</li>
  <li>1.16</li>
  <li><em>The Clone Wars</em> animated movie</li>
  <li><a href="https://www.starwars.com/news/star-wars-the-clone-wars-chronological-episodeorder">Lots of <em>Clone Wars</em> episodes totally out of order</a></li>
  <li>Final 4 episodes (Season 7, episodes 9-12) of <em>The Clone Wars</em>. This arc overlaps with the film Episode III. (Arguments can be made for a different viewing order, but this is the one I like.)</li>
  <li><em>CW</em> episode 7.9</li>
  <li><em>Episode III: Revenge of the Sith</em></li>
  <li>Remaining <em>CW</em> episodes: 7.10-12</li>
  <li><em>Star Wars Bad Batch</em></li>
  <li><em>Star Wars Rebels</em></li>
  <li>Films: <em>Rogue One,</em> Episodes IV-VI</li>
  <li><em>The Mandalorian</em></li>
  <li><em>The Book of Boba Fett</em> jumps around in time but seems to take place immediately after season 2 of Mando</li>
  <li><em>Star Wars Resistance</em>: animated series leading up to Episode VII (I couldn’t watch past the first season)</li>
  <li>Episodes VII-IX</li>
</ol>

<h3 id="references">References</h3>

<ul>
  <li>Chronological list of <a href="https://www.starwars.com/news/star-wars-the-clone-wars-chronological-episodeorder">Clone Wars episodes</a></li>
  <li><a href="https://starwars.fandom.com/wiki/Main_Page">Wookieepedia</a></li>
</ul>]]></content><author><name></name></author><category term="Star Wars" /><category term="not-tech" /><category term="entertainment" /><summary type="html"><![CDATA[It's all about Ahsoka]]></summary><media:thumbnail xmlns:media="http://search.yahoo.com/mrss/" url="https://productionwithscissors.run/assets/img/header/scissors-crop-t.png" /><media:content medium="image" url="https://productionwithscissors.run/assets/img/header/scissors-crop-t.png" xmlns:media="http://search.yahoo.com/mrss/" /></entry></feed>