Table of Contents
Intro
The FreeBSD operating system contains innumerable
powerful features. One of these features is
bhyve, its native type 2 (OS-level)
hypervisor, which can host virtual machines running multiple different OSes,
including Linux.
This post will walk you through creating a Linux virtual machine on FreeBSD
using the CBSD tool, which greatly simplifies creating
and managing bhyve VMs.
Note: This tutorial is meant for a learning experiment only. It is not meant for use setting up production systems. It skips most security features and sets up no fault tolerance.
Audience
This tutorial assumes you have basic FreeBSD or Linux command-line or system administration skills and have gone through the process of installing FreeBSD.
FreeBSD Tips for Linux People
Software installation
FreeBSD has a very mature and reliable software package management system and
a library of third-party packages similar to most Linux distributions. You can
install pre-compiled binary packages using
pkg or you
can compile from source code using the ports
collection.
I generally compile from ports, which allows custom compile-time options and
can sometimes be more up-to-date, but pkg should be fine and definitely much
faster.
Text-based User Interfaces
FreeBSD uses a very distinctive style of interactive menus. If you compile
from ports, you will see it a lot. CBSD also uses it.
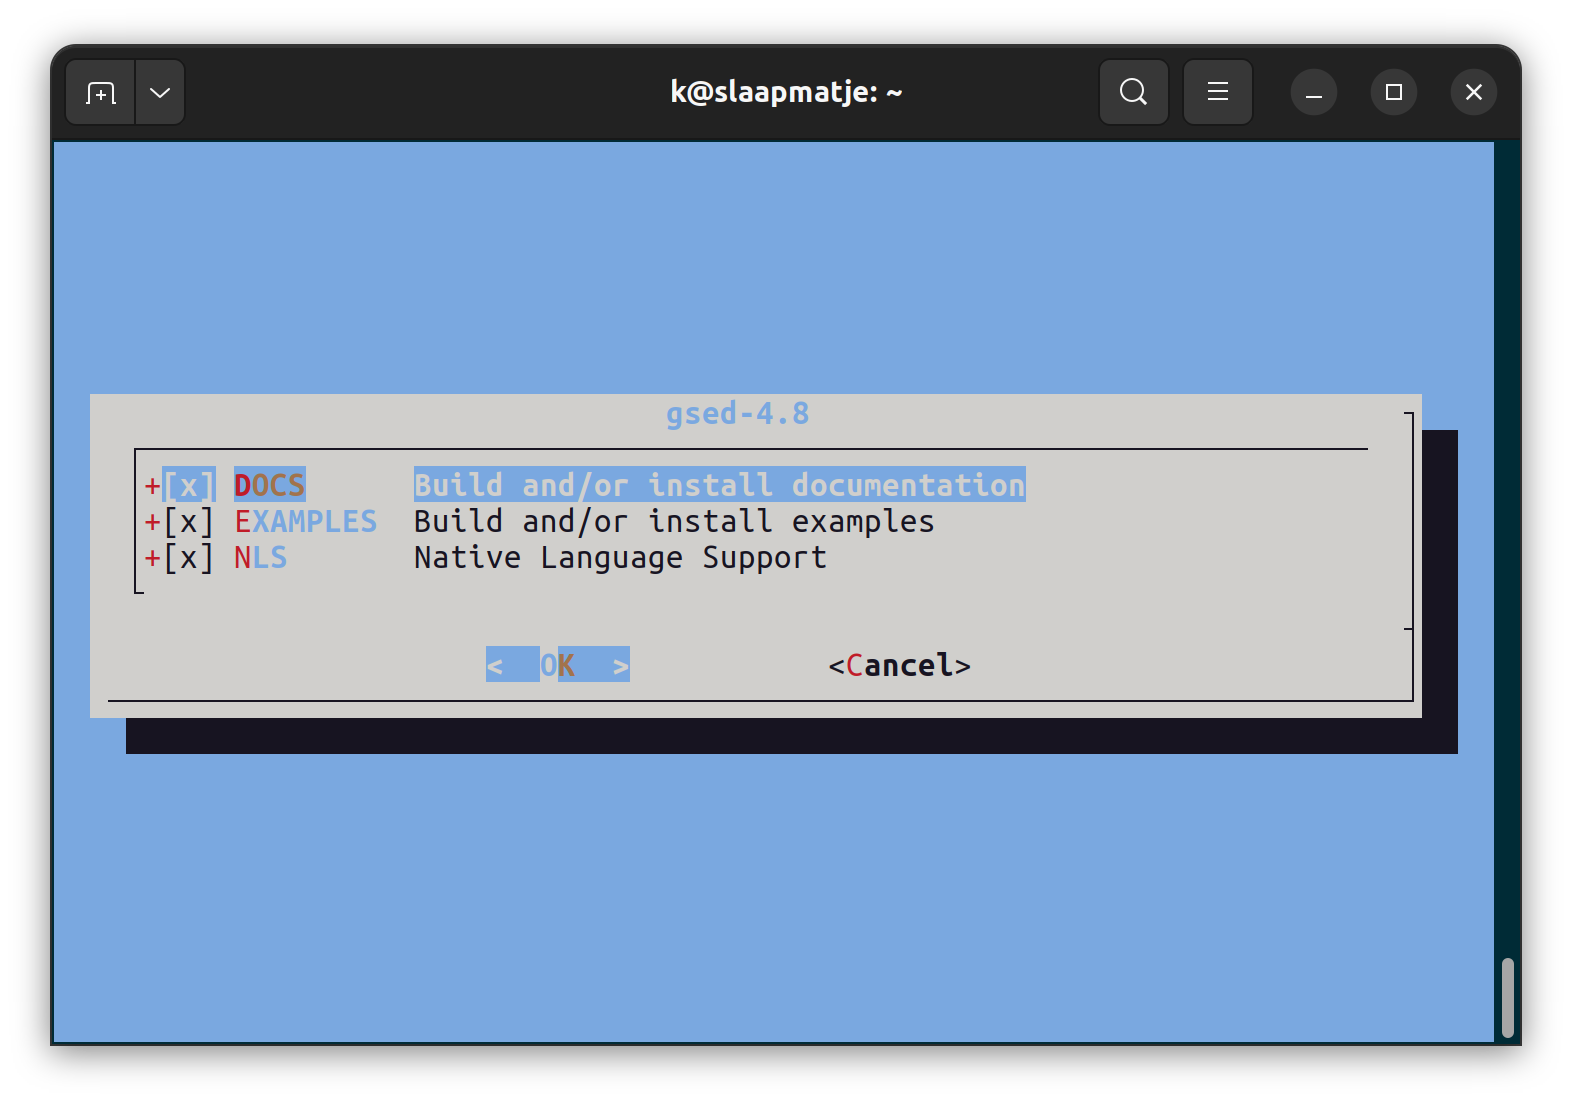
The distinctive FreeBSD interactive interface with its shadow box menu and its light blue background
- To navigate the menu: use the
<up/down>arrow keys - To change an option: navigate to that line, press the spacebar.
- If the item is a checkbox, it will toggle the selection
- A pop-up will appear if the option is a multi-choice or a text box entry
When you have finished the configuration, use the <left>/<right> arrow keys to
navigate the options below the menu. Select <Ok> to confirm and hit enter.
Tools
- Your favorite Linux command-line tools like
grep,sed,awk, andfindare all here but they sometimes behave a little differently than on GNU/Linux. - If you absolutely need the GNU versions, you can usually install them via
packages or ports, with
gorgnuprefixed to the name (gnugrep,gsed, etc.) bashis also not installed by default. You can install it viapkgorports
Root access
sudo access is not set up automatically, unlike many Linux distributions.
In the default installation, FreeBSD expects users needing root access to be
added to the wheel group (in /etc/group) and to su to root, using the
root password to authenticate. If this is an important or shared host, you
can configure
sudo
The root user also defaults to csh as its login shell. You probably want
to install bash and use that instead.
Setup and configuration
Host (FreeBSD Hypervisor) Requirements
- CPUs must support FreeBSD bhyve virtualization (see the FreeBSD Handbook page on bhyve for compatible CPUs)
- FreeBSD: At least
13.0-CURRENT. I tested this on13.1-RELEASE - File system for VM storage: ZFS
- If you don’t want to install root on ZFS, that’s fine. You can create a ZFS pool on another disk or disk partition.
- I installed
13.1-RELEASEas ZFS-on-root and let the installer use its default partitions. Previous FreeBSD installers may require additional ZFS configuration- Static IP. If your host’s IP address changes, you may have to reconfigure CBSD later.
VNC Client
To connect to the console of the new VM during the installation phase, you will need a VNC (Virtual Network Computing) client on a graphics-based host (for example, Windows or a Linux desktop). When connecting from a Linux host, I like the TigerVNC client, which is available as a pre-built package for many Linux distros.
ZFS Storage
These instructions assume you have a
ZFS pool of reasonable
size and it’s named zpool. “Reasonable size” depends on how many VMs you
want to create, but let’s assume a bare minimum of 10-20Gb per VM.
Install and Configure Tools
Tools
You will need to install the following via the pkg command or by compiling
the port. The port group is in parentheses.
git(devel)CBSD(sysutils)nsd(dns)tmux(sysutils)
Initialize CBSD
Before we run CBSD the first time, we need to
initialize its configuration. You can find the default values in
/usr/local/cbsd/share/initenv.conf but we’re going to change a few of those.
In addition to populating /usr/cbsd (the “workdir”) and writing
configuration files, the initenv subcommand given the
above values will also append boot-time CBSD options to /etc/rc.conf and
/boot/loader.conf.
You can run the initenv subcommand one of two ways:
- Interactively. This is long and rather confusing if you don’t know what you’re doing.
- Using a seed file with the values pre-set.
Important: all CBSD commands need to be run as root
Notes:
- My host has the hostname
nuckleheadand the IP address 192.168.1.76. You should use your own host’s values for those options. - For the RSYNC and RACCT questions, because this is a non-production system, you probably want to answer disable them to save resources
- CBSD version 13.1.13 seems to ignore the
racct=0option (don’t enable accounting). After initialization is done, you can remove the linekern.racct.enable=1from/boot/loader.conf initenvmay offer different configuration questions depending on answers to previous questions
Initialize CBSD the Quick Way
Configure CBSD from the command line
- Save the following to a file called
initenv.conf# cbsd initenv preseed file for nucklehead host # refer to the /usr/local/cbsd/share/initenv.conf # for description. # nodeip="192.168.1.76" nodename="nucklehead" jnameserver="10.0.0.1" nodeippool="10.0.0.0/16" nat_enable="pf" fbsdrepo="1" zfsfeat="1" parallel="0" stable="0" sqlreplica="0" statsd_bhyve_enable="0" statsd_jail_enable="0" statsd_hoster_enable="0" ipfw_enable="0" racct="0" natip="10.0.0.1" initenv_modify_sudoers="" initenv_modify_rcconf_hostname="" initenv_modify_rcconf_cbsd_workdir="1" initenv_modify_rcconf_cbsd_enable="1" initenv_modify_rcconf_rcshutdown_timeout="1" initenv_modify_syctl_rcshutdown_timeout="" initenv_modify_rcconf_cbsdrsyncd_enable="" initenv_modify_rcconf_cbsdrsyncd_flags="" initenv_modify_cbsd_homedir="1" workdir="/usr/cbsd" - Edit
nodeipto you FreeBSD’s IP address andnodenameto the hostname - Run
env workdir=/usr/cbsd /usr/local/cbsd/sudoexec/initenv inter=0 `pwd`/initenv.conf
Initialize CBSD the Long Way
Configure CBSD interactively
This example shows a run-through of an interactive configuration, using the command
env workdir=/usr/cbsd /usr/local/cbsd/sudoexec/initenv
Enable pf Networking
The pf
firewall
needs some additional setup.
# Create the configuration file
cp /usr/local/examples/pf.conf /etc/pf.conf
# Enable the NAT gateway
echo 'gateway_enable="YES"' >> /etc/rc.conf
# Start
service start
Load kernel modules
We need to set up several kernel modules. We load them now then add them to
/boot/loader.conf so they will load automatically at boot time.
for module in vmm if_tuntap if_bridge nmdm; do
    kldload "$module"
    echo "${module}_load=\"YES\"" >> /boot/loader.conf
done
Create our Linux Virtual Machine
We’re finally ready to create our VM.
We’re going to select the latest available supported version of Ubuntu. Note that this may not be the current Ubuntu release. We’ll cover how to configure releases with no CBSD support in a later post.
Notes
- In this example, we are going to use Ubuntu Server 22.04.
- Your menu options may differ if you’re using a different version of CBSD.
- We will configure the VM manually through the UI. A later post will show how to configure from a template file instead.
Configure the VM
Run cbsd bconstruct-tui to start the VM configuration.
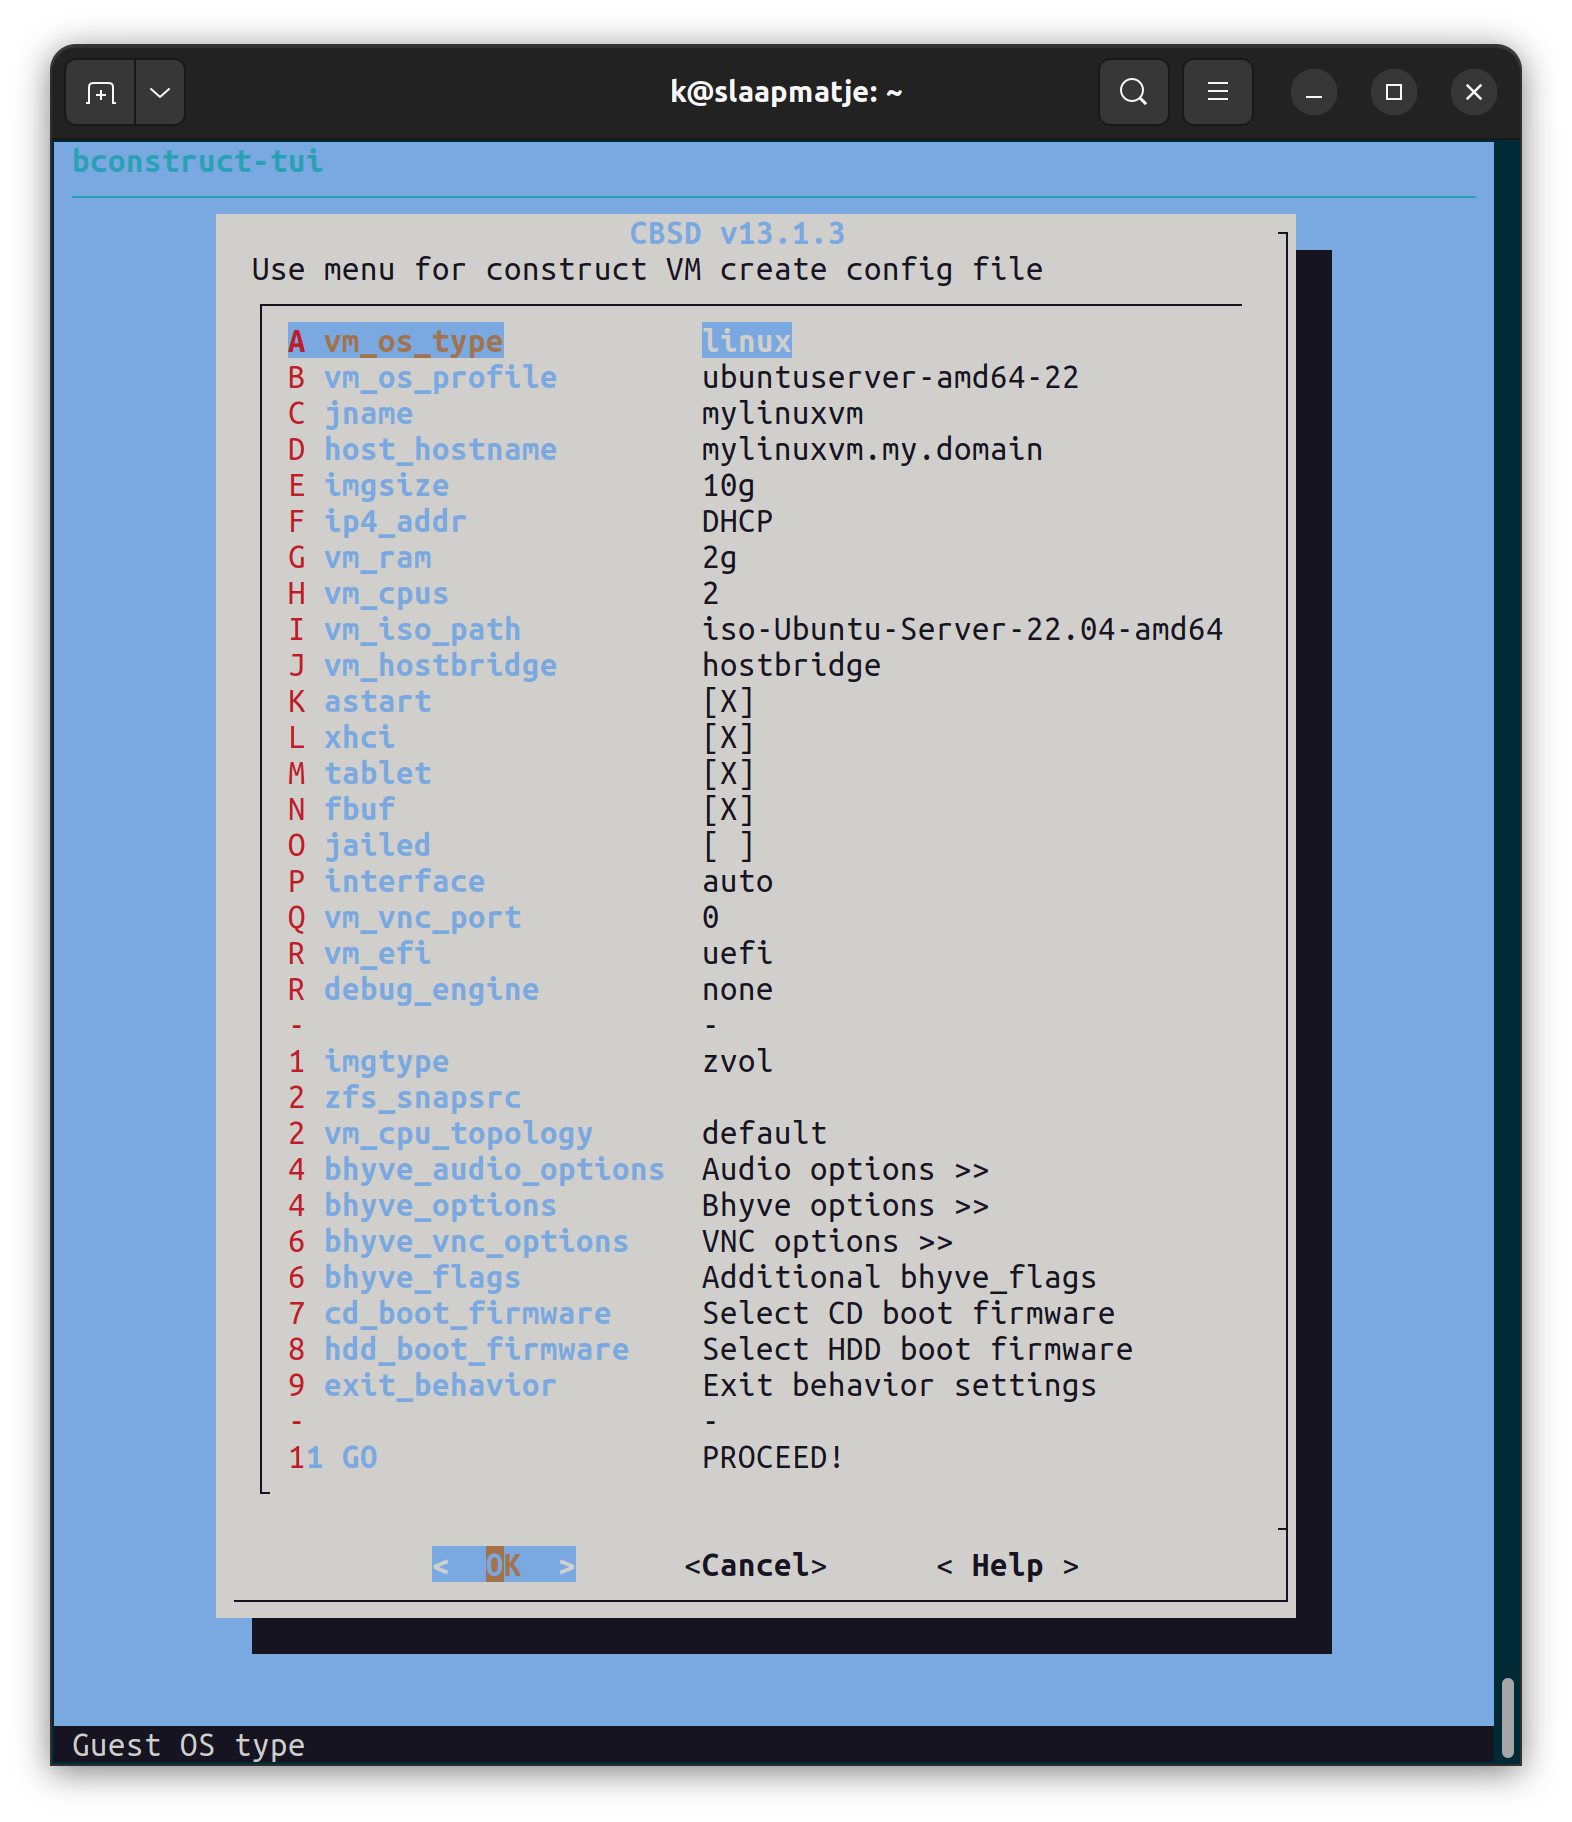
This menu shows my configuration. You may want to tweak `jname` (the VM's identifying name), `host_hostname`, or network options.
We also want to set up our VNC endpoint so we can connect to the VM after it boots.
Navigate to the bhyve_vnc_options option and
press enter to bring up the sub-menu.
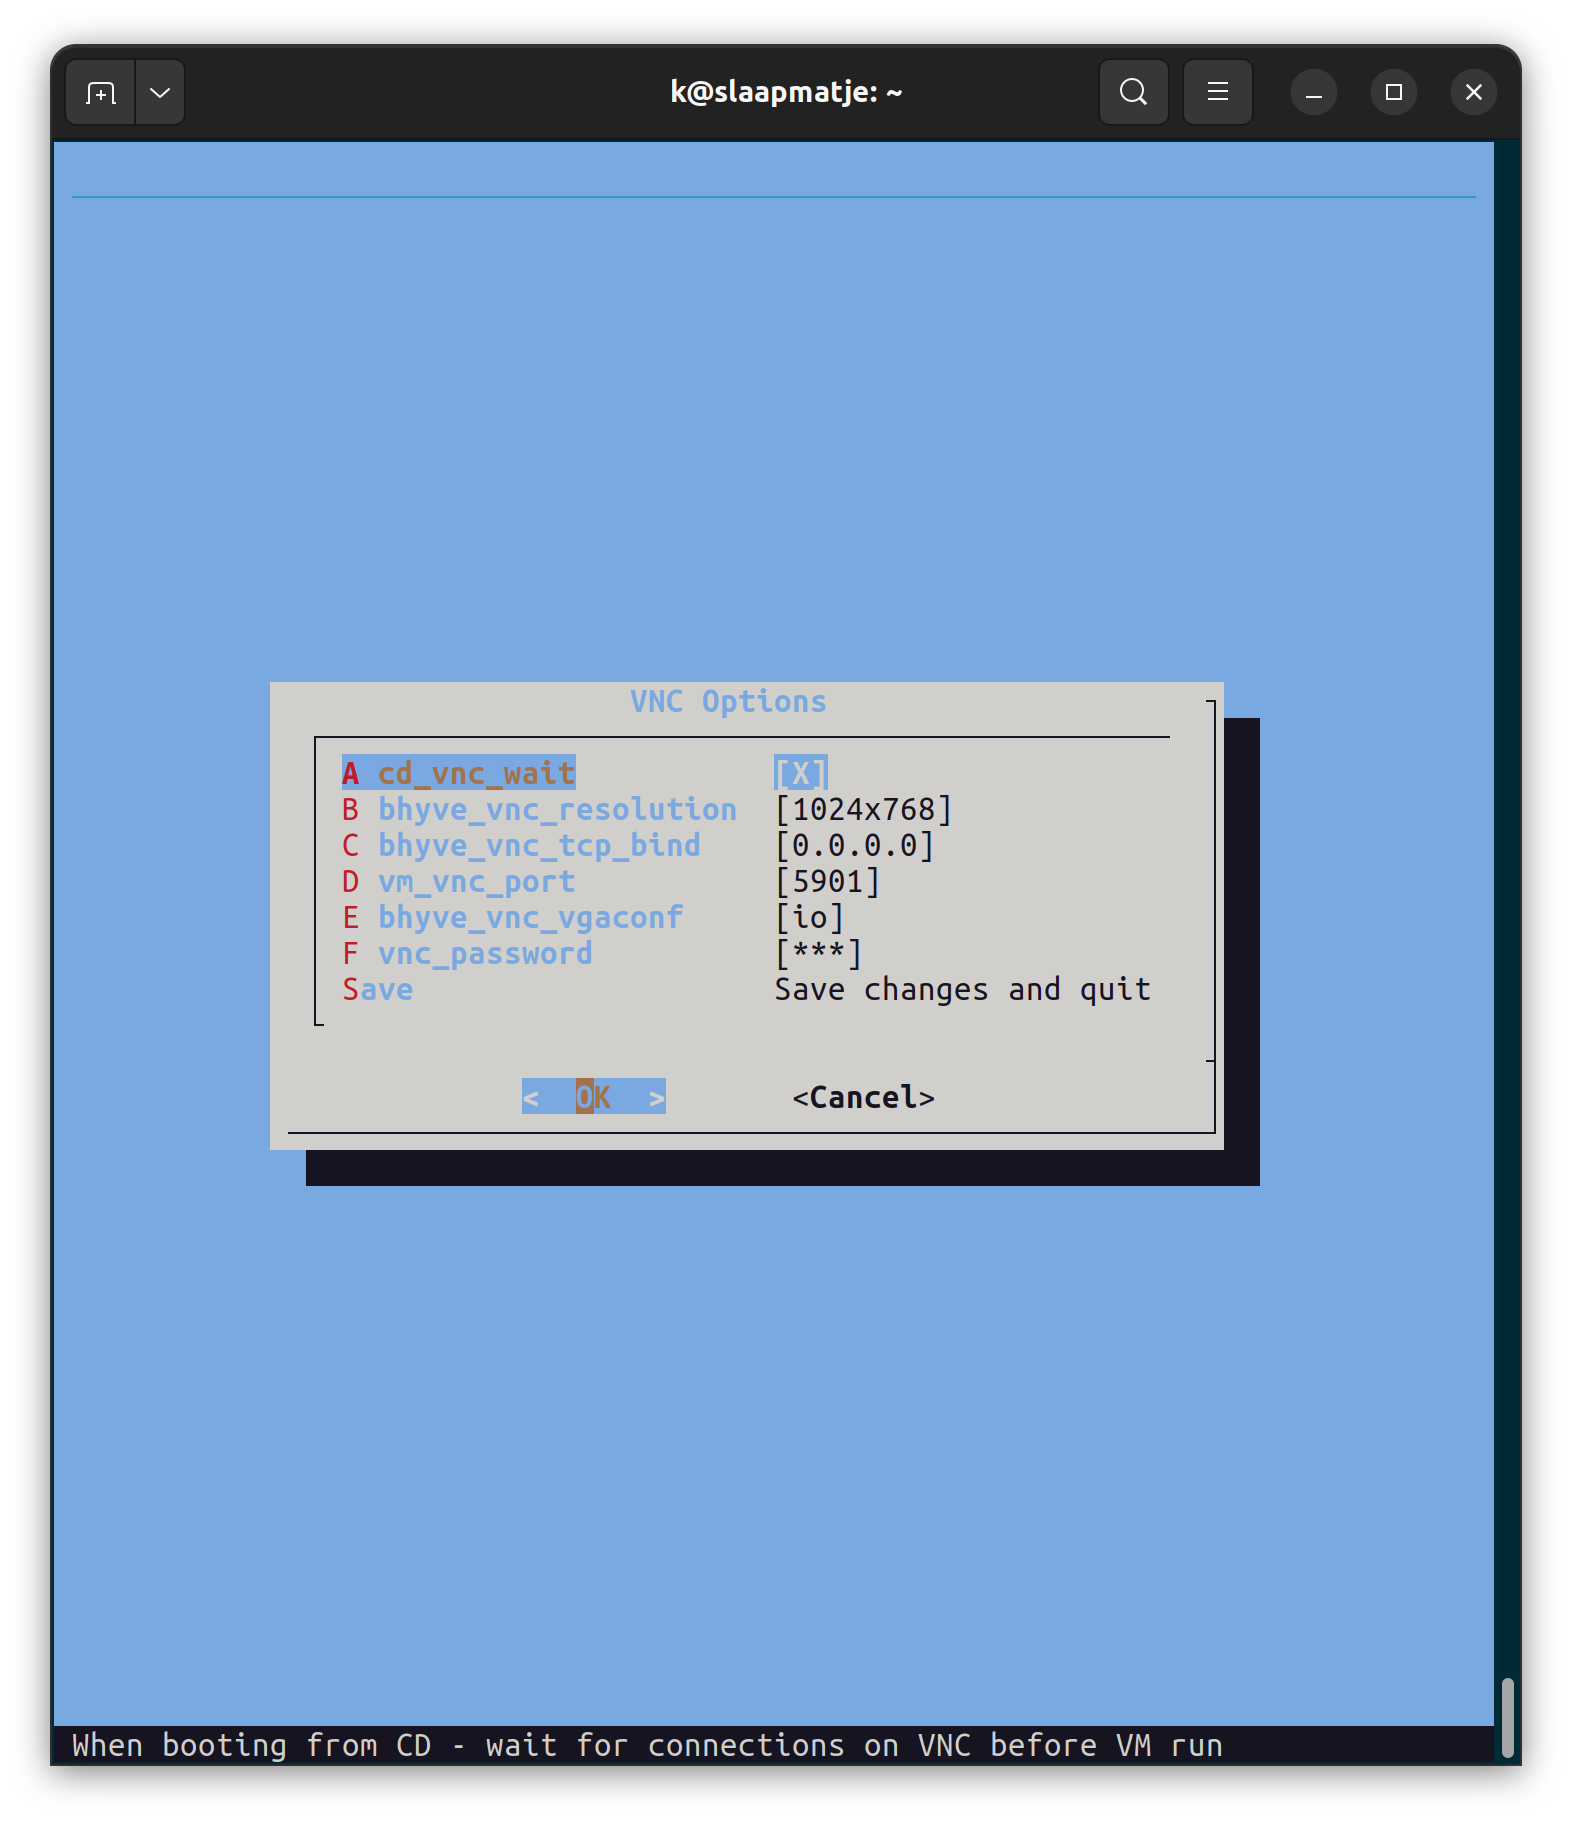
VNC configuration sub-menu
VNC options:
- If you connect to your hypervisor via SSH, you want to change the bind IP
(
bhyve_vnc_tcp_bind) to that host’s IP address. You can also set it to 0.0.0.0 to bind it to all the network interfaces on the host hypervisor. - If the
vm_vnc_portis set to 0, a random port number will be assigned. We’ll set it here to 5901. Be careful of port collisions if you have more than one VM on the host. They each need a unique VNC port. - Be sure to set the password!
- Select
Savewhen done to go back to the main menu.
Once you’ve finished the configuration, select Ok in the main menu.
You will then be asked if you want to create the vm immediately. We’ll select
yes here.
Start the VM
Our VM still hasn’t started running, but CBSD has created its configuration. We can start the VM by running one more command.
cbsd bstart mylinuxvm
The first time you start an image with a specific operating system, you will need to wait as the image is pulled from the internet, which can take take several minutes or more, depending on the speed of your internet connection. CBSD will try to find the fastest mirror for you. Once the image for a specific Linux version has been downloaded, though, you can re-use it for more VMs with the same version, which will speed up the process greatly.
[root@nucklehead ~]# cbsd bstart mylinuxvm
init_systap: waiting for link: em0
Looks like /usr/cbsd/vm/mylinuxvm/dsk1.vhd is empty.
May be you want to boot from CD?
[yes(1) or no(0)]
1
Temporary boot device: cd
vm_iso_path: iso-Ubuntu-Server-22.04-amd64
No such media: /usr/cbsd/src/iso/cbsd-iso-ubuntu-22.04-live-server-amd64.iso in /usr/cbsd/src/iso
Shall i download it from: http://mirror.truenetwork.ru/ubuntu-releases/22.04/ http://ubnt-releases.xfree.com.ar/ubuntu-releases/22.04/ http://mirror.pop-sc.rnp.br/mirror/ubuntu-releases/22.04/ http://mirror.easyspeedy.com/ubuntu-iso/22.04/ http://ubuntu.mirrors.ovh.net/ubuntu-releases/22.04/ http://ftp.halifax.rwth-aachen.de/ubuntu-releases/22.04/ http://ubuntu.connesi.it/22.04/ http://mirror.nl.leaseweb.net/ubuntu-releases/22.04/ http://releases.ubuntu.com/22.04/ http://mirror.waia.asn.au/ubuntu-releases/22.04/ ?
[yes(1) or no(0)]
1
Download to: /usr/cbsd/src/iso/cbsd-iso-ubuntu-22.04-live-server-amd64.iso
Scanning for fastest mirror...
             Mirror source:                       bytes/sec:
 * [ 1/17  ] http://electro.bsdstore.ru:          0
 * [ 2/17  ] http://ftp.halifax.rwth-aachen.de:   failed (http://ftp.halifax.rwth-aachen.de/ubuntu-releases/22.04/ubuntu-22.04-live-server-amd64.iso)
 * [ 3/17  ] http://mirror.easyspeedy.com:        failed (http://mirror.easyspeedy.com/ubuntu-iso/22.04/ubuntu-22.04-live-server-amd64.iso)
 * [ 4/17  ] http://mirror.nl.leaseweb.net:       failed (http://mirror.nl.leaseweb.net/ubuntu-releases/22.04/ubuntu-22.04-live-server-amd64.iso)
 * [ 5/17  ] http://mirror.pop-sc.rnp.br:         failed (http://mirror.pop-sc.rnp.br/mirror/ubuntu-releases/22.04/ubuntu-22.04-live-server-amd64.iso)
 * [ 6/17  ] http://mirror.truenetwork.ru:        failed (http://mirror.truenetwork.ru/ubuntu-releases/22.04/ubuntu-22.04-live-server-amd64.iso)
 * [ 7/17  ] http://mirror.waia.asn.au:           failed (http://mirror.waia.asn.au/ubuntu-releases/22.04/ubuntu-22.04-live-server-amd64.iso)
 * [ 8/17  ] http://releases.ubuntu.com:          failed (http://releases.ubuntu.com/22.04/ubuntu-22.04-live-server-amd64.iso)
 * [ 9/17  ] http://ubnt-releases.xfree.com.ar:   failed (http://ubnt-releases.xfree.com.ar/ubuntu-releases/22.04/ubuntu-22.04-live-server-amd64.iso)
 * [ 10/17 ] http://ubuntu.connesi.it:            failed (http://ubuntu.connesi.it/22.04/ubuntu-22.04-live-server-amd64.iso)
 * [ 11/17 ] http://ubuntu.mirrors.ovh.net:       failed (http://ubuntu.mirrors.ovh.net/ubuntu-releases/22.04/ubuntu-22.04-live-server-amd64.iso)
 * [ 12/17 ] https://clonos.ca.ircdriven.net:     593920
 * [ 13/17 ] https://clonos.us.ircdriven.net:     643072
 * [ 14/17 ] https://electrode.bsdstore.ru:       0
 * [ 15/17 ] https://mirror.bsdstore.ru:          0
 * [ 16/17 ] https://mirror2.bsdstore.ru:         0
 * [ 17/17 ] https://plug-mirror.rcac.purdue.edu: 8125098
 Winner: https://plug-mirror.rcac.purdue.edu/cbsd/iso/
Processing: https://plug-mirror.rcac.purdue.edu/cbsd/iso/ubuntu-22.04-live-server-amd64.iso
retrieve ubuntu-22.04-live-server-amd64.iso from plug-mirror.rcac.purdue.edu, size: 1g
/usr/cbsd/src/iso/cbsd-iso-ubuntu-22.04-live-s        1398 MB   10 MBps 02m08s
Checking CRC sum: 84aeaf7823c8c61baa0ae862d0a06b03409394800000b3235854a6b38eb4856f...Passed
Automatically register iso as: cbsd-iso-ubuntu-22.04-live-server-amd64.iso
Path already exist for: iso-Ubuntu-Server-22.04-amd64
VRDP is enabled. VNC bind/port: 192.168.1.76:5901
For attach VM console, use: vncviewer 192.168.1.76:5901
Resolution: 1024x768.
VNC pass: vncpass

Warning!!! You are running a system with open VNC port to the world wich is not secure
Please use IP filter or balancer with password to restrict VNC port access
Or change vnc_bind params to 127.0.0.1 and reboot VM after maintenance work

bhyve renice: 1
Waiting for PID.
PID: 75699
bstart done in 4 minutes and 16 seconds
[root@nucklehead ~]#
We can check the status of our vm:
cbsd bls mylinuxvm
[root@nucklehead ~]# cbsd bls mylinuxvm
JNAME      JID    VM_RAM  VM_CURMEM  VM_CPUS  PCPU  VM_OS_TYPE  IP4_ADDR  STATUS  VNC
mylinuxvm  75699  2048    0          2        0     linux       DHCP      On      0.0.0.0:5901
Once it starts, we can open our VNC client. For the VNC server, you need to
enter the IP address of your FreeBSD host and the port that you assigned
during configuration, e.g. 192.168.1.76:5901
Install Ubuntu
A window should open showing the the Linux boot. Depending on how long it
takes you to connect, you may see the grub boot menu or the Ubuntu installer
may have already started. Go through the installation process.
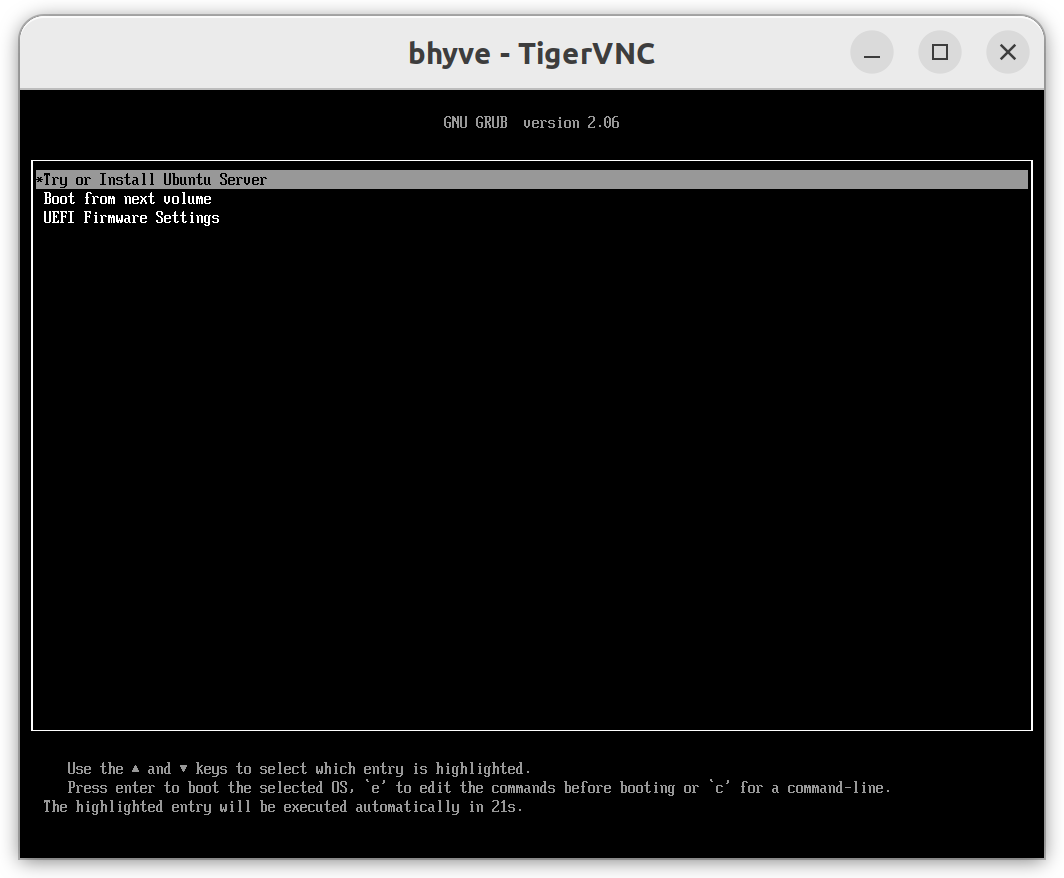
Success! We're booting!
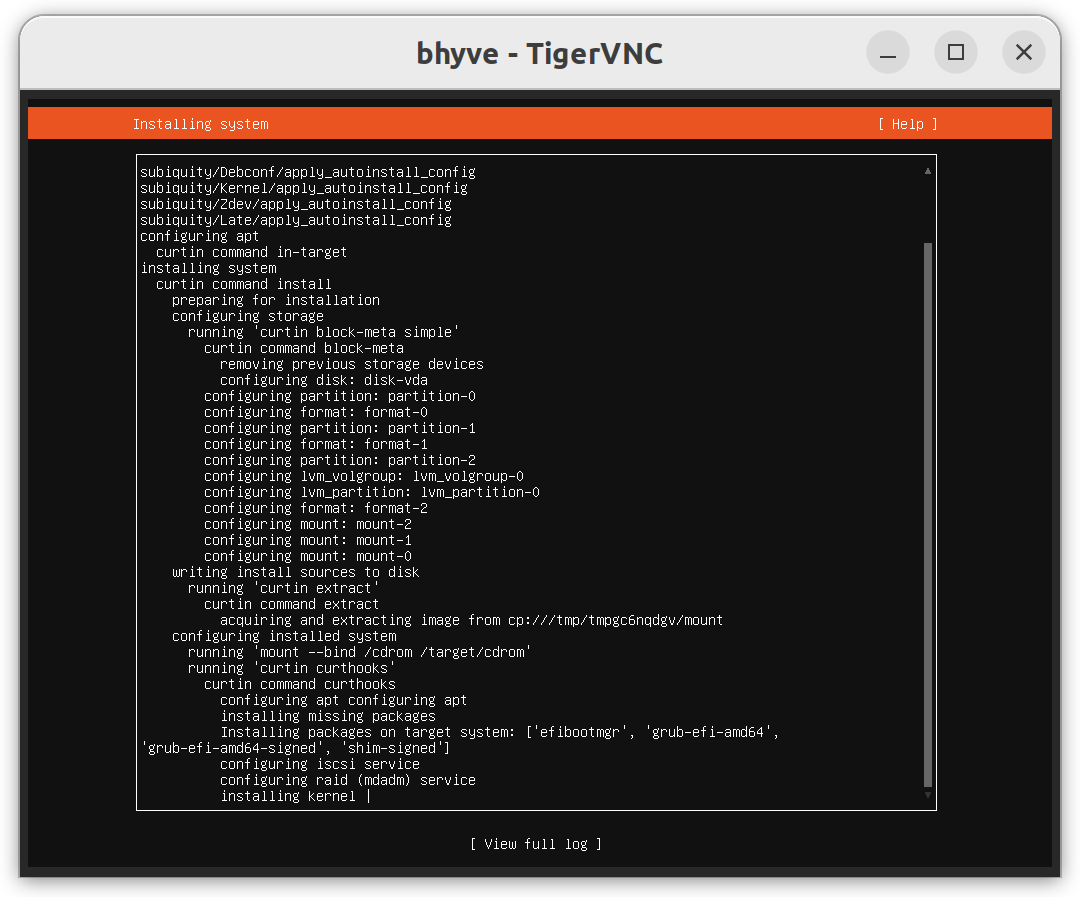
And installing!
Rebooting will usually close the VNC client, forcing reconnection. The host should boot to console, allowing you to log in with the username and password you chose during installation.
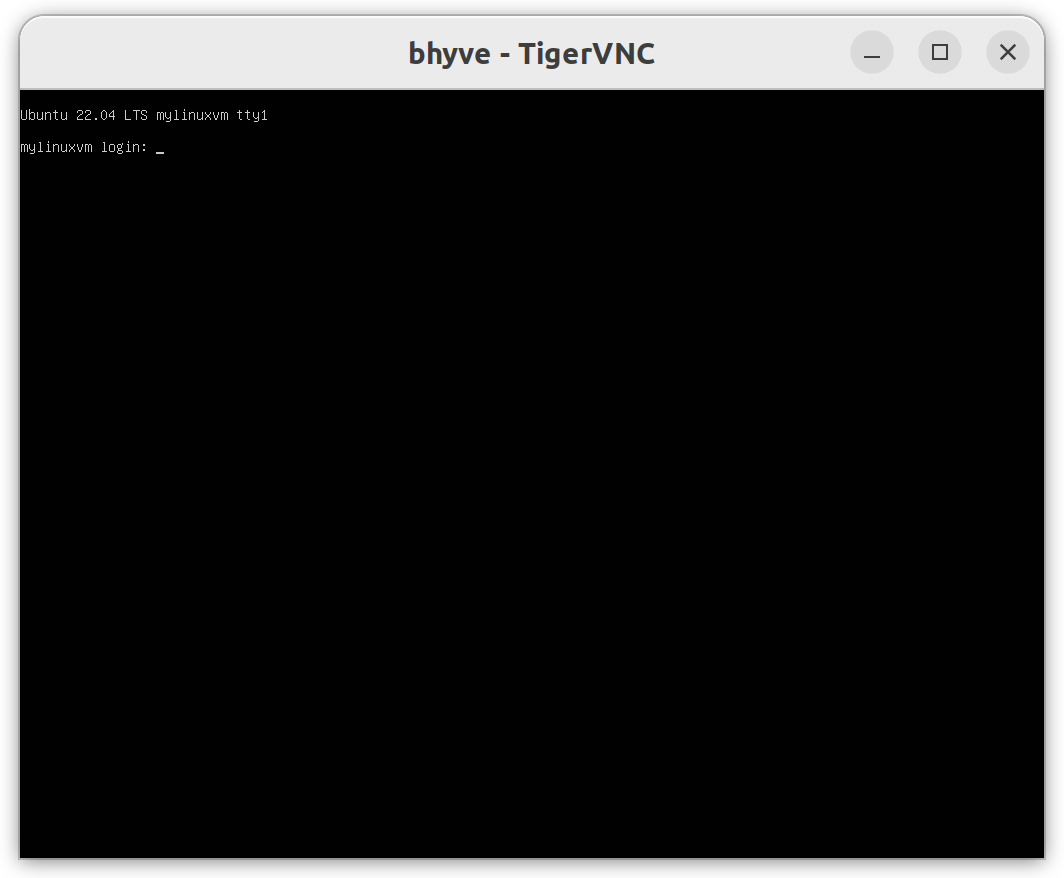
Voila!
Clean up
Once you’re done with the VM, you can run the following to stop and free the resources.
# Stop the VM
cbsd bstop jname=mylinuxvm
# Delete the VM configuration and ZFS volume
cbsd bdestroy jname=mylinuxvm
- CBSD added some configuration options to the files to
/etc/rc.confand/boot/loader.confthat you will want to remove.
You can reboot your system to clear the following two changes, or manually revert them. Leaving them in place until the next reboot is probably harmless, though.
- Unload the kernel modules you added via
kldloadabove - Remove the VM’s network interfaces, probably named
bridge1andtap1, depending how many VMs you created. You can remove these with the command for each interface. (DO NOT try to destroy any other interfaces! Leavelo0andem0alone!)ifconfig tap1 down ifconfig tap1 destroy
And that’s it! Now you know how to create a basic Linux VM on FreeBSD bhyve!
If you have questions or comments, you can @ me on Twitter.
References
- https://cbsd.io/
- https://docs.freebsd.org/en/books/handbook/bsdinstall/
- https://docs.freebsd.org/en/books/handbook/firewalls/#firewalls-pf
- https://docs.freebsd.org/en/books/handbook/ports/#pkgng-intro
- https://docs.freebsd.org/en/books/handbook/ports/#ports-using
- https://docs.freebsd.org/en/books/handbook/security/#security-sudo
- https://docs.freebsd.org/en/books/handbook/zfs/
- https://tigervnc.org/
- https://www.freebsd.org/
- https://www.freebsd.org/doc/handbook/virtualization-host-bhyve.html
